
Videos and tutorials / Connect Mobile
Connect Mobile user guide: mobile app
Everything you need to use Connect Mobile on your Android or iOS phone: logging in, calls, transfers, contacts, texting, chat, voicemail, fax and your account settings.
Initial startup & logging in
Upon initial startup, the app will request device permissions necessary for full app functionality. It is recommended that the user grant all requested permissions for the best user experience.
Username & password
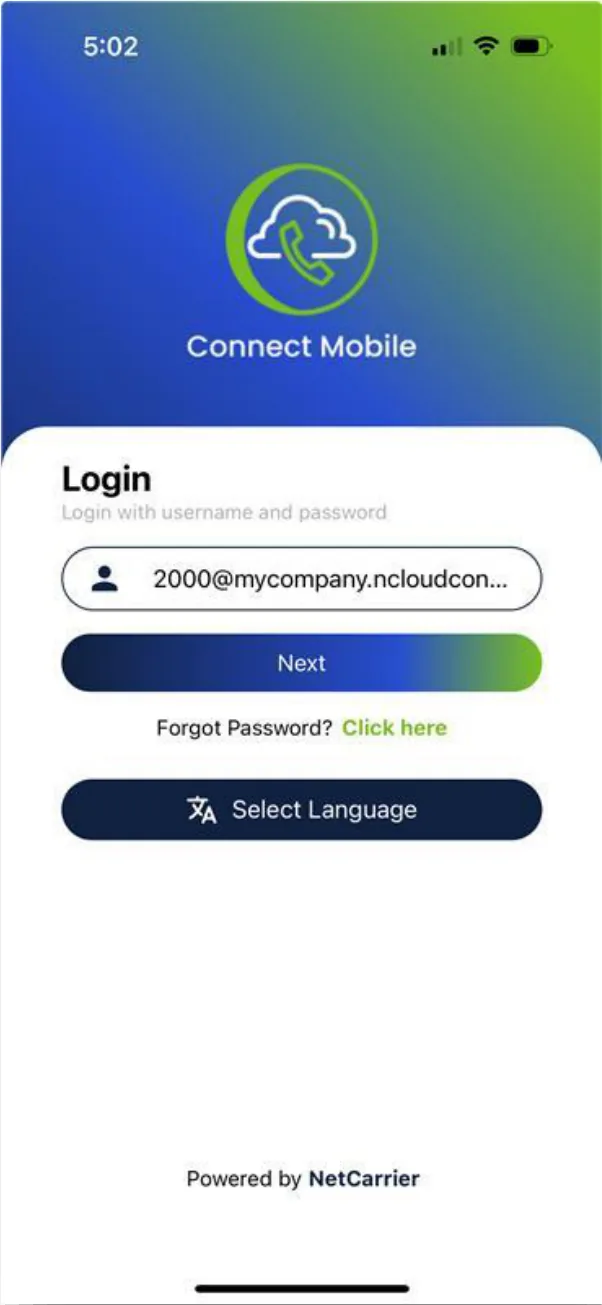
- Enter the extension username in the provided field and tap ‘Next’.
- Usernames will always follow the standard format of [extension]@[server name].ncloudconnect.com, for example,
2000@mycompany.ncloudconnect.com
- Enter the password associated with the extension in the pop-up window and tap ‘Login’.
Forgotten password
- Tap the ‘Click Here’ link located under the ‘Next’ button of the login page to reset a forgotten password.
- Enter the extension username in the provided field and tap ‘Send OTP’.
A confirmation code is emailed to the address associated with the extension username. Upon entering the 6-digit code in the provided field, the user will be prompted to enter a new password.
- These codes expire in 5 minutes. Use the ‘Resend code’ link to resend a new code if necessary.
The user password for Connect Mobile is synced with their extension password for the nCloud User Portal. This means that if the password is updated through the app, the portal password will update as well, and vice versa.
Overview
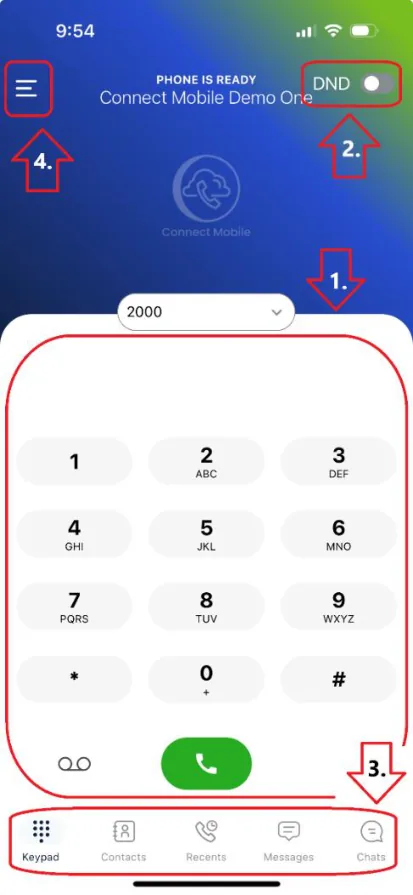
Upon successful login the app displays the keypad. At the top of the screen above the name of the extension the app will display an ‘Account Registering’ message while the app connects to the hosted server. It will then display ‘Phone is Ready’ once the connection is established and the softphone is ready for use.
1. dialer – primary calling controls, includes a VM button for
accessing Voicemail via IVR that will show the number of unheard messages (if any) in red.
2. do not disturb (DND) – enables/disables DND, which
prevents inbound calls from ringing this device while active.
3. bottom menu – allows navigation between the different
pages of the app:
- Keypad Contains dialer and call controls
- Contacts Lists contacts of different types
- Recents Displays call history
- Messages Contains text/SMS conversations with external numbers
- Chats Contains internal chat conversations with other users
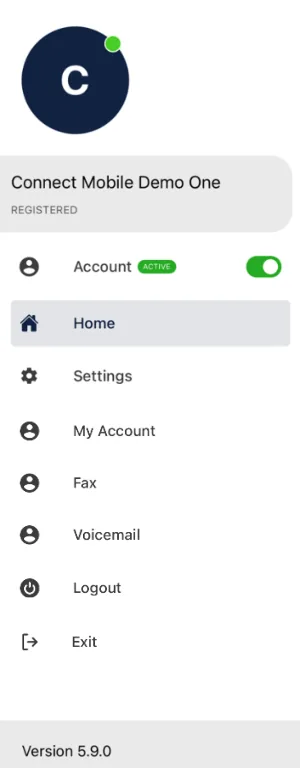
4. side menu – provides access to
various additional settings and features:
- Account toggle Can be used to deactivate connection with hosted server, app is rendered inert when disabled.
- Home Closes side menu. Tapping anywhere on the right side of the screen (off-menu) will also close menu.
- Chat Presence Menu Tapping the icon above the user name at the top of the side menu allows the user to set their chat presence
- Settings Contains app preferences and troubleshooting tools.
- My Account Contains additional user extension features such as number screening and call forwarding.
- Fax Provides interface for sending, viewing, and managing faxes on desktop faxing lines associated with the user extension.
- Voicemail Provides a graphical interface for listening to and managing VM.
- Logout Logs the user out, returning them to the login page and deactivating app until credentials are successfully entered again.
- Exit Minimizes app to run in the background, does not log out or deactivate the app and calls are still able to be received.
Call handling
Receiving a call
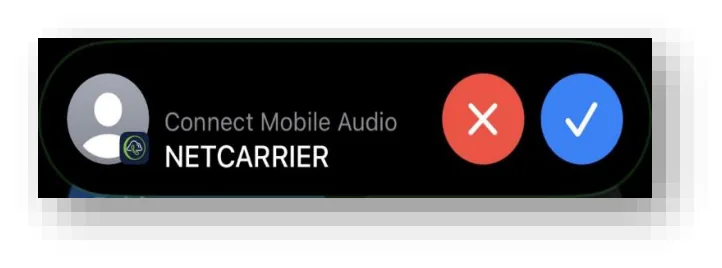
Inbound calls to the user extension utilize the native ringer and alert settings of the mobile device, meaning that they will ring at the same volume and can be answered via the same procedure as a normal call to the cell number of the mobile device. Calls ringing through the app display a ‘Connect Mobile Audio’ label and icon so they can be easily distinguished from a regular cell call.
- Notifications must be enabled in the mobile device settings to allow calls to alert properly. This permission is one of those requested upon initial startup.
Making a call
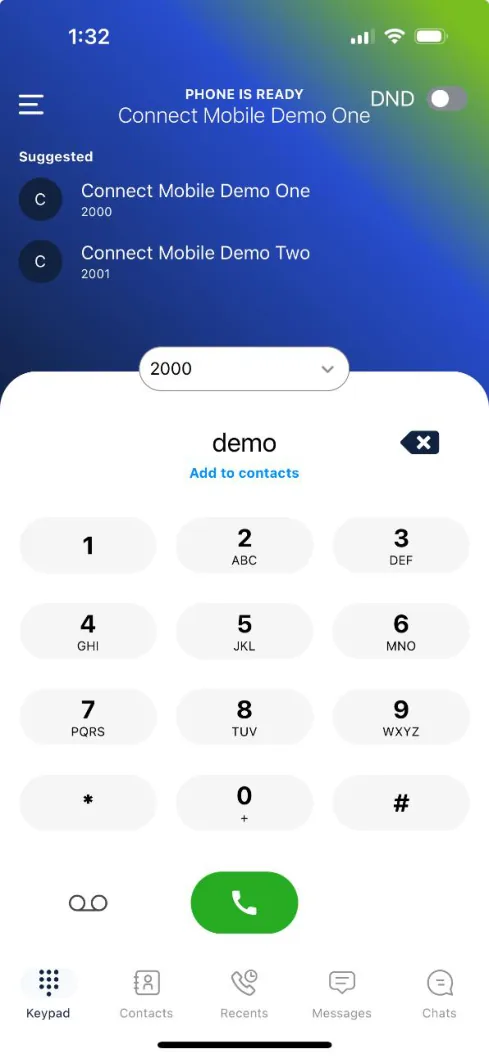
To make a call, use the dialer on the Keypad to enter the number or extension you wish to call and press the green ‘Call’ button. Users can also tap the field above the dialer to enter the name of a contact using the touchscreen keyboard
- If the destination is a listed contact, the user can enter just part of the number or name of the contact and tap the desired recipient in the suggested contacts to auto-complete the number
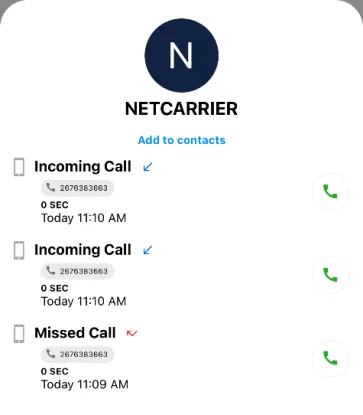
Calls can also be initiated directly from the Contacts page and the Recents page by tapping on the desired entry, then tapping the green ‘Call’ button that appears on the detail pop-up:
Active call controls
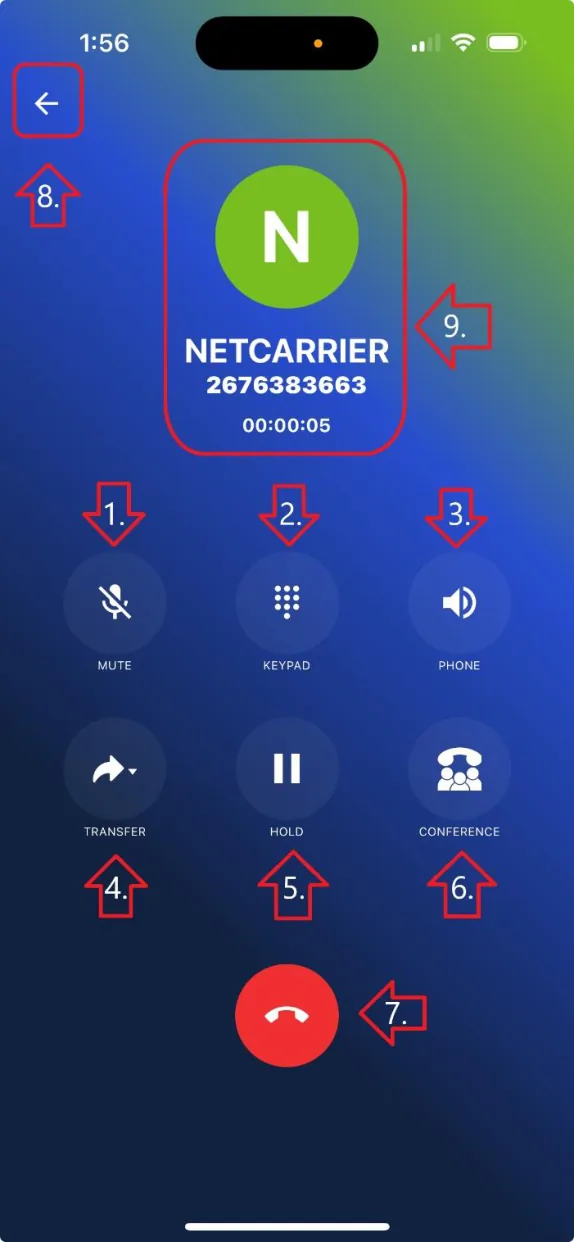
1. mute – tap to mute device microphone, tap
again to unmute.
2. DTMF dialer – tap to bring up the touch
tone keypad, used for selecting options on AAs or entering PINs into a Voicemail IVR, etc.
3. speakerphone – tap to send call audio to
device speakerphone, tap again to disable.
4. transfer – tap to select transfer type from
the dropdown menu. Upon selecting transfer type, the call is automatically placed on hold and the app displays the keypad.
- Blind Transfer Dial the number or extension of the transfer recipient and press the green transfer button. Call will immediately leave the user extension and begin ringing the transfer recipient.
- Consultative Transfer Dial the number or extension of the transfer recipient and press the green transfer button. Caller will remain on hold while the app connects the user on a call with the transfer recipient. Transfer can then be completed by tapping the ‘Transfer’ button. Transfers can be cancelled by tapping on the active call listing on the Keypad page, returning the user to the active call controls.
5. hold – tap to place the call on hold. tap again to resume the call
- Conference – Tap to initiate a conference call, automatically placing the active call on hold and returning the user to the Keypad. Dial the desired participant and tap the green button. Once the call is answered, the ‘Merge’ button can be used to join the calls.
7. disconnect – tap to terminate the active call
- Return – Tap to return to the dialer to place a second call or to interact with other pages of the app while still on the active call.
- Call info – Displays caller name (if any) and number along with duration of call.
Multi-call handling
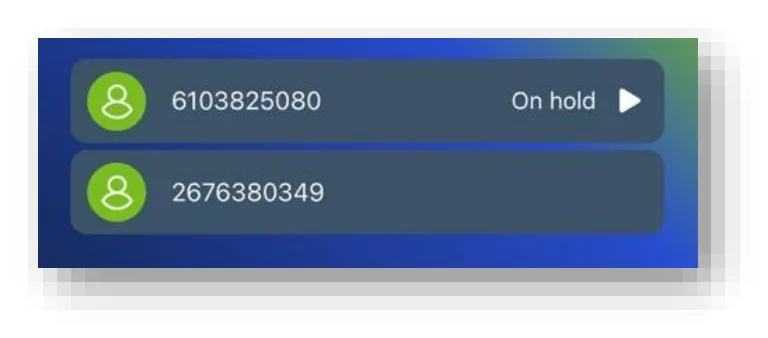
Connect Mobile can support simultaneous calls with up to 2 other parties. When there are multiple calls active on the app, the Keypad (accessible by tapping the ‘Return’ arrow in the top left corner of the active call controls) will list all calls at the top of the screen:
- Tapping on the ‘Play’ icon on the listing of the call on hold will swap the calls, placing the currently active call on hold and resuming the initial call.
- Tapping anywhere else on the active call listing will bring up the active call controls for that call.
The active call controls offer additional controls for multi-call handling while multiple calls are active:
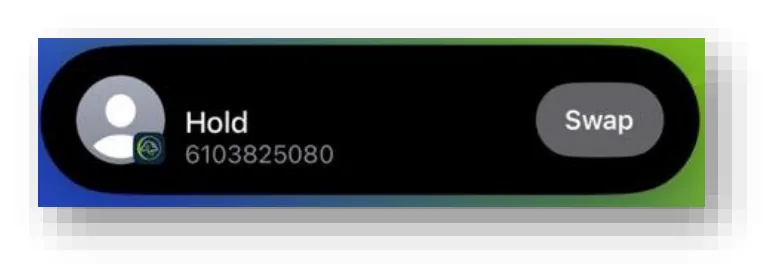
- There is a banner showing the status and number of the other call along with a button to swap the active call. This banner can be minimized by tapping anywhere on the banner other than the swap button.
- Conference calls and consultative
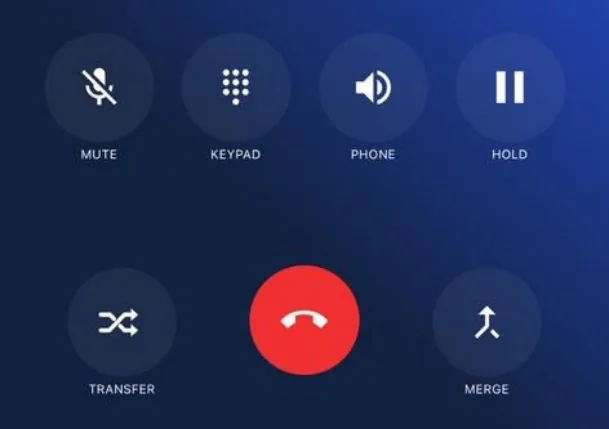
transfers can be completed directly from the active call controls while there are multiple active calls:
- The ‘Transfer’ button will join both active calls but disconnect the user, completing a consultative transfer.
- The ‘Merge’ button will join the user and both active calls together in a conference call.
Contacts
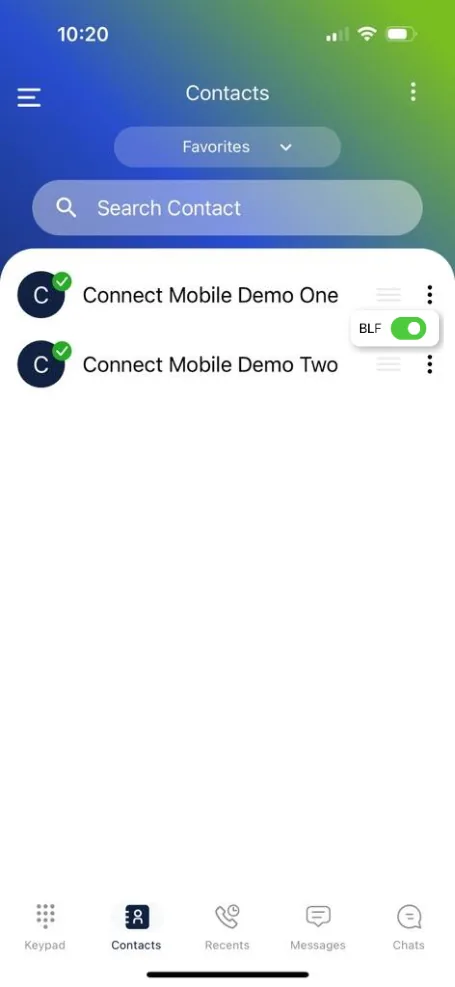
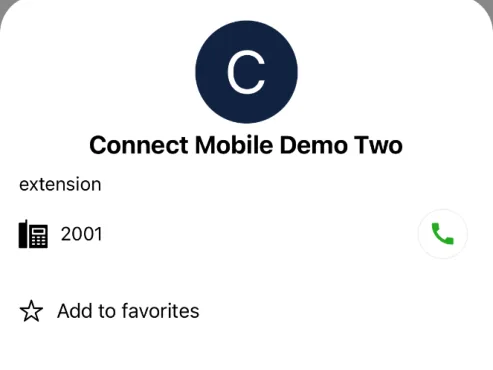
Tapping on an entry in the Contacts list will bring up a pop-up window that displays contact information, along with controls to call the contact or to select it as a Favorite. Contacts are automatically grouped into four pages: Enterprise contacts, Phone contacts, Favorites, and All contacts. Users can select which category to view using the dropdown menu at the top of the page above the search bar.
Enterprise contacts
This section contains all the contacts in the phone system’s Global Address Book, which is common to all extensions on the system. Entries in this list can be added or edited in the nCloud admin portal.
Phone contacts
If the user granted permission for the app to access local device contacts, they will be listed in this section. Permission is requested upon initial start-up and the first time the Contacts page is accessed. If permission was not granted, a button to request access is displayed in place of the listing.
Favorites
Contacts of any type can be designated as a Favorite, which allows them to then be displayed in the Favorites list for quick access. To add a contact to the Favorites list, tap on the entry to bring up the contact details and tap on the ‘add to Favorites’ option. Contacts can be removed from the Favorites list in the same manner.
- If the contact is another user on the nCloud system, then the user can enable BLF (Busy Lamp Field) monitoring of their extension by tapping on the triple dots to the right of the listing and enabling the BLF switch.
- With BLF enabled, the contact will display a grey dot if the user is offline, a solid green dot if they are online and available, a flashing green dot if a call is ringing their extension, or a red dot if they are currently on a call.
Recents
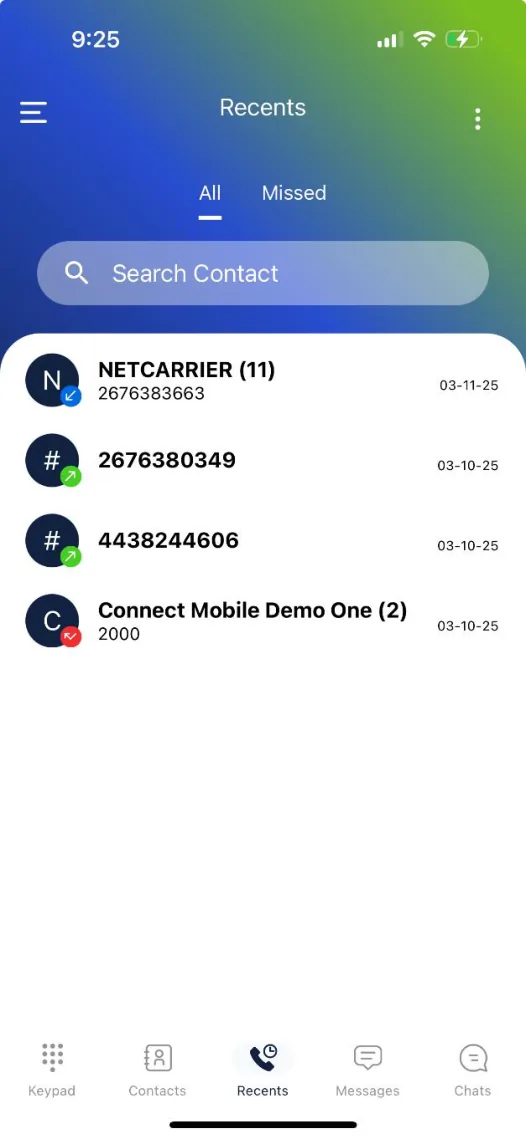
App call history can be accessed from the ‘Recents’ page, which can be set to display all calls or just missed inbound calls using the tabs immediately above the search bar.
Entries within this list will show the number, calling name (if any), and the date of the last call to that number. If there are multiple calls to the same number, the entry will display the number of calls in parentheses at the end of the listing.
Each entry can be expanded to show the call type, exact time and date, and duration of each call to that number along with a ‘Call’ button for redialing:
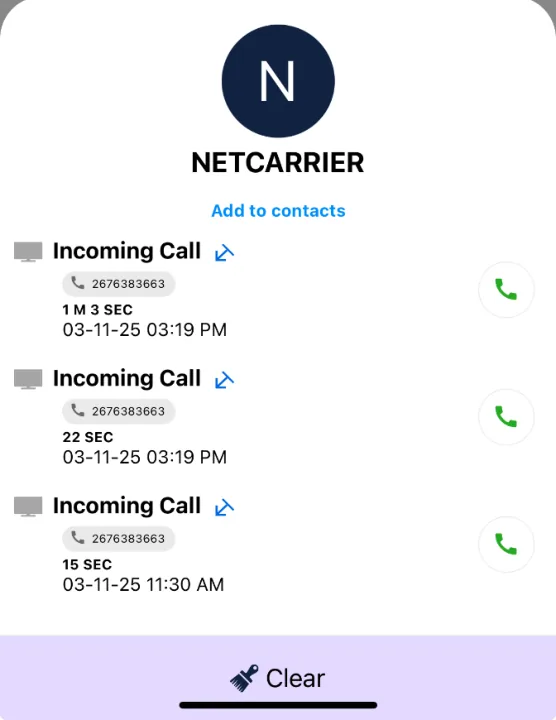
- Tapping the ‘Add to contacts’ button will create a new device contact for that number. This feature is only available if the user has granted permission to the app to access device contacts.
- Tapping the ‘Clear’ button will clear the entry only from the app history, all call records for the user extension are preserved and accessible from within the nCloud admin portal for up to 90 days.
Messages
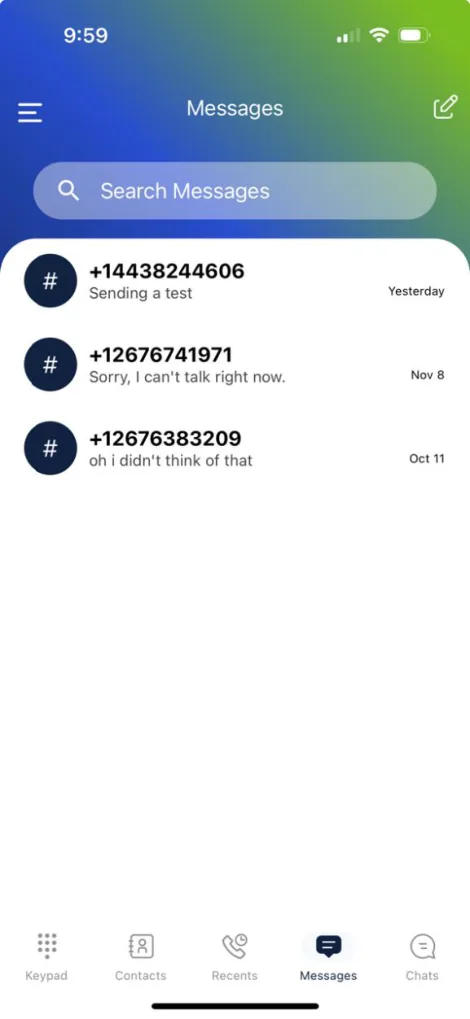
If the user has an SMS-enabled DID assigned in the nCloud admin portal, they can send and receive text messages from this number on the ‘Messages’ page. Please note NetCarrier’s SMS service does not support group texting, conversations are 1:1 only. To start a new conversation, tap the pen & paper icon in the top right corner of the page. The user can enter the desired number they wish to text in the provided field or tap the address book icon to the right of the field to select a contact. Once the number is entered, tap the ‘Send SMS’ icon that appears under the field. Multiple individual conversations can be started at once by entering multiple recipients.
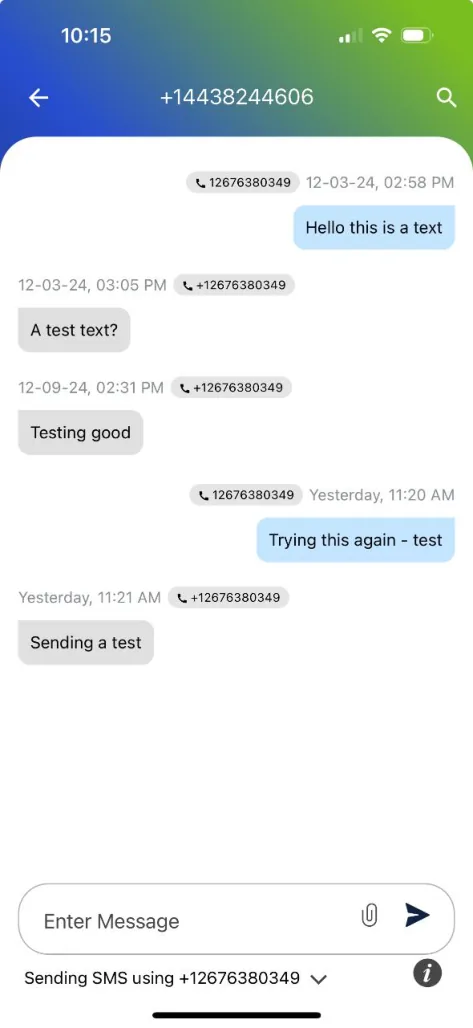
Once a new conversation has been started, tapping the ‘Enter Message’ field at the bottom of the page will bring up the keyboard. Tapping the arrow icon at the right side of the field will send any entered messages. If the user wishes to send a file or image, tapping the paperclip icon will allow them to pick a source:
- Camera to take a photo using the device camera
- Documents to pick an existing file
- Gallery to send an existing photo
- Audio to pick an existing audio file Once a file is selected, it can be sent using the arrow icon.
Chats
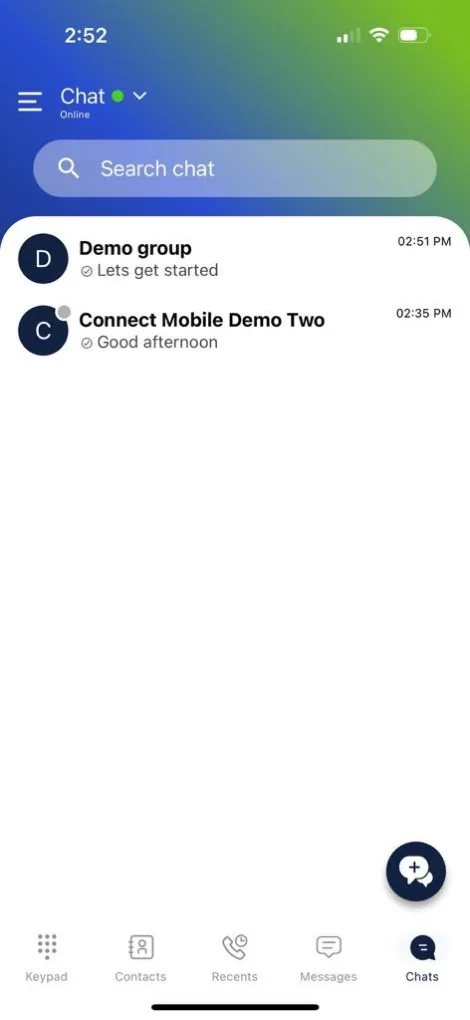
The ‘Chats’ page hosts internal conversations with other Connect Mobile users on the system. Existing conversations are displayed upon initially opening the page. To begin a new conversation, tap the speech bubble icon in the bottom right corner.
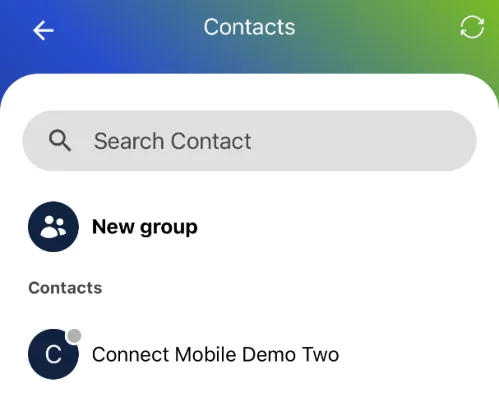
- To begin a conversation with a single user, tap on their entry in the contacts list.
- To begin a new group conversation, tap on the ‘New Group’ entry above the contact list. The user can then select users they’d like to add to the group by tapping their entries in the list. Once all desired users have been selected, tap the large ‘Add’ button on the bottom of the screen.
Once a new conversation has been started, tapping the ‘Enter Message’ field at the bottom of the page will bring up the keyboard. Tapping the arrow icon at the right side of the field will send any entered messages. If the user wishes to send a file or image, tapping
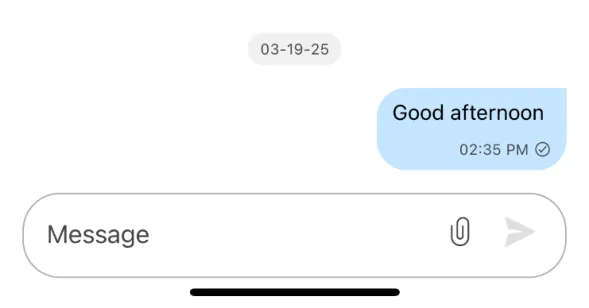
the paperclip icon will allow them to pick a source:
- Camera to take a photo using the device camera
- Documents to pick an existing file
- Gallery to send an existing photo
- Audio to pick an existing audio file Once a file is selected, it can be sent using the arrow icon.
Voicemail
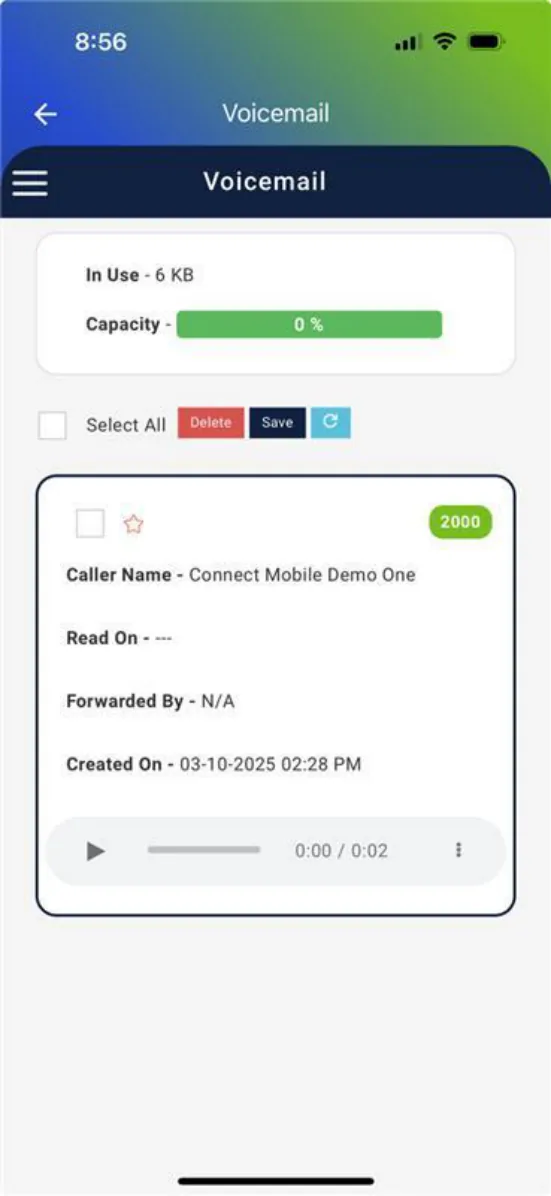
Voicemail in the user’s mailbox can be listened to and managed from the Voicemail page, accessible via the Side Menu.
- Mailboxes have three folders, Inbox, Saved, and Trash. The user can navigate between these folders using the triple bar icon near the top left corner.
- To listen to a voicemail, press the ‘Play’ button in the gray bar at the bottom of the voicemail entry.
- To save a voicemail, tap the star icon in the top left corner of the voicemail entry. Multiple voicemails can be saved at once by checking the box in the top left corner of the entries and pressing the ‘Save’ button at the top. Saved voicemails can be viewed in the Saved folder.
- To delete a voicemail, check the box in the top left corner of the entry and press the ‘Delete’ button at the top. Multiple voicemails can be deleted at once in the same manner. Deleted voicemails can be viewed in the Trash folder. Voicemails in the Trash folder are permanently deleted after a set expiration time (default: 30 days). This expiration limit can be changed in the Voicemail settings section of the ‘My Account’ page or the nCloud user portal.
- The ‘Select All’ checkbox will check all voicemails in the currently displayed folder when tapped.
- The ‘Refresh’ button to the right of the save and delete buttons can be used to reload the mailbox. To exit the mailbox, tap the arrow icon in the top left corner of the app.
Note: If the user has the ‘email and delete’ feature enabled for their mailbox, voicemails will not show in Connect Mobile.
Fax
A user can access either their personal fax or any business desktop fax accounts associated with their extension from the ‘Fax’ page, which is accessible from the Side Menu. If there are multiple fax accounts then the user will be prompted to select a default account upon initially accessing the page. Users can always select which fax account is displayed using the ‘Select Fax Account’ dropdown menu at the top of the page. There are three pages within the ‘Fax’ section of the app: Send Fax, Fax Address Book, and Faxes. Users can navigate between these pages using the triple bar icon near the top left corner. To exit the ‘Fax’ page, tap on the arrow icon in the top left corner of the app.
Send fax
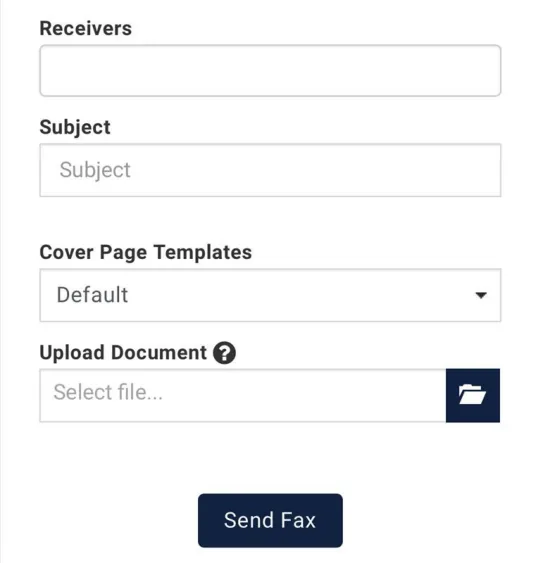
Users can send a fax by filling out the provided fields:
Receiver Enter the recipient fax number, then tap the entry in the dropdown that appears. This dropdown menu will also include any entries in the Fax Address Book. Multiple numbers can be added in this way to send a fax to multiple recipients at once.
Subject Enter a subject for the fax Cover Page Template – Select a cover page for the fax. Cover pages can be viewed, added, and edited in the nCloud Admin Portal.
Upload document Tapping on the folder icon allows the user to select the file on their device that they want to send as a fax. (file type must be .pdf or .tiff)
Fax address book
This page contains the address book for the fax account. Entries in this list will be displayed in the dropdown menu on the Send Fax page for quick selection. To add an entry to the address book, tap on the ‘Add New’ button to the right of the search bar, then add a first name, last name, and number in the provided fields before tapping the ‘Save’ button.
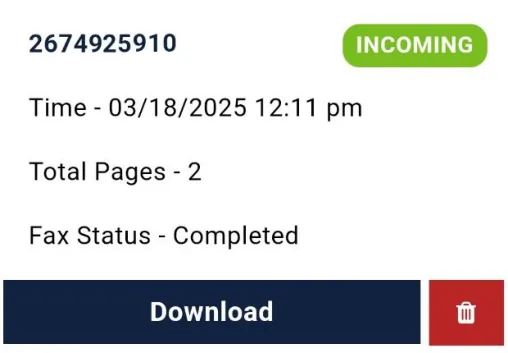
Faxes
This page contains a log of all faxes sent or received by the displayed account going back 30 days. Each entry can be downloaded or deleted using the provided buttons at the bottom, and displays number, direction, date/time, page count, and status of the fax.
My account
The ‘My Account’ page, accessible via the Side Menu, contains several pages of user configuration settings that control how the user’s extension handles calls, voicemails, and other available features. The page is split into several sections which can be navigated using the triple bar icon near the top left corner. To apply any changes made on any of these pages, tap the ‘Save’ button at the bottom of the page. To exit the ‘My Account’ page, tap the arrow icon in the top left corner of the app.
Calling configuration
Anonymous Call Reject When checked, user extension will automatically decline calls from anonymous numbers (hidden CallerID number). Ring Timer – This determines the number of seconds the user extension will ring on a normal inbound call before going to voicemail. When a forward is active, this setting is overridden by the forwarding settings.
Fax configuration
Email Addresses for Inbound Faxes If the user has a personal fax, this determines the email(s) to which inbound fax notifications are sent to. Does not apply to business desktop faxes. Enable email notification for failed/successful faxes – When checked, user will receive a email notification for failed and/or successful outbound faxes once the transmission is complete.
Ring group forwarding
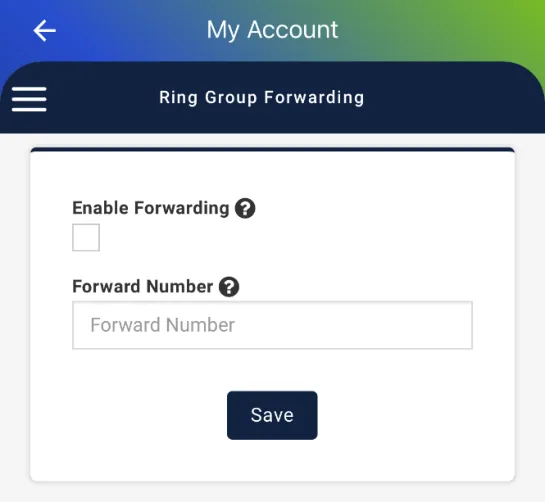
This setting allows the user to forward calls that are delivered to their extension specifically by a Ring Group. To enable, check the ‘Enable Forwarding’ box and enter the forwarding destination in the ‘Forward Number’ field, then hit the ‘Save’ button.
Note: This setting will only forward calls that are offered to the user extension from a Ring Group. To forward calls that ring or are transferred to the extension directly or via user DID, see the ‘Call Forwarding’ section below.
Call forwarding
This setting allows the user to forward calls that reach their extension directly, by call or transfer to their individual extension or DID. Users can choose between two types of forward, Individual or Find Me Follow Me (explained below). To select and enable forwarding, select the desired type of forward from the ‘Forward Service’ dropdown menu and tap ‘Save’. Once a forward service is selected, a new tab with the name of that forward type will appear in the triple-bar menu. Tap on the new tab to view or edit forwarding details. To disable call forwarding, set forward service to ‘None’. Forwarding details for each type of forward are saved and do not need to be re-entered if that forwarding type is activated again.
Note: This setting will only forward calls that are offered directly to the user extension or DID and will not affect calls that are offered as part of a Ring Group. To forward calls from a Ring Group, see the ‘Ring Group Forwarding’ section above.
Individual forwarding
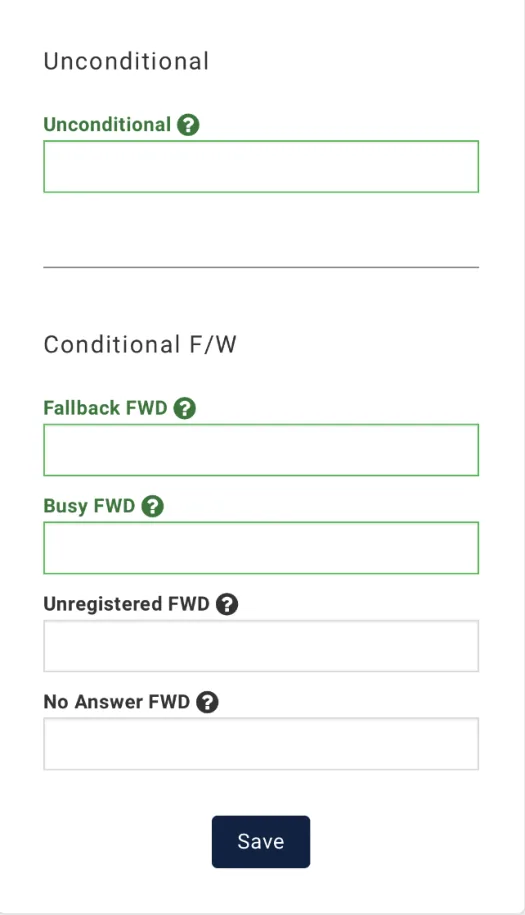
Individual forwards occur for all calls or calls that meet certain conditions. To set an Individual forward, navigate to the ‘Individual’ page after setting forward service to Individual and tap the ‘Update’ button. Unconditional – Forwards all calls to the destination entered in the field Fallback FWD – Forwards calls to the entered destination only if the initial call fails for any reason, such as the call being declined or the extension being unregistered. Busy FWD – Forwards calls to the entered destination only if the initial call is rejected Unregistered FWD – Forwards calls to the entered destination only if the extension is not currently registered on any deskphone or softphone app (Connect Mobile). No Answer FWD – Forwards calls to the entered destination only after ringing for a set amount of seconds. Once a destination is entered in the field a ‘Time Out’ field will appear below that allows the user to set the length of time before the forward takes effect.
Find Me Follow Me forwarding
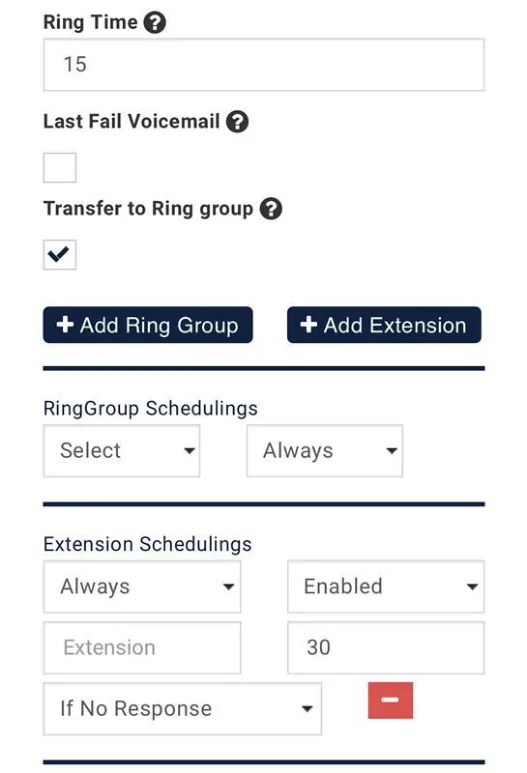
A Find Me Follow Me forward allows forwarding to occur based on a schedule, or to multiple other destinations at the same time or in sequence. Schedules must be created in the extension’s nCloud User Portal before they are available for use in this interface. Ring Time – Determines how long the user extension will ring before the forward activates. Last Fail Voicemail – When checked, calls that are not answered at the forwarding destination will be transferred to original user’s voicemail. Not guaranteed if forward destination is an external number. Users can add a forwarding destination by tapping the ‘Add Extension’ button and filling out the fields that appear. Multiple forwarding routes can be added to forward the call to multiple destinations:
- Schedule Select a schedule for this forward
to follow
- Enabled/Disabled Enables or disables this specific forwarding route
- Extension Enter the forwarding destination in this field. Can be another extension or a 10-digit external number
- Ring Time Enter the length of time in seconds that the forward should be offered to this specific forwarding route
- At the Same Time/If No Response Allows the user to select whether this forwarding route should become active at the same time as the route before it, or in sequence after the timer for the preceding route has elapsed. If there is only one route in the forward, this determines whether the forward is offered while the original user extension is still ringing, or after the ring timer at the top of the Find Me Follow Me page has elapsed.
If the user is forwarding their extension to a Ring Group, check the Transfer to Ring group box, then select the extension of the desired Ring Group from the dropdown list on the left, and the desired schedule from the dropdown on the right. Additional Ring Groups can be added using the ‘Add Ring Group’ button if the forwarding destination is going to change based on a schedule.
Note: If the user wishes to forward both direct calls and Ring Group calls, both settings must be programmed separately. They can be forwarded to different destinations if needed. Calls that reach the extension as part of a Call Queue cannot be forwarded.
Voicemail
There are three sections to the Voicemail configuration page which become visible in the triple bar menu once the ‘Voicemail’ option is tapped.
This section contains settings for the voicemail-to-email feature. When the Enable box is checked, the system will send a notification to up to two email addresses which will contain the number of the caller, the date/time the voicemail was received, the extension of the mailbox it arrived in, and the voicemail itself attached as an audio file to the notification. By default, the emails are sent to the primary and secondary emails associated with the user extension. The ‘Override’ checkbox underneath each field can be used to alter the destination. Once checked, the Forward to Email field will become editable and an alternate email address can be entered. When checked, the Forward to email and delete from server feature will automatically delete voicemails from the user mailbox upon sending the email notification, allowing the user to manage voicemails entirely via email without the mailbox itself ever filling up. Please note that emails deleted using this feature are permanently deleted and will not appear in the trash folder.
General
This section contains various voicemail settings, including those related to the mailbox auto-cleaning feature. Max Voicemail length – Controls the maximum voicemail length (in seconds) allowed Move to Trash days – Unheard messages are automatically moved to the Trash folder after this many days Empty Trash days – Messages in the Trash folder are automatically and permanently deleted after this many days. File Encoding – Allows the user to select between .mp3 and .wav file encoding for voicemail recordings Whitelist Caller – Allows the user to enter a number from which they can call and check voicemail remotely without being asked for a PIN
Greeting
This section contains settings related to the user voicemail greeting. Audio must be uploaded to the user’s nCloud User Portal audio library or recorded via the prompts in the Settings section of the voicemail IVR before it is available for use on this page. To record a greeting via the voicemail IVR, dial ‘5’ after calling into voicemail via the button on the dialer and entering the user PIN. Once recorded, users can select audio for their Standard, Out of Office, and Extended Absence greetings using the provided dropdown menus, and listen to selected audio using the ‘Play’ button underneath each field. Users can select an active greeting using the ‘Choose Greeting’ dropdown menu at the bottom of the page.
Number screener
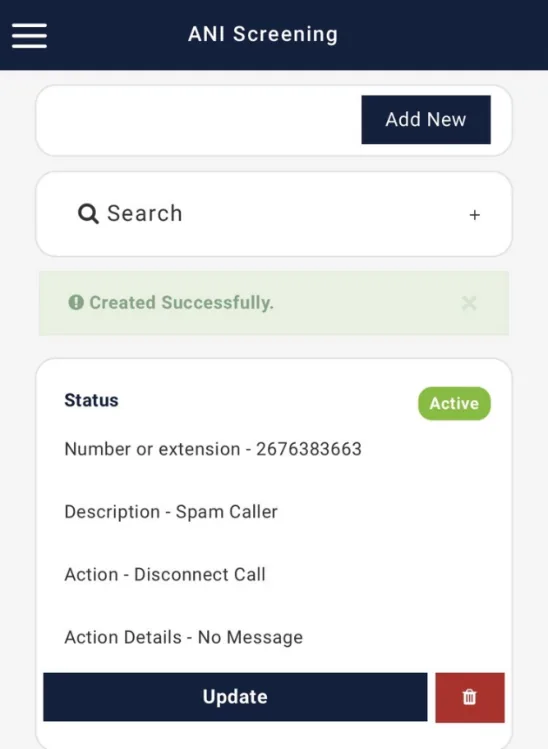
This page allows the user to set up automatic rules for their extension to utilize when it receives calls from a specific number. This feature’s most common application is to block calls from specific numbers but it can also be used to transfer calls to a specific destination or voicemail box. Existing entries are displayed after the ‘Number Screener’ option in the triple bar menu is tapped. Entries can be edited or deleted using the buttons at the bottom of each entry. To create a new entry, tap the ‘Add New’ button and fill out the provided fields: Number or extension – Enter the number that is being screened Description – Enter a short description or label for the entry Action – Select the desired option from the dropdown menu. Calls can be disconnected, transferred to a specific extension or external number, or transferred to a specific voicemail box. Upon selecting an action, the ‘Action Details’ field will appear. Action Details – If the user has selected ‘Disconnect call’ as the action, this field allows them to select an audio file to play before disconnecting the call if desired. If the user has selected either of the transfer options, this field allows them to enter a destination for the automatic transfer.
Settings
Additional settings and diagnostic tools for the Connect Mobile app can be accessed by tapping the ‘Settings’ option in the Side Menu: Update Configurations – Updates the app to reflect current settings in the nCloud admin and user portals App Language – Allows the user to choose from available language localizations Themes – Allows the user to select between light or dark visual themes for the app About Us, Privacy Policy, & Help – Links to different pages of the NetCarrier website containing relevant information and documentation Debugging – This section contains various diagnostic tools that will assist our Support team in gathering detailed information during the troubleshooting process of any potential issues or malfunction. Should a user encounter any issue in the proper function of the app, please contact helpdesk@netcarrier.com.
Still stuck?
Our U.S.-based support team answers 24/7/365.