
Videos and tutorials / nCloud Connect
nCloud Connect admin portal guide
How administrators manage the nCloud Connect phone system: users and user groups, call routing, auto attendants, ring groups, numbers, reports and more.
Admin sign-in
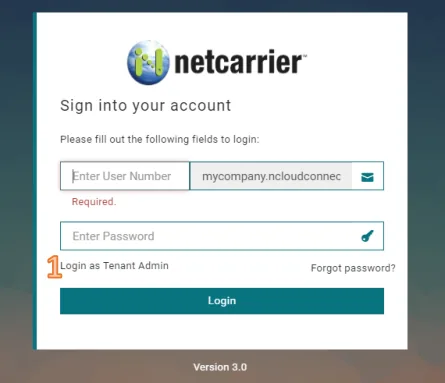
The initial landing page is for user login.
To log into your admin user:
- Click Login as Tenant Admin
- Enter the Username and Password provided by your
Project Manager
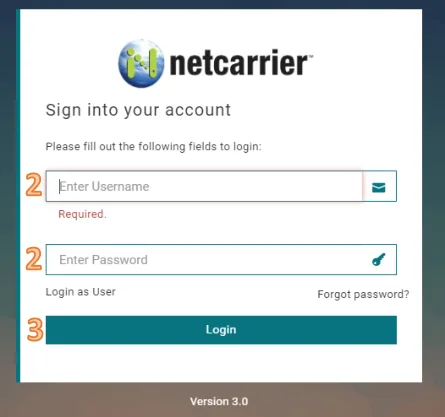
- Click Login
User management
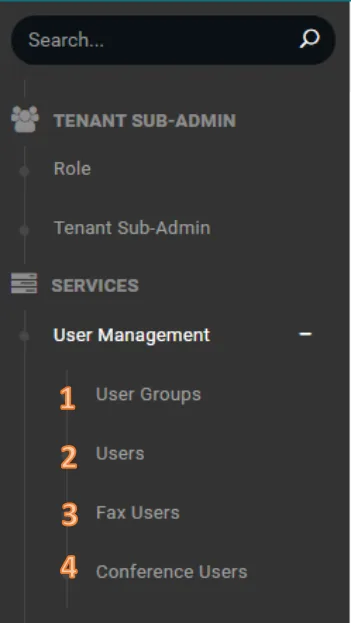
By clicking on User Management, four menu items become available.
- User Groups: Used to make changes to multiple users based on admin defined grouping
- Users List of users or extensions within your phone system and their configuration
- Fax Users Users built for the Desktop Faxing feature
- Conference Users Users built for the Business Conference feature In this guide we will focus on User Groups and Users.
User groups
Within the User Group page you have a few tools at
your disposal to manage your users based on
parameters like location, department, etc.
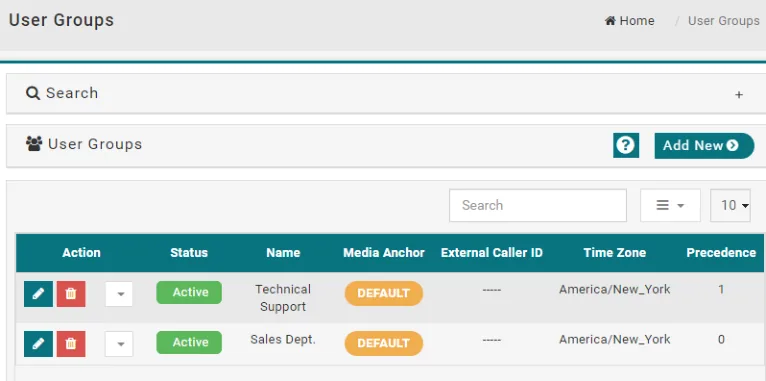
Use the button to edit the Name, Precedence,
Description, and Status of the group.
Use the button to deletes a User Group.
External Caller ID is the phone number recipients will
see when you call them.
To add a new group use the button.
Creating user groups
Here you can control uniform settings and features for all
users added to a group.*
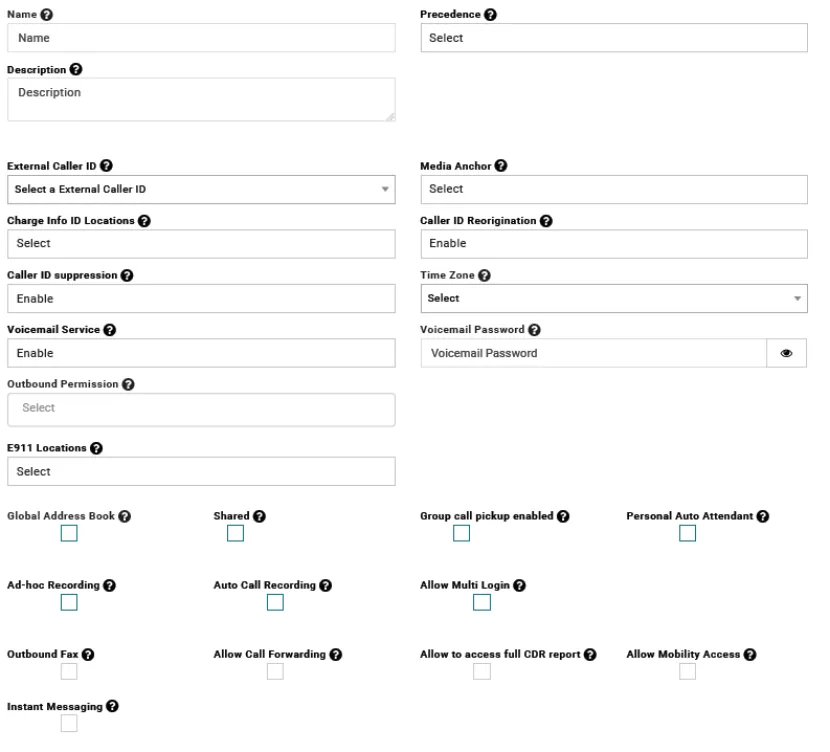
External Caller ID The Phone numbers recipients see when
you call them.
Caller ID Reorigination If enabled, calls forwarded from
users within this group will display the original callers’ Caller
ID.
Caller ID Suppression If enabled, calls to external recipients
within this user group will mask your Caller ID.
Group Call Pickup Enabled If enabled, users within this
group can pickup each other’s calls.
Ad-Hoc Recording If enabled, users within this group can
turn call recording on using the designated star code.
(Default *22) Allow Mobility Access: If enabled, allows users within this
group may utilize the nCloud Connect Mobile App.
Instant Messaging If enabled, allows users to utilize Jitsi
XMPP messaging application.
*The Name and Precedence fields are required to create a user group.
Users
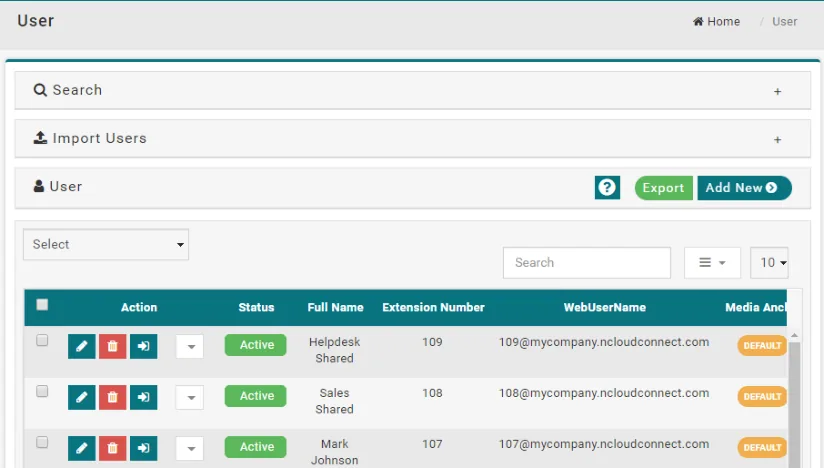
The user page allows you to manage your users at an
individual level. Here you can search for, create, edit,
import, and export users.
Use the  button to create a new user.† Use the button to edit an existing user’s name,
extension, user group, features, etc.
Use the button to delete an existing user.
Use the  button to login to the User’s portal to
manage their personal settings.
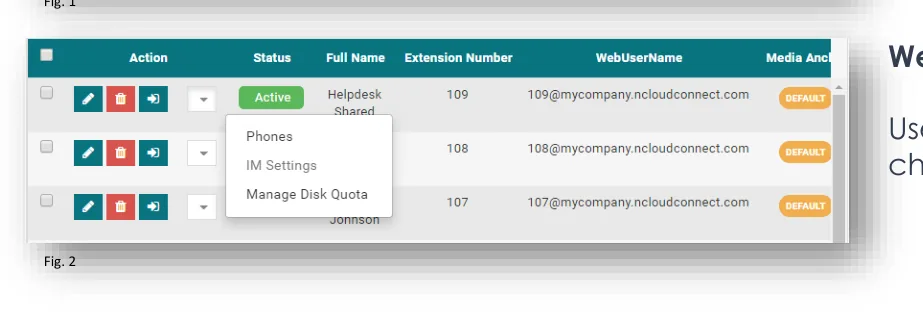
WebUserName is their username for portal login.* Use the button to edit phones from the user,
change IM settings, and manage their Disk Quota.
†If Add New is missing you have reached your max users. To add more
contact technical support.
*This username is required to login to the mobile app if user is unable to
scan the QR code from the portal.
First Name: The first name to be displayed for a user.
Last Name: The last name to be displayed for a user.
Email: Assigned email for the user.
Extension Number: Extension number chosen for a new extension.
The extension number can not be changed after the user has
been created.
Password: The password the user will use to log into their user portal.
SIP Password: Required for SIP registration for various SIP devices.
(This is auto generated) User Group: Determines which user group this user falls under.
User Aliases: Assigns an alias for the user.
Apply Configuration From Groups: Applies the configuration of a
selected User Group. Must be checked for User Group settings to
be applied.
Notify User: If checked, a notify email will be sent to this user.
Status: Enables if the user is active or inactive.
*First Name, Last Name, Extension, Password, and Voicemail Password fields are required to create a user.
External Caller ID: The Phone numbers recipients see when you call
them.
Caller ID Reorigination: If enabled, calls forwarded from users
within this group will display the original callers’ Caller ID.
Caller ID Suppression: If checked, calls to external recipients will
mask your Caller ID.
Voicemail Service: If checked, this user will have their own
voicemail box Voicemail Password: Personal voicemail access password. Only
numbers are accepted.
Global Address Book: If checked, the user will appear in the global
address book.
Shared: If checked, the user can be built on multiple phones and
calls can be shared between the phones.
Outbound Fax: If checked, the user is able to send faxes.
Ad-Hoc Recording: If checked, the user is able to manually record
their calls.
*First Name, Last Name, Extension, Password, and Voicemail Password fields are required to create a user.
Auto Call Recording: If checked, the user’s calls will be
automatically recorded.
Allow Multi Login: If checked, the user is able to login in on multiple
devices.
Allow Call Forwarding: If checked, the user is able to forward their
calls.
Personal Auto Attendant: If checked, the user is able to set up an
auto attendant before their voicemail.
Allow to access full CDR report: If checked, the user has admin
level CDR permissions.
Allow Mobility Access: If checked, the user is able to use the
mobile application.
Instant Messaging: If checked, the user is able to use instant
messaging.
Enable Dynamic Whitelisting: If checked, the user’s IP address will
be dynamically whitelisted.
Self Authorization: If checked, the user will need to enter their PIN
for their own voicemail.
*First Name, Last Name, Extension, Password, and Voicemail Password fields are required to create a user.
Manage DID
The DID Management page allows you to dictate call
routing for individual DIDs.
DID Groups: You may add DIDs to specific groups to
allow global changes to routing and forwarding for
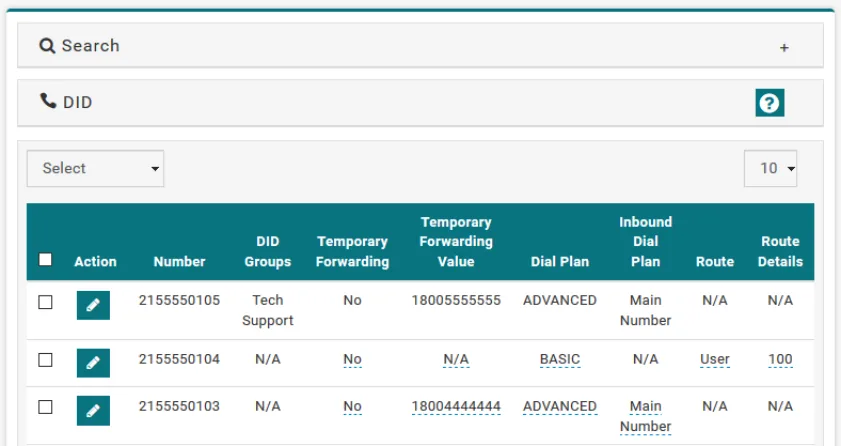
specific departments, locations, promotions, etc.
Temporary Forwarding (Value): If set to yes, this feature
will circumvent any existing routing to the specified
destination under Temporary Forwarding Value.† Dial Plan: A dial plan determines how the DID route
behaves during specific times of the day. If set to
advanced you must specify which Inbound Dial Plan is
to be used.
Route (Details): If the Dial Plan is set to basic, here you
will specify where the call will be sent to (e.g. Extension,
Ring Group, Auto Attendant) and finally which specific
extension the DID points to.
The Temporary Forwarding by default can be enabled or disabled by
dialing *37+DID of the extension.
† The Temporary Forwarding Value must be set prior to using the star code.
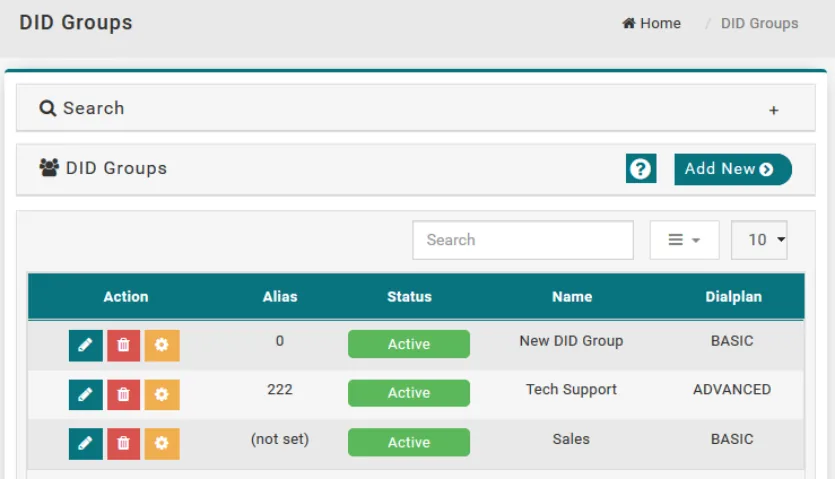
After choosing DID Groups from the side bar
the list of all your DID Groups will appear.
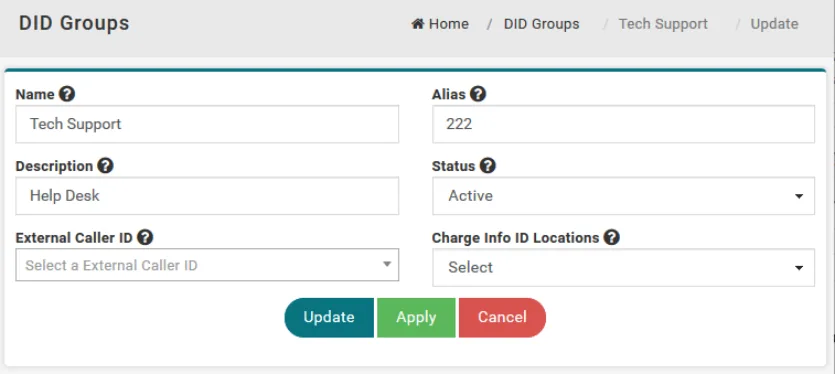
Use the button to edit the name of the
group, the alias, add a description, and set it
active or inactive.
Use the button to delete any groups.
Use the button to make changes to the DID
Groups call routing.
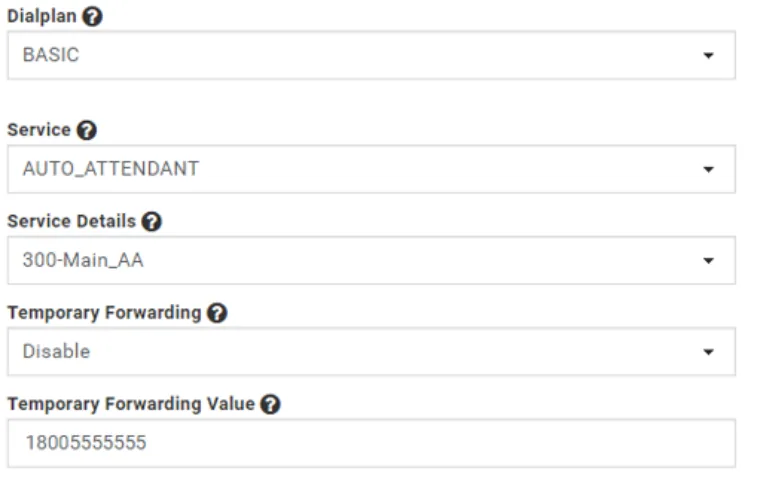
After using the configuration button you will be able to
adjust the DID Groups call routing.
Dial Plan: A dial plan determines how the DID route
behaves. If set to advanced you must specify which
Inbound Dial Plan is to be used.
Service (Details): If the Dial Plan is set to basic, here you
will specify where the call will be sent to (e.g. Extension,
Ring Group, Auto Attendant) and finally which specific
extension the DID points to.
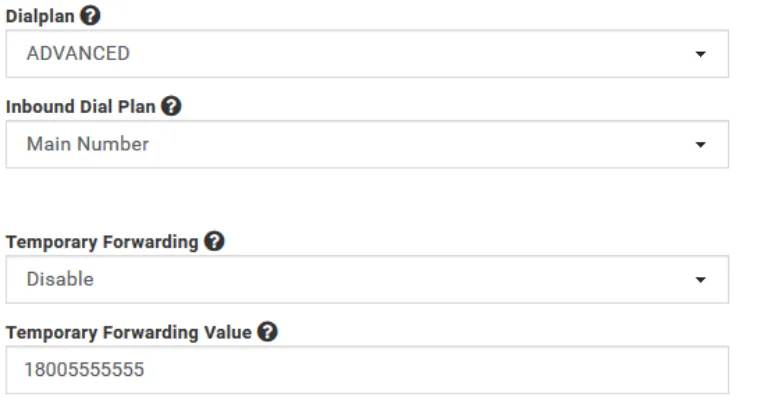
Temporary Forwarding (Value): If set to enabled, this
feature will circumvent any existing routing to the
specified destination under Temporary Forwarding Value.†
The Temporary Forwarding by default can be enabled by
dialing *38+Alias of the DID Group and use *39+Alias to
disable the Temporary Forwarding.
† The Temporary Forwarding Value must be set prior to using
the star code.
ANI screening
ANI Screening allows you to determine the destination
of specific callers based on their inbound caller ID. This
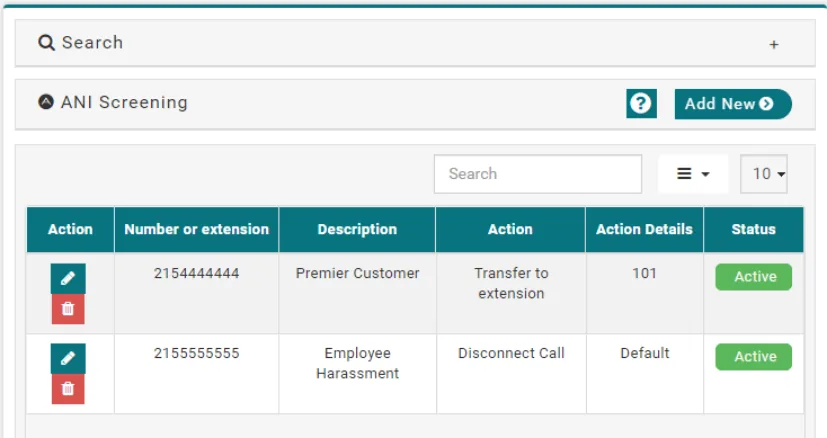
can be used to direct VIP clientele to any extension,
voicemail, or simply disconnect callers.
Number or Extension: Defines the caller’s number in the
ANI ruleset.
Description: Set by you to notate the ruleset.
Action: Determines which action the phone system will
take when presented the specified caller.
Action Details: If the specified Action requires any
further parameters to function, they are specified here
such as extension or message to play when disconnect
call is selected.
To add a new ruleset use the  button.
Creating an ANI ruleset
When creating the ruleset you’ll need to consider the
following:
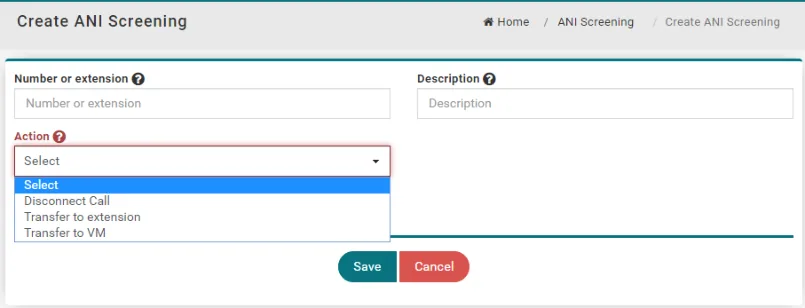
Number or Extension: This can be an internal extension
or any type of external caller ID whether it is a 10 digit
phone number or a 15 digit international number.
Description: Include a description to easily track and
search for the ruleset.
Action: Choose how you would like the specified caller
to be handled. Calls can be disconnected,
automatically transferred to an extension, or sent
directly to a voice mailbox.
Ring and hunt groups
While this page has the title of Ring Group you are able
to build Ring and Hunt Groups with their own call flow
and rules respectively. Some of the tools on this page
are as follows:
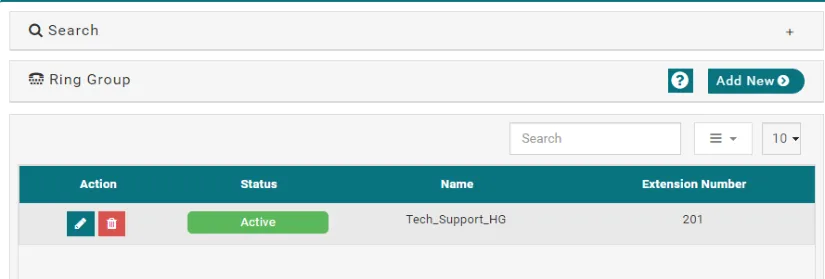
Use the button to edit the name, Failover Prompt*,
and users within the Ring/Hunt Group.
Use the button to delete a Ring/Hunt Group.
Use the  button to create a new Ring/Hunt
Group *The Failover Prompt can be anything found within your
audio library from music on hold, voice recordings, or a
combination using the audio phrase feature covered in
a later section.
Adding ring and hunt groups
Below are some of the parameters you may include when
building a new Ring/Hunt Group:
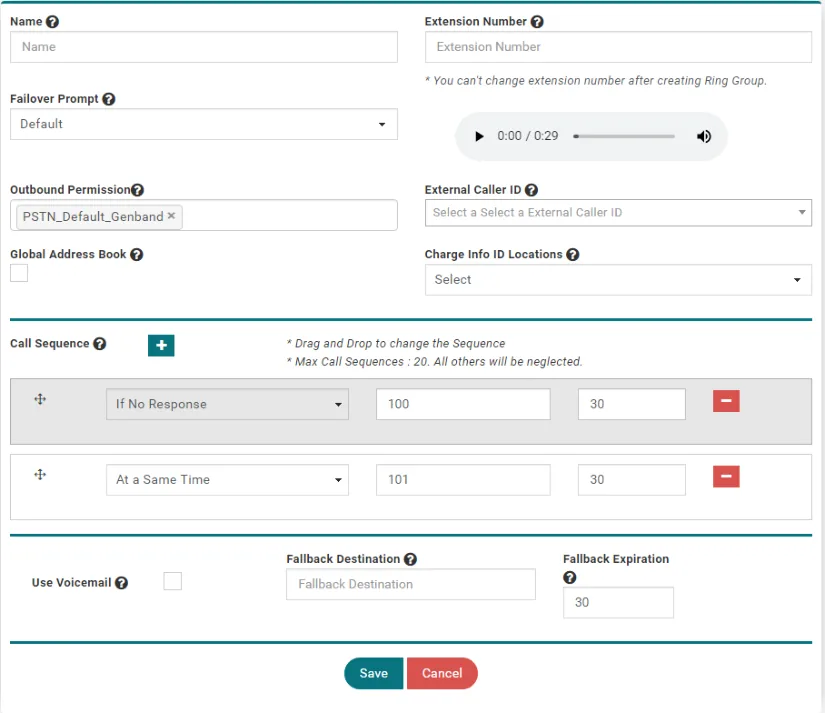
Name: The name of the Group.
Extension Number: The internal extension for the group.
(Required) Call Sequence: Here you can determine which recipients
will be reached and how.
If No Response/At the Same Time: Determines If calls will
- ring at the same time or in a particular order.
- Extensions: Set the extension you wish to ring in the
group in the order, if any, you would like them to ring.
- Ring Timer: Determine how long you would like the
extension to ring. (Maximum 60s)*
Use Voicemail: Determines if the group will use the final
user’s voicemail when a call is not answered within the
defined time.
Fallback Destination: Defines an extension the call is routed
to after the ring timer has expired. (This is unavailable if Use
Voicemail is enabled) *Combined time if no anchor is used (e.g. Auto Attendant, Call Queue, etc.)
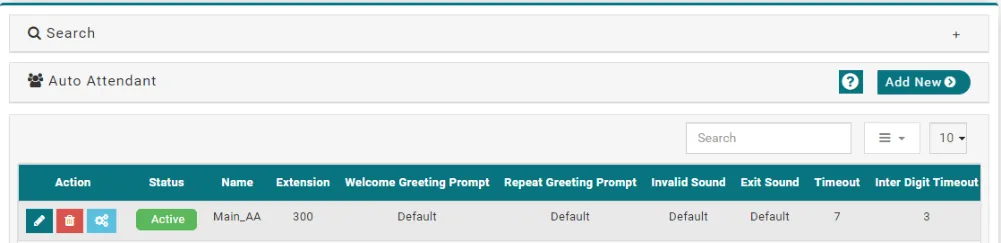
This page allows you to create and manage your Auto Attendants. Use the button to edit the name, prompts, timeouts, and other associated rulesets within an auto attendant. Use the button to delete an auto attendant. Use the  button to configure options, prompts and sub auto attendants. Use the button to create a new auto attendant. Welcome Greeting Prompt: The audio file in use when a caller reaches the auto attendant. Repeat Greeting Prompt: Audio file in use when repeating the welcome IVR. Invalid Sound: Audio file played when an invalid option is selected Exit Sound: Audio file played when exiting the auto attendant. Timeout: Time allotted for caller to select an option Inter Digit Timeout: Time allotted between digit entry. (Used when dialing extensions is allowed from the auto
attendant)
Creating auto attendants
Creating an auto attendant is done in two parts. First by
creating the attendant itself by using and then building
the attendant tree via the button.
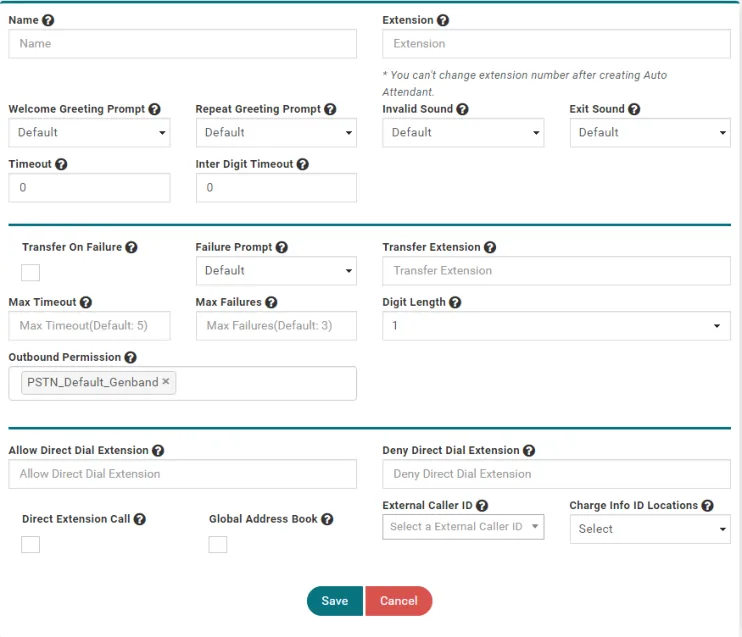
Name: The name of the auto attendant. (Required) Extension: The desired internal extension.
Welcome Greeting Prompt: Audio file when first reaching the
auto attendant.
Repeat Greeting Prompt: Audio file played when repeating the
Welcome IVR.
Invalid Sound: Audio file played when an invalid digit is
selected.
Exit Sound: Audio file played when leaving the auto attendant.
Timeout: Time allotted for caller to select an option.
Inter Digit Timeout: Time allotted in between digits entered.
Transfer on Failure: If enabled, after a predetermined amount of
failures the caller will be transferred to the specified extension.
Allow/Deny Direct Dial Extension: Can allow or deny callers to
reach specific extensions through the auto attendant.
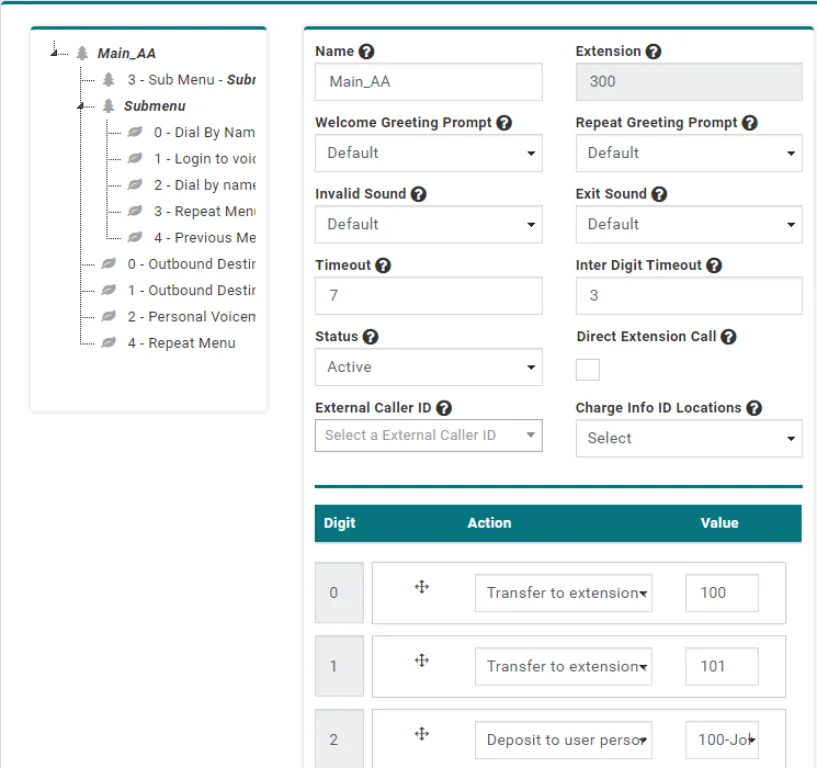
While you are able to alter previously covered fields in
the configuration window, here we will only cover the
unique aspects of this page.
Auto Attendant Tree: A visual representation of the
options available to a caller.
Digit: The digit a caller will select to execute the
specified action.
Action: Play file, Transfer, Repeat Menu, Voicemail
Deposit, Previous Menu, Sub Menu, Dial by Name, No
Action, Disconnect , Voicemail Login.
Value: Specifies further required parameters which
could include extensions, other attendants, DIDs, etc.
Submenu: Submenus are used to provide a specific
subset of options within the main menu. An example
would be, “Press option 4 for directions” after pressing 4,
each subsequent option would specify a different site.
Call parks
On this page you can create new parks and edit existing
ones.
Use the button to edit an existing park’s name,
description, background music, etc.
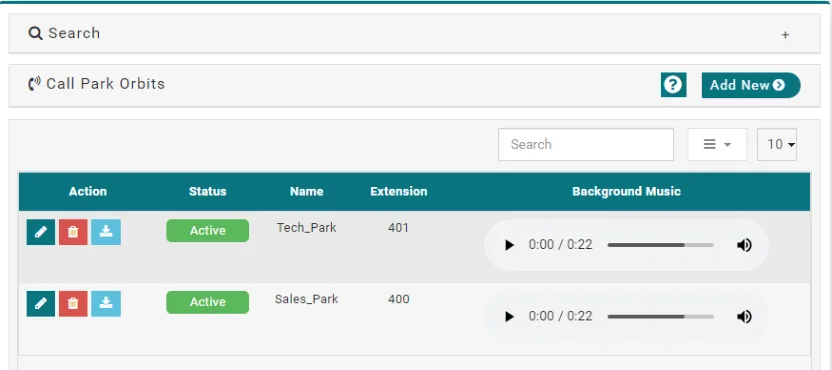
Use the button to delete an existing park.
Use the  button to download the current background
music applied to the selected park.
Use the button to create a new park.
Editing an existing call park allows you to change behavior
along with details for tracking and organizational purposes Background Music: Audio file played while caller waits in
Fig. 1
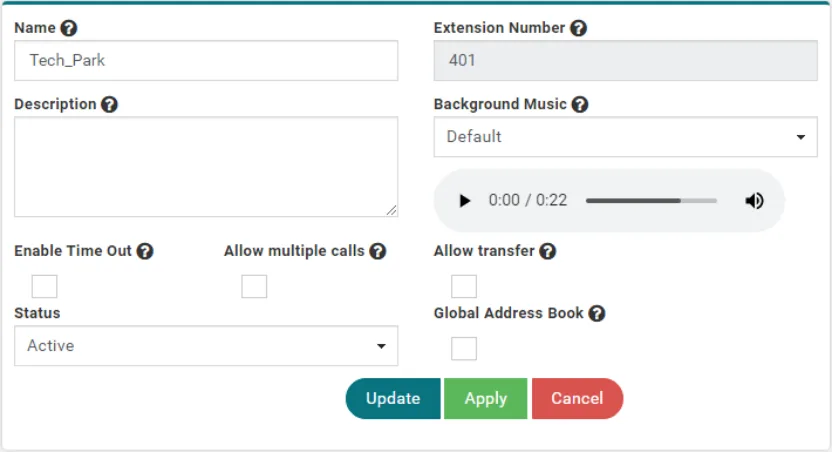
the call park.
Enable Timeout: If enabled, call will automatically transfer
back to user that transferred into the call park after the
allotted time has expired.
Allow Multiple Calls: If enabled, multiple callers can be
parked within one call park. Callers will be retrieved in the
order in which they were parked. (We recommend
keeping this option disabled to simplify your call park
management) Allow Transfer: If enabled, gives the caller the ability to
Fig. 2
transfer back to the user that parked them by pressing a
defined key. (Default 0)
Creating call parks
Below are descriptions of each field available when
creating a call park.
Extension: The direct extension used to reach this call
park.
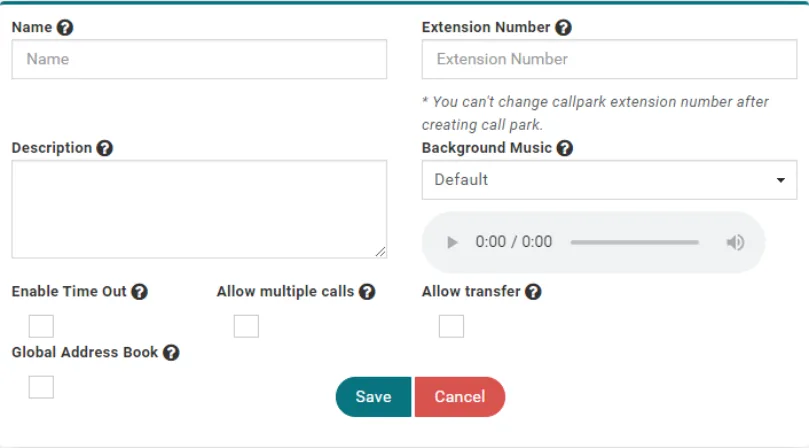
Background Music: Audio file played while caller waits
in the call park.
Enable Timeout: If enabled, call will automatically
transfer back to user that transferred into the call park
after the allotted time has expired.
Allow Multiple Calls: If enabled, multiple callers can be
parked within one call park. Callers will be retrieved in
the order in which they were parked.
Allow Transfer: If enabled, gives the caller the ability to
transfer back to the user that parked them by pressing
a defined key. (Default 0)
Conference bridges
The first thing you may notice is Disk Usage. This keeps
track of conference recordings and the space used on
the server by said recordings.
Use the button to edit the name, participant code,
moderator code, etc.
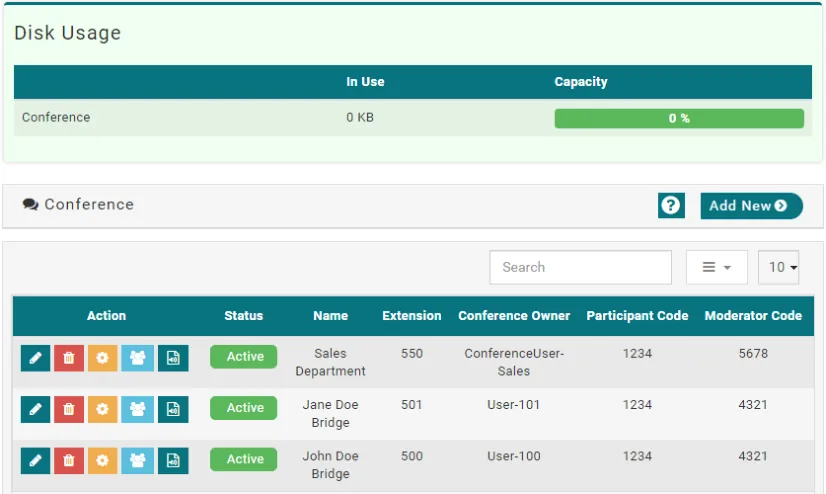
Use the button to delete the conference bridge.
Use the button to configure the star codes for each
individual bridge.
Use the  button to monitor and manage the
conference in progress.
Use the  button to view and manage your previously
recorded conferences.
Use the button to create a new conference
bridge.
Conference Owner: Determines the administrator of the
conference bridge.
Participant/Moderator Code: PIN’s that must be used to
call into the conference bridge and gives permissions
respective to their login.
Creating conference bridges
Name: The name of the conference bridge. Extension: The internal extension of the conference
bridge. Participant Code: The code used to access the
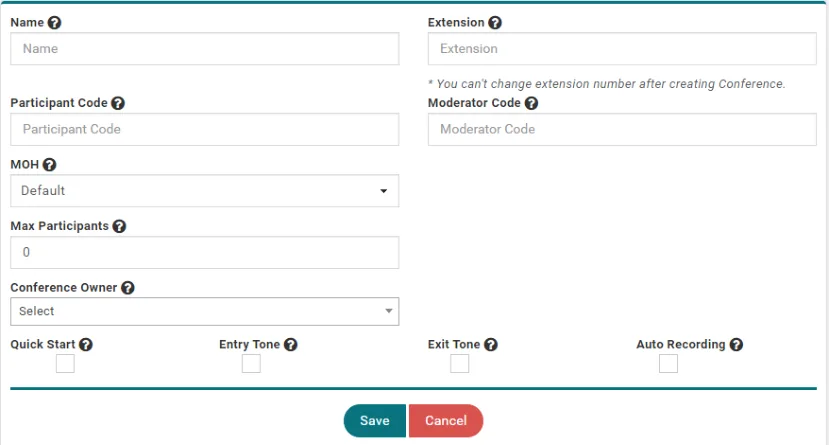
conference bridge as an attendee. Moderator Code: The code used to begin the
conference bridge unless Quick Start is enabled. MOH: Hold music that participants will hear prior to a
moderator logging in (Quick Start must be disabled). Max Participants: Total participants that may join the
conference. Conference Owner: The administrator of the conference
bridge. Quick Start: If enabled, allows participants to begin
without the presence of a moderator. Entry Tone: A tone that plays when participants enter the
bridge. Exit Tone: A tone that plays when a participant exits the
bridge. Auto Recording: If enabled, all conferences will be
recorded and stored within the auto recording page for
this bridge.
Connect Unify Pro: queues
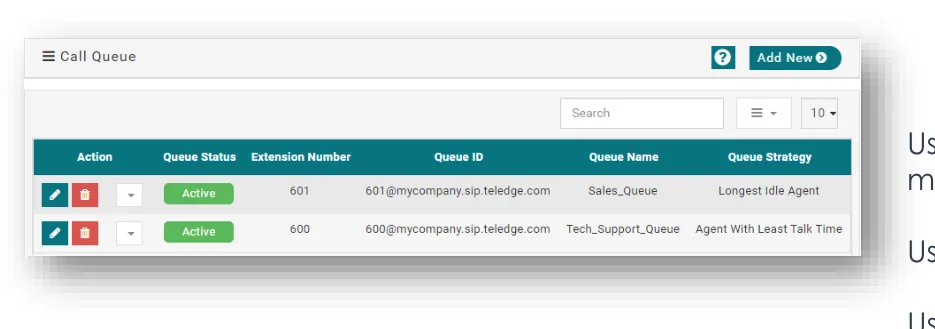
Use the button to edit your queue’s name, rules,
music on hold, etc.
Use the button to delete a queue.
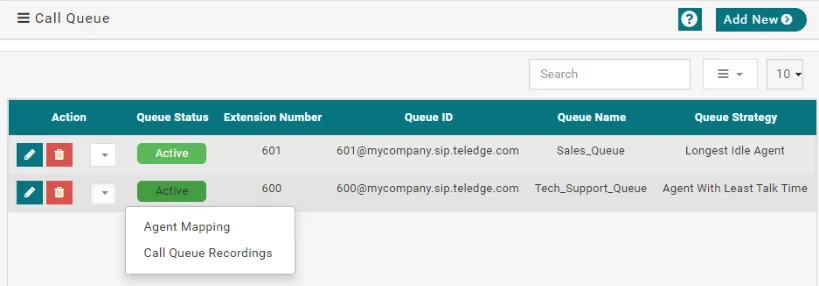
Use the button to access Agent Mapping and Call
Queue Recordings.
Use the button to create a new queue.
Queue Strategy: Give you a quick look at how the
queue handles your caller distribution to your agents.
(e.g. Agent with most talk time, agent with least talk
time, longest idle agent, etc.)
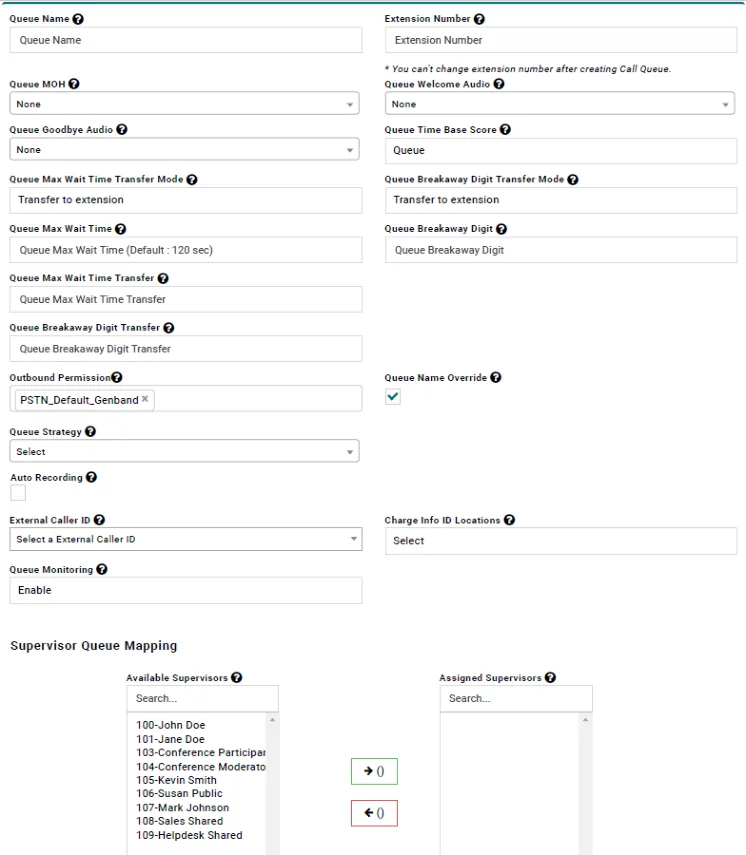
Extension Number: Internal extension assigned to the queue.
Queue MOH: The audio file assigned to play while the caller is on hold.
Queue Welcome Audio: The audio file assigned to play when a caller
enters the queue.
Queue Goodbye Audio: The audio file assigned to play when a caller exits
the queue. Queue Time Base Score: Determines whether base time score1 is based on
when the call first connected (system) or when the caller entered the
queue (queue).
Queue Max Wait Time Transfer Mode: If a max wait time is set the caller
can be transferred to another extension.
Queue Breakaway Digit Transfer Mode: If a breakaway digit is set this goes
to an extension.
Queue Max Wait Time: Determines max wait time for callers within the
queue.
1 Base time score helps the system determine the priority of a caller based on the length of their call.
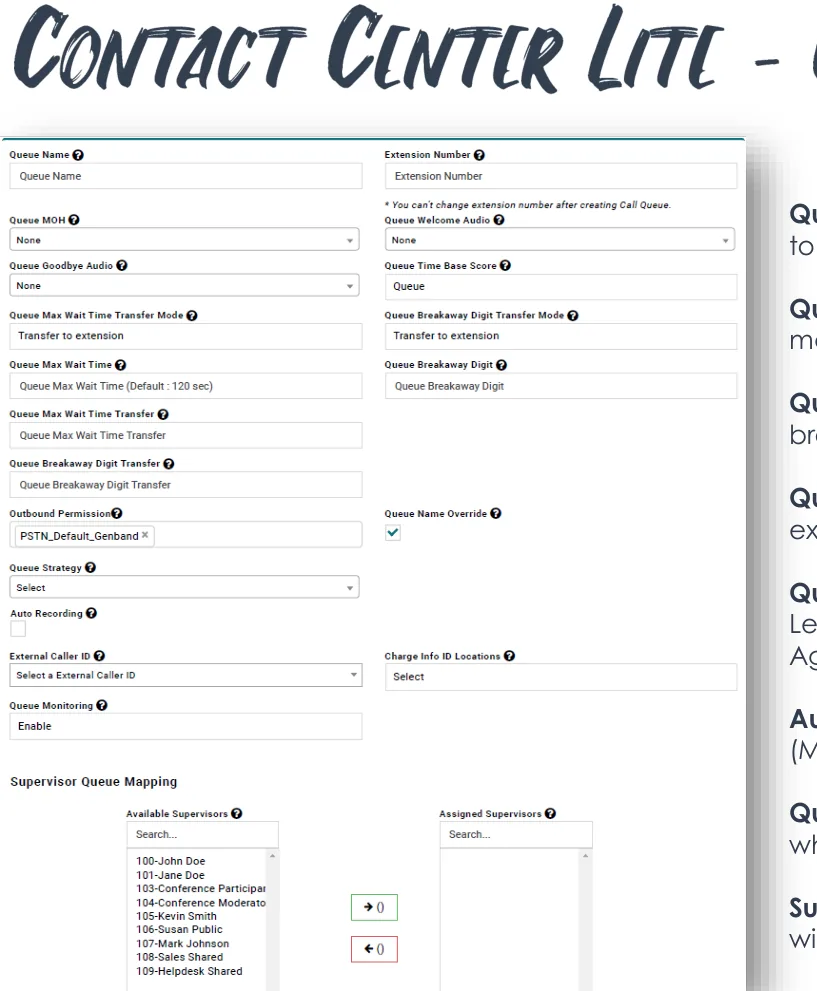
Queue Breakaway Digit: Determines the digit a caller can press to be sent
to the specified extension or to activate callback.
Queue Max Wait Time Transfer: Extension the caller is sent to after reaching
max wait time.
Queue Breakaway Digit Transfer: Extension caller is sent to after pressing
breakaway digit.
Queue Name Override: If enabled, allows agents to see queue name and
extension as caller ID rather than the caller’s original caller ID.
Queue Strategy: Can be set to Agent with Most Talk Time, Agent with
Least Talk Time, Longest Idle Agent, Random, Ring-All, Round-Robin1, or
Agent with most calls.
Auto Recording: Automatically records all calls made within the queue.
(May require additional storage) Queue Monitoring: If enabled, allows supervisors to monitor, barge in, or
whisper agent calls.
Supervisor Queue Mapping: This tool allows you to determine which user
will be set as supervisors within the queue.
1 Round-Robin rings in order or of agents listed see page 27 – Agent Mapping.
Connect Unify Pro: agents
Use the button to edit wrap up time, reject delay
time, and no answer delay time.
Use the  button to delete an agent.
Use the to create a new agent.
Wrap Up Time: A timer between phone calls to allow
the agent to finish any work associated with the first call
before another call is offered.
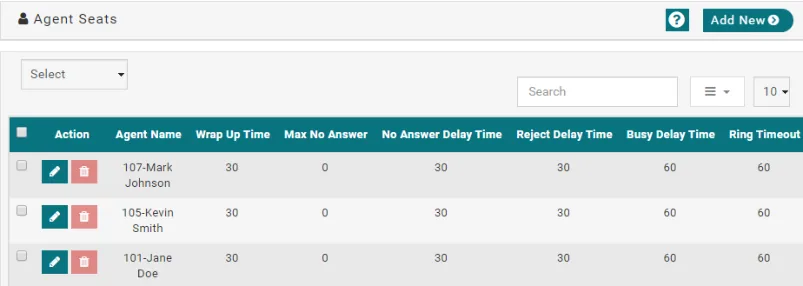
Max No Answer: Number of calls an agent can miss
before being set to “Break” No Answer Delay Time: If an agent misses a call the
system will wait this amount of time before offering
another call.
Reject Delay Time: If the agent rejects a call the system
will wait this amount of time before offering another
call.
Busy Delay Time: If agent rings busy the system will wait
this amount of time before offering another call.
Ring Timeout: How long an agent can ring before call is
offered to another agent.
Connect Unify Pro: agent mapping
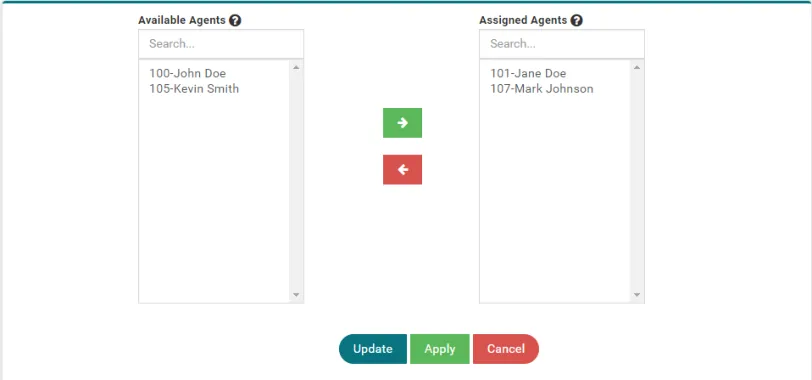
Agent mapping allows you to define which of your
agents may participate in your queues. Agents can be
assigned to as little or as many queues as you’d like.
To assign an agent to the queue highlight an available
agent you’d like to add and use the  button.
To remove an agent highlight an assigned agent and
use the  button.
Call recording
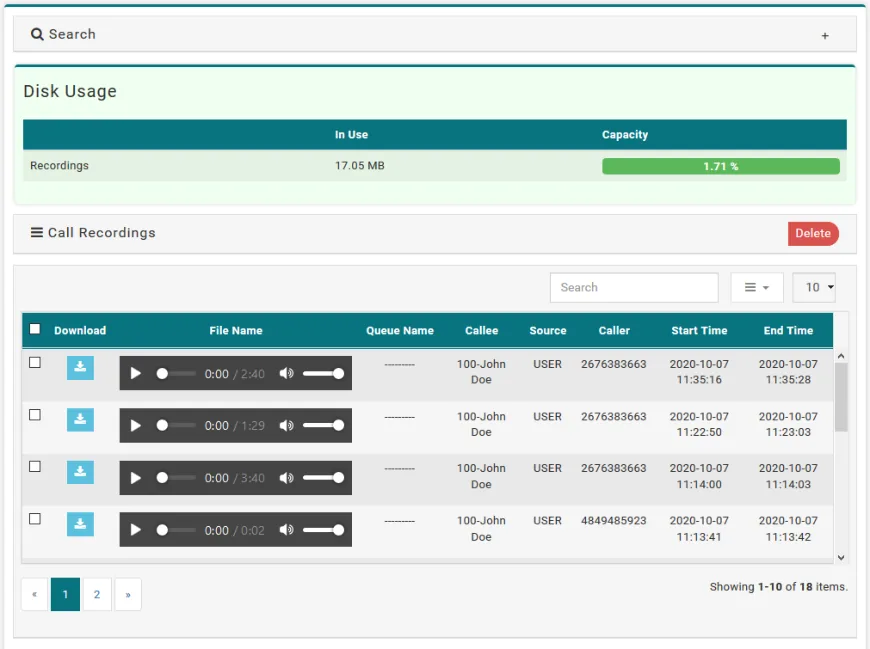
The Call Recording section is where call recordings
can be listened to, downloaded, and deleted.
Call recordings can be downloaded using the 
button. Use the player next to
the download button to listen to any recorded
calls.
Recordings will show the name of the call queue
the call was recorded in, the user who received
the call(callee), phone number of the person who
placed the call(caller), the start time of the call
and the end time of the call.
The disk usage for call recordings is shown above
the list of calls. Use the checkbox  to select any
recording and the delete button  to remove
any recordings.
Intercom
Intercom is based on permission by phone group. In
other words, only phones within specified phone groups
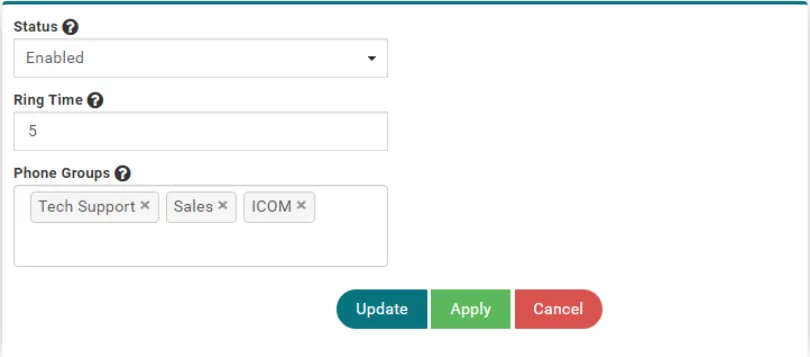
may receive intercom calls.
Status: Enable or disable intercom.
Ring Time: How long the phone will ring prior to
automatically answering. Pressing zero allows you to
accept an incoming intercom immediately. (Setting this
to zero allows the speaker to initiate without ringing) Phone Groups: Specified phone groups to give the
intercom permission to.
Paging groups
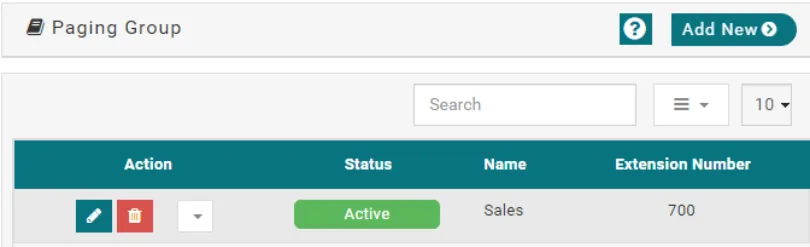
Use the button to edit name, ring timeout, status,
etc.
Use the button to delete the paging group.
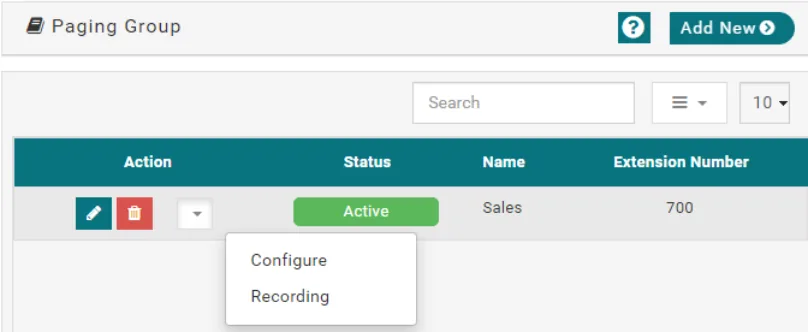
Use the button to access the Configure and
Recording menus.
Use the button to create a new paging group.
Creating paging groups
First start by building the group itself, filling in the
following fields:
Name: Name of the paging group.
Extension Number: Internal extension assigned to the
group.
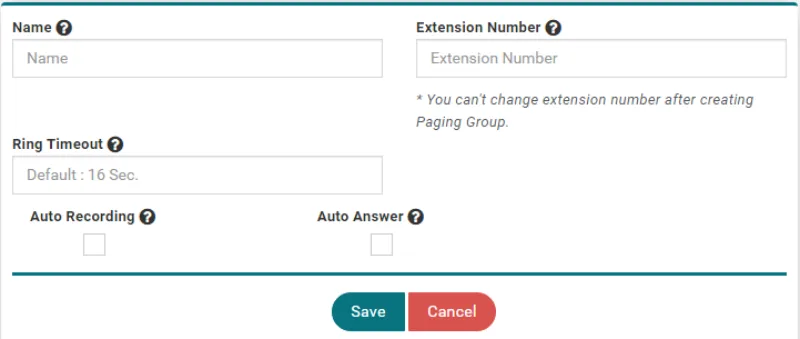
Ring Timeout: Time in seconds before page is
automatically ended.
Auto Recording: If enabled, records all pages made to
this group.
Auto Answer: If enabled, paged phones automatically
answer.
After the group is created, open configuration and add
the users you’d like to have in the group.
Use the  button to add users.
Use the  button to remove users.
Inbound dial plans
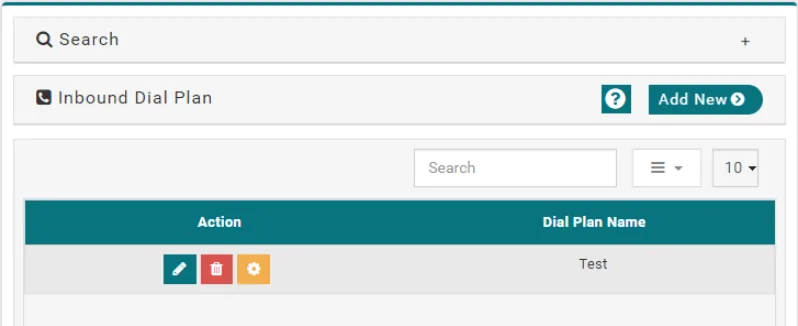
Use the button to edit a dial plan’s name.
Use the button to delete a dial plan.
Use the button to configure your dial plan’s routes
and scheduling.
Use the button to create a new dial plan.
Creating inbound dial plans
Simply name the new dial plan to start. After that head
to the configuration window for the new dial plan.
Use the button to add new routes. Routes are
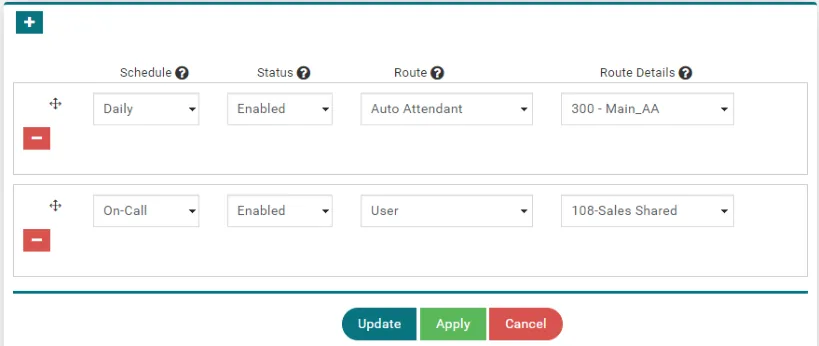
prioritized by the order they are presented. Top route
having highest priority.
Use the button to remove a route.
Click and drag the  icon to move a route.
Schedule: The schedule that a route will follow.
Schedules are built in the schedule window. (Default:
Always) Status: Determines if the route is enabled or disabled.
Route: Determines if the route will send the call to a
user, auto attendant, queue, etc.
Route Details: The specific destination of the route.
Schedules
Schedules are used to determine when routes and
forwards are active.
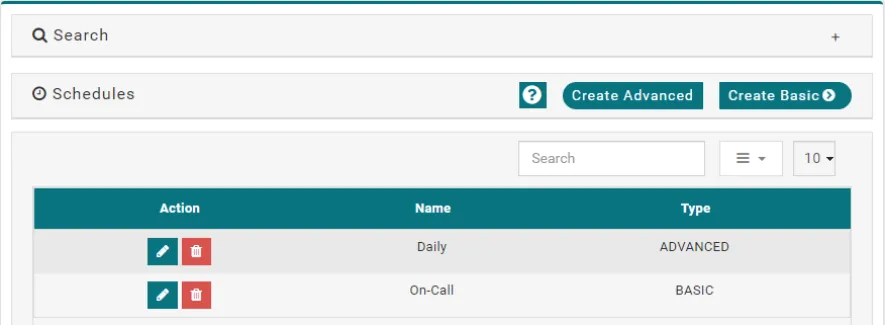
Use the button to edit the parameters of an existing
schedule.
Use the button to delete a schedule.
Use the button to create an advanced
schedule.
Use the button to create a basic schedule.
Creating basic schedules
Use the button to add a line.
Use the button to remove a line.
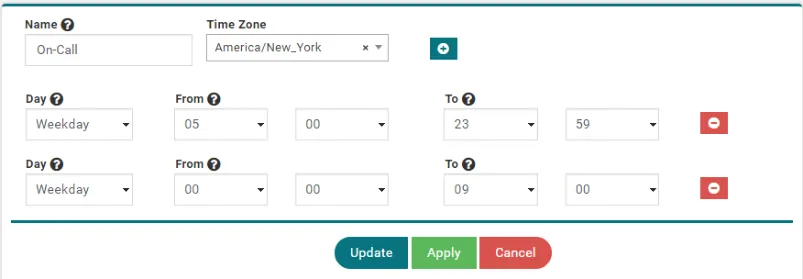
Name: The name of the schedule.
Time Zone: The time zone of the schedule. Particularly
useful for multi-site time management. (Multiple time
zones) Day: Specifies the day of the week the schedule line
covers. Can be a particular weekday or can cover an
entire weekday/weekend.
From: The start time of the line.
To: The end time of the line.
Creating advanced schedules
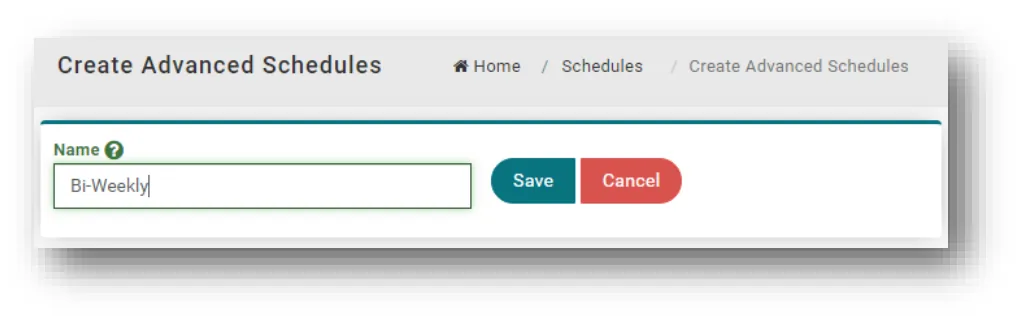
After using a name will need to
be entered into the field and saved by using
the  button.
Once a schedule has been created rules will
need to be added to dictate the
parameters of the schedule.
As rules are created they will appear in a list
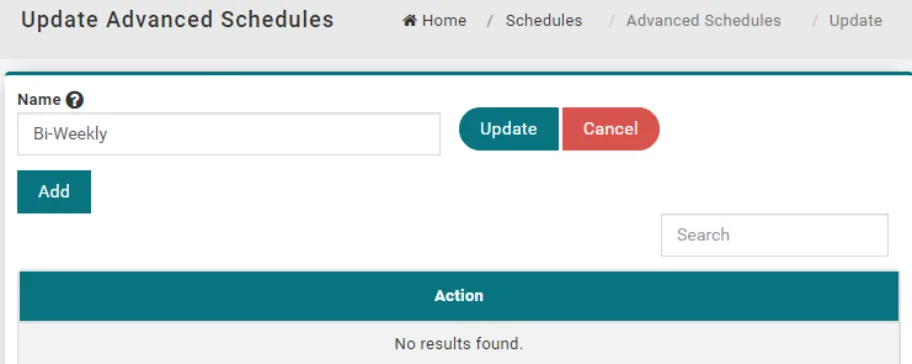
below the Action line.
Use the  button to create rules.
Multiple rules can be added to an
advanced schedule.
Rules will be listed with the most recently
created rule at the top of the list.
Creating rules
Time Zone: Determines the time zone the schedule
will be used in.
From Datetime: Determines the date and time
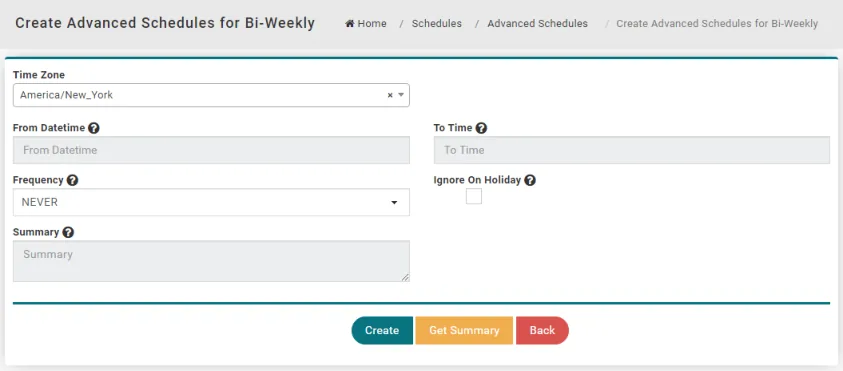
when the schedule will begin.
To Time: Determines the time the schedule will end.
Frequency: Determines how often this rule will
repeat.
I.e., Never, Daily, Weekly, Monthly, and Yearly
Ignore on Holiday: Tells this schedule to ignore on
predetermined holidays.
Summary: Use the  button to get a summary
of the rule being added. Summaries will be auto-
generated when the  button is used.
Choosing a start time
Choose the start time by clicking the empty field
labeled From Datetime.
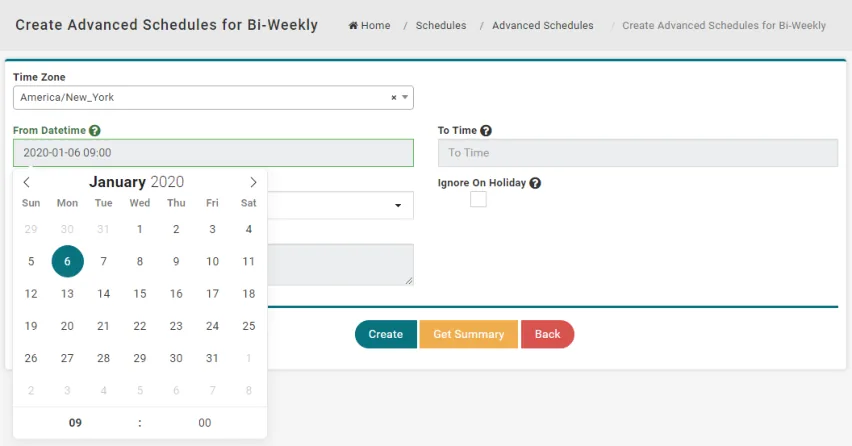
A calendar will appear just below the field as
pictured to the left.
Choose the date by clicking it and a blue circle will
appear around the chosen date.
Once the date is chosen a digital clock will appear
beneath the calendar and the start time can be
set.
The clock will be in 24 hour format.
I.e., For 1 AM use 01:00 but for 1 PM use 13:00.
Choosing an end time
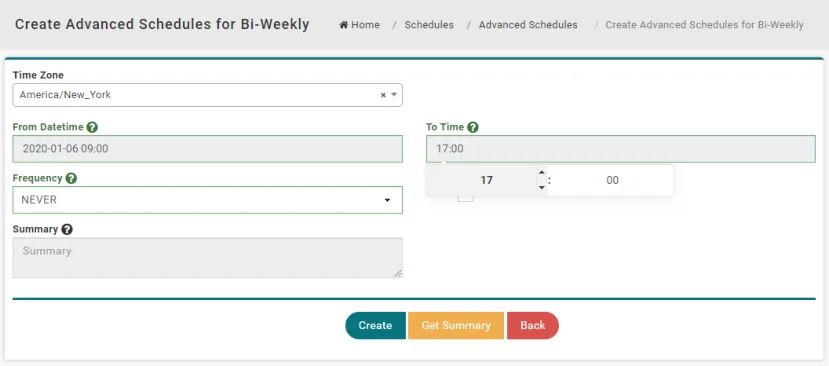
Choose the end time by clicking the field labeled To
Time.
Only the end time will chosen during this step. The
end date for this rule can be chosen in a later step.
The start and end times are adjusted by clicking the
up or down arrows next to the hour or minutes portion
on the clock. The time can also be entered via the
keyboard.
Choosing the frequency
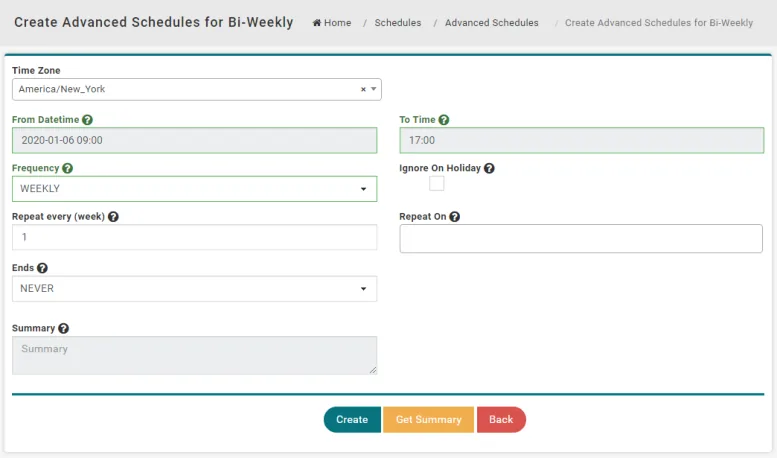
The drop down field under Frequency chooses
how often this schedule is repeated.
Never, Daily, Weekly, Monthly, and Yearly are the
choices.
Depending on the frequency chosen, more options
will appear.
Pictured is a weekly schedule with the added options
of Repeat Every(Week), Repeat On, and Ends.
Repeat Every(Week): Sets how often this rule will
repeat. The example shown is set for every other
week.
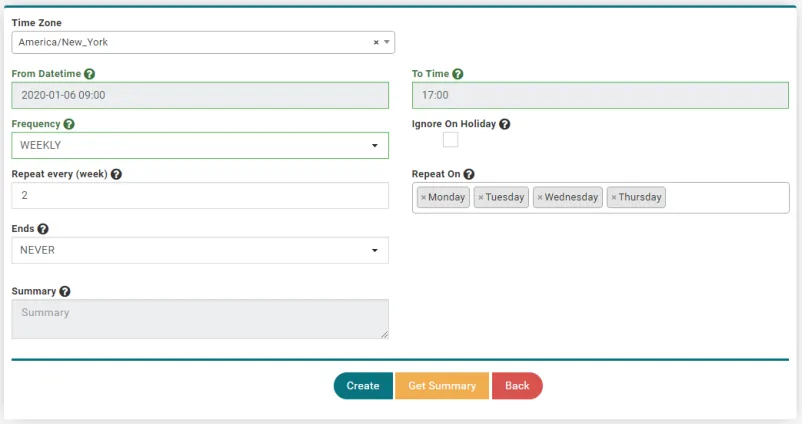
Repeat On: Sets the days in which the rule will
repeat. This field is a drop down and will list all of the
days of the week when clicked.
Ends: Sets when the rule will expire. Choices are
Never, On and After.
Never: No end date
On: Sets a date for the rule to expire
After: Sets the number of times for the
rule to repeat
Use the  button to save the rule.
The above schedule is set to start on january 6th, 2020. it will be active from 9am to 5pm, monday through thursday. it will run every other week and is set to never end
Rules list
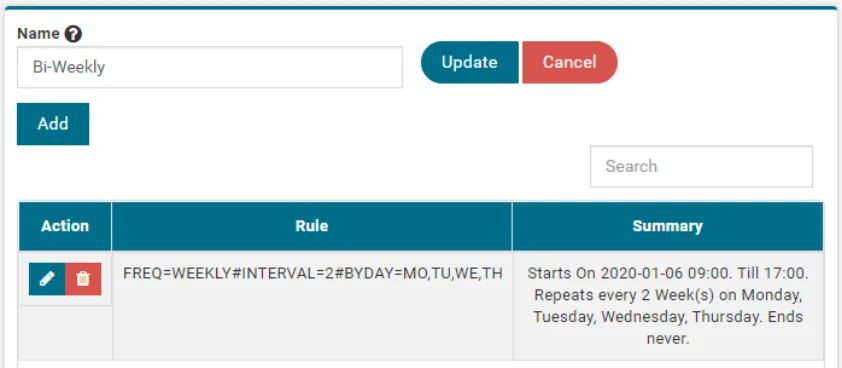
Once a rule has been created for the schedule it will
appear in the list under the Update Advanced
Schedules Section.
Multiple rules can be added as needed to cover gaps
in a schedule.
The schedule to the left repeats every other week.
A second rule is needed to cover the off weeks.
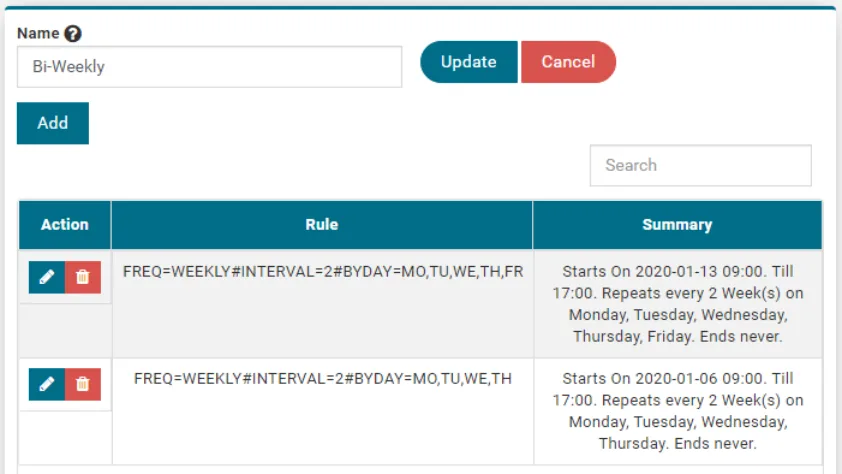
The second rule has been added.
Multiple Rules will be listed in order of creation with
the newest at the top.
The listed rules alternate between being open or
closed on Fridays.
Note that the start date for the second rule is a week
apart from the original rule.
Never-repeat schedules
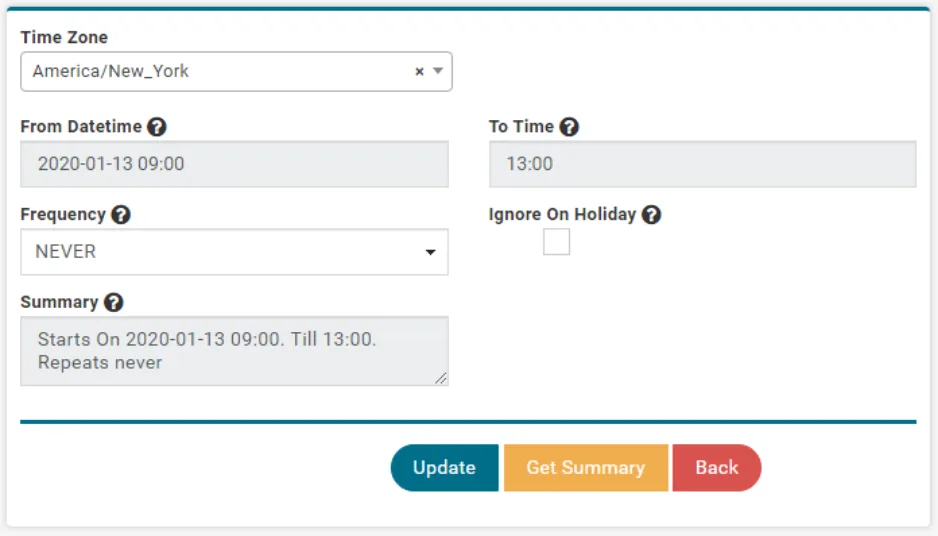
Never repeat schedules can be used for single
day events that don’t need to be repeated.
When Never is chosen as the frequency no
additional options will be added.
The shown schedule will start at 9AM on
1/1/2020 and will end at 1PM and will never be
repeated.
Daily repeat schedules
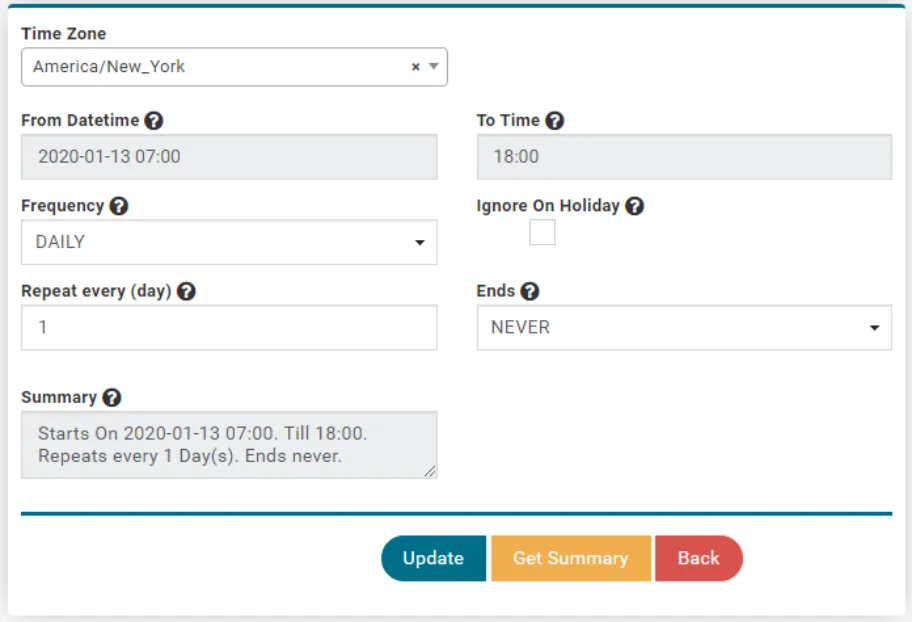
Daily repeat schedules can be used to
repeat on a per day basis.
When daily is selected the additional field of
Repeat every (day) will appear.
This type of schedule can be repeated
every other day or every three days by
changing the frequency to either two or
three days respectively.
In this example, the schedule will repeat
everyday and is active from 7AM until 6PM
and is set to never end.
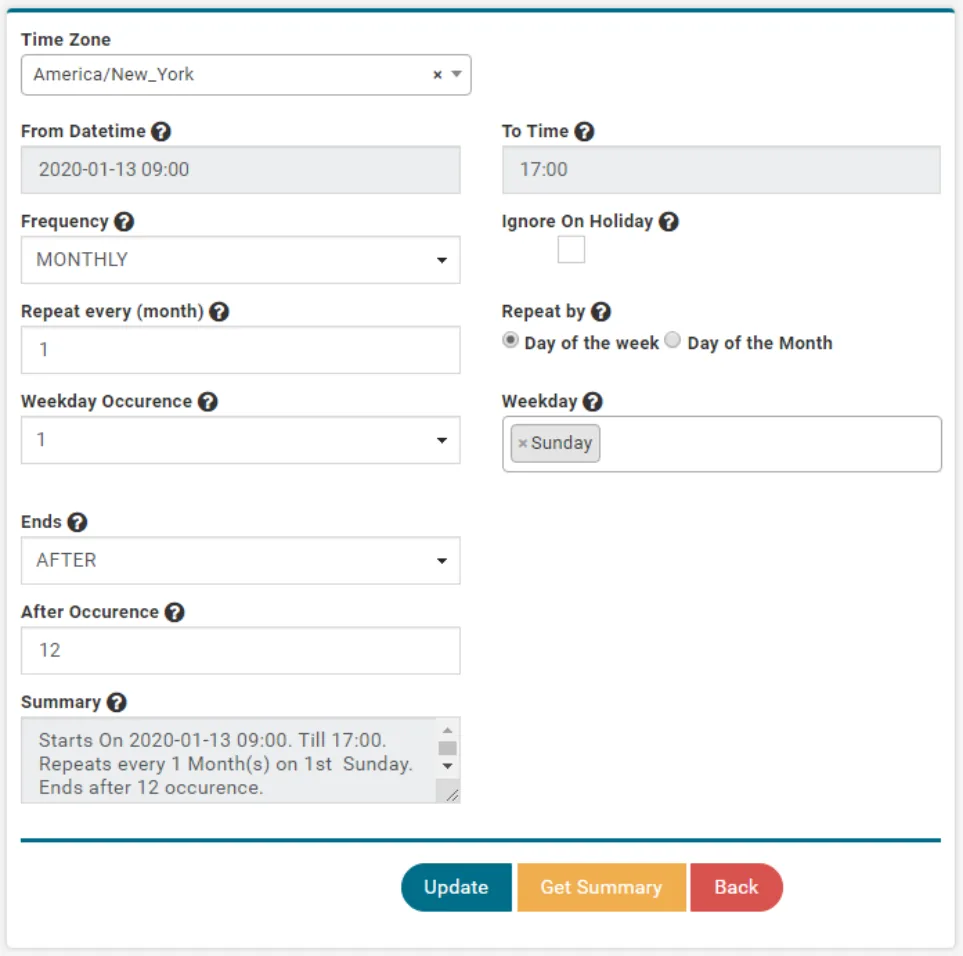
Monthly schedules are able to repeat on a
monthly basis.
When Monthly is selected as the frequency
the additional option of Repeat by will
appear.
Repeat by will have the options of Day of the
week or Day of the Month.
If Day of the week is selected the Weekday
and Weekday Occurrence fields are added.
In the Weekday field the days of the week of
the schedule are chosen.
Weekday Occurrence sets when in the month
the schedule will repeat.
The schedule shown will be active from 9AM
until 5PM on the first Sunday of every month
and will repeat for 12 months.
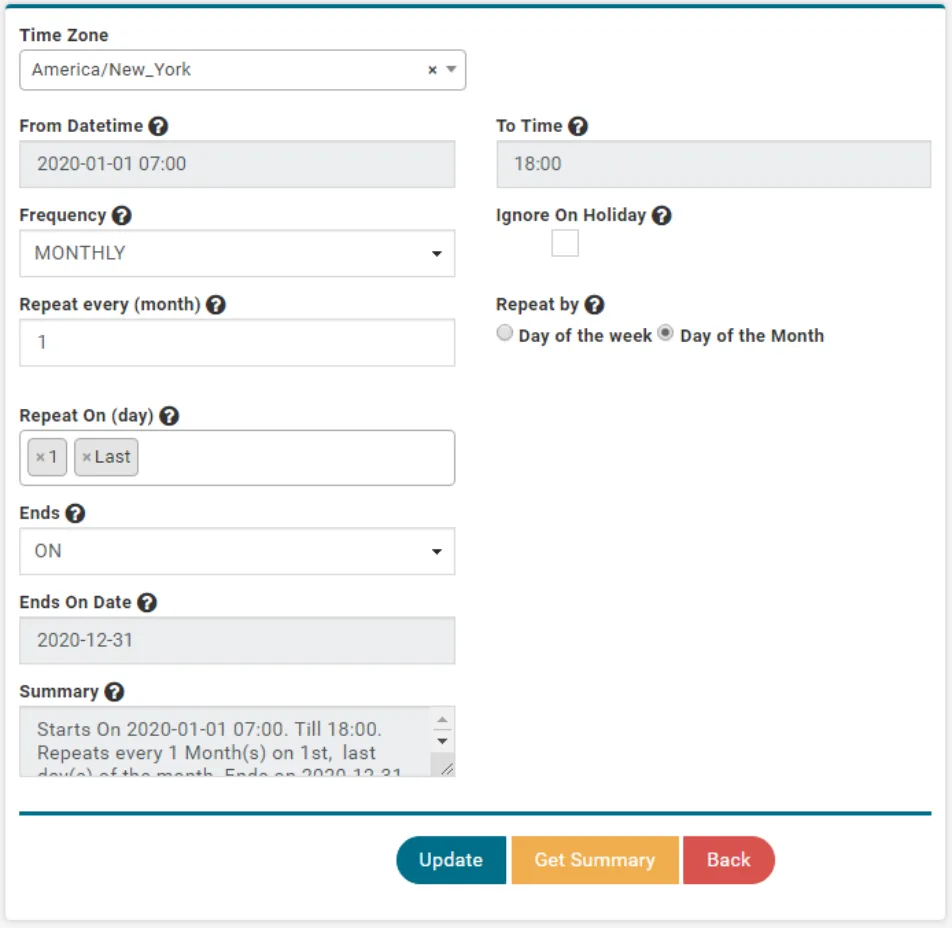
In this example Day of the Month was chosen
in the Repeat by section.
Repeat on (day) allows specific numbered
days of a month to be chosen.
The pictured schedule will play from 7AM
until 6PM, will be active on the first and last
day of the month, and will end on 12/31/20.
Yearly repeat schedules
Yearly schedules allow for a single day to be
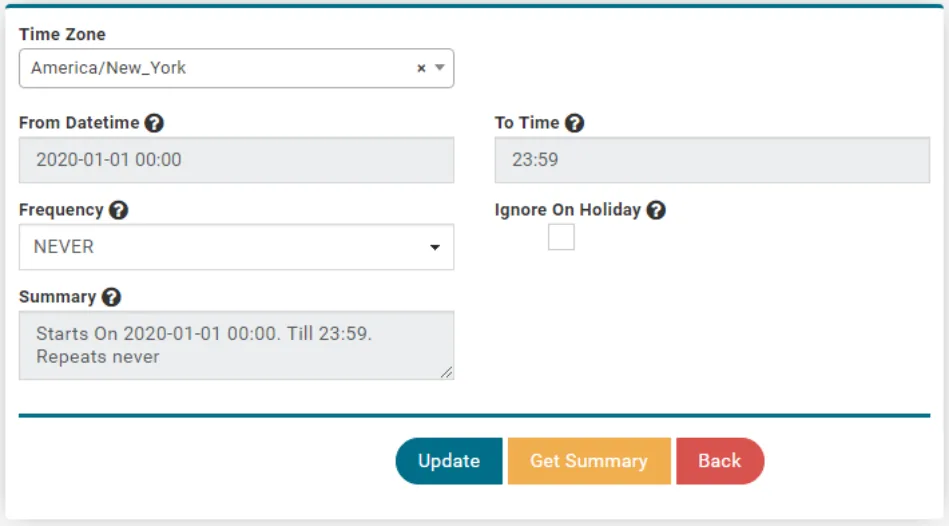
repeated on a yearly basis.
When Yearly is selected as the frequency
the additional options of Repeat every
(year) and Ends are added.
Repeat every (year) will chose how often
the schedule is repeated. If 1 is chosen the
schedule will be repeated every year. If 2 is
chosen the schedule will be repeated every
other year and so forth.
This schedule will start at midnight on 1/1/20
and will end at 11:59PM. It will be repeated
yearly and will never end.
Multiple rules are able to be added for all
schedules.
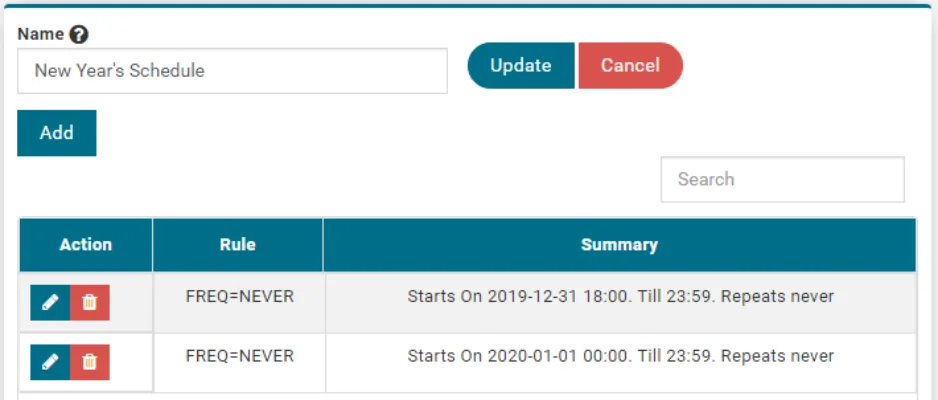
Shown is the yearly schedule with an added
rule for the 31st of December to compliment
the previous yearly schedule.
The second rule is listed at the top of the
rules list.
This schedule is set to start a 6PM on
December 31st and will run until 11:59PM.
The original rule will then be active after
midnight.
Holidays
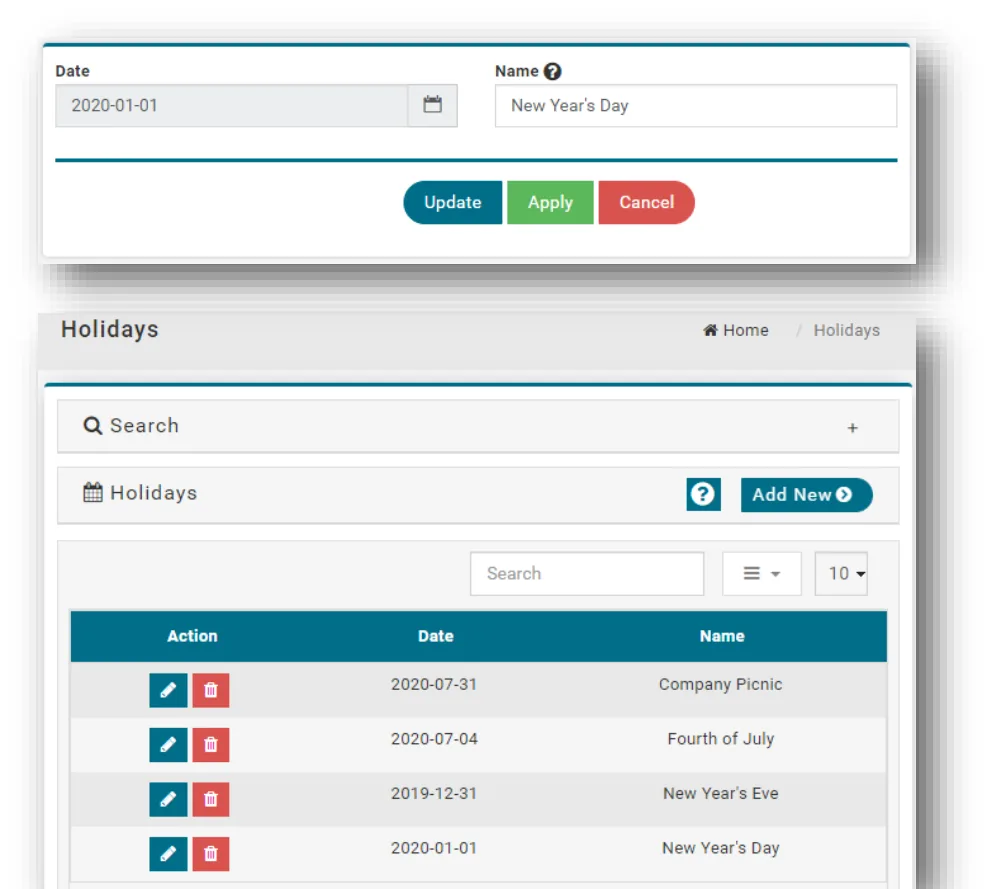
Specific days can be set to be ignored in the
Holidays sub-section.
Use the button to add additional
holidays.
When adding a new holiday there will only be
two sections, Date and Name.
Choose the date by clicking Date field and
the calendar will once again appear. Only
the date is chosen in this section and no times
are chosen.
The Name field is the named by the admin
and can be freely chosen.
Added holidays will populate in the list and will
show the date selected and the name given.
They will appear in order of most recently
added to the list at the top.
Phone groups
Phone groups allow you to easily assign features,
functions, firmware, etc. to your phones based on
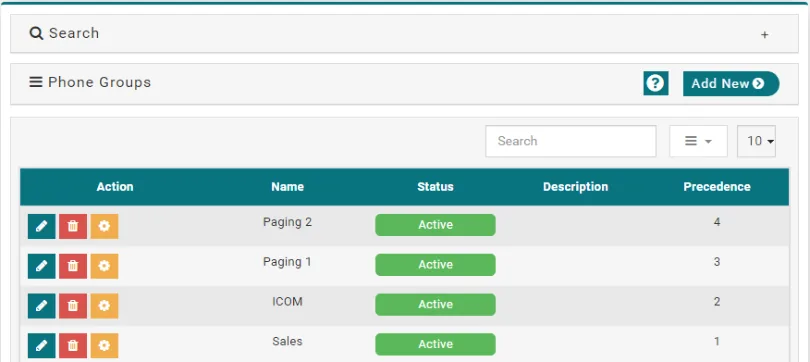
department, locality, company etc.
Use the button to edit the name, description,
precedence, and status of the phone group.
Use the button to delete the phone group.
Use the button to change any settings, features, or
firmware by phone model.
Use the button to add a new phone group.
Creating phone groups
To create a phone group simply fill in the below fields.
Name: The name of the phone group.
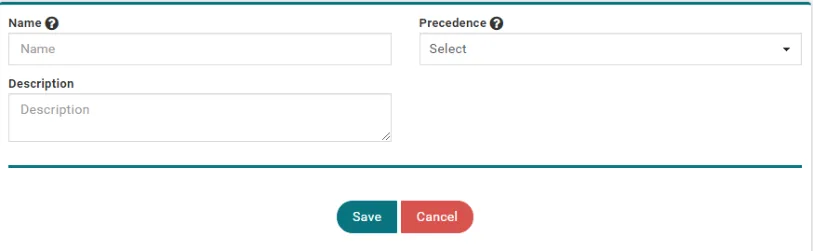
Precedence: The priority this phone group takes over
other existing groups. Phone groups cannot share
priority and require a set priority between 0 and 99, 0
being the highest.* Description: Description of the phone group.
After you have completed the creation of the phone
group you may configure it to your specifications. Use
the button. *Phones may only be assigned to one phone group.
Phones
Here you may configure individual phones for use by
your users (Extensions)
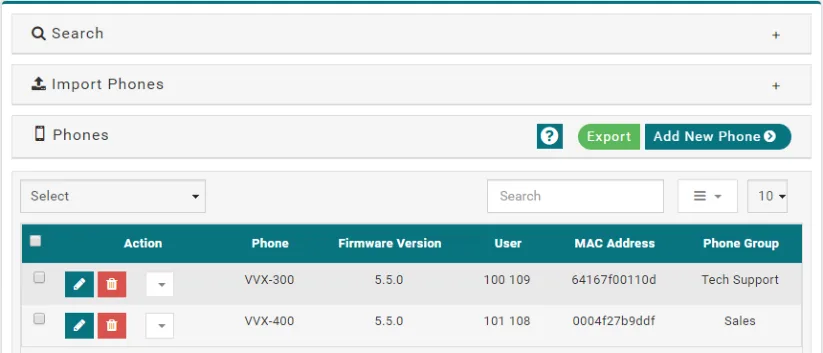
Use the button to edit the phone model, phone
group, and firmware version.
Use the button to delete the phone.
Use the button to access the configuration menu.
Apply Configuration, Reboot Phone, Generate File, and
Schedule Send Profile are all actions you can perform
to the phone.
Use the button to add a phone.
Fig. 1
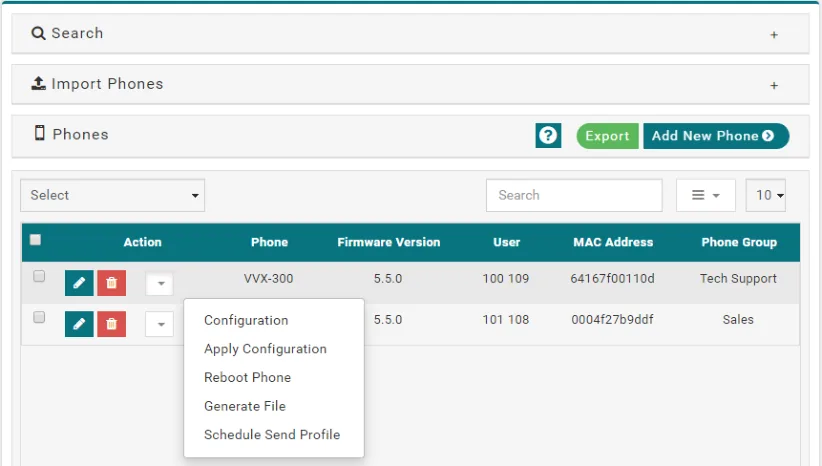
Apply Configuration: Applies the latest generated
configuration file to the phone.
Reboot Phone: Reboots the phone when it is in an idle
state.
Generate File: Takes the most current configuration and
prepares it to be sent to the phone.
Schedule Send Profile: Allows you to build the profile
now and apply it to the phone at the most convenient
time possible.
Fig. 2
Adding phones
To build a new phone to the system fill in the below
fields.
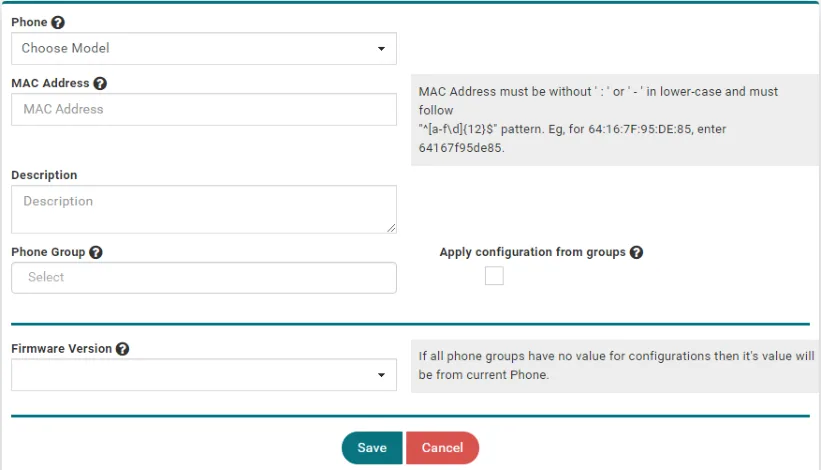
Phone: Choose the applicable phone model you will
be provisioning.
MAC Address: Enter the 12 character MAC address.
Phone Group: Choose the phone group you would like
to build this phone to, if applicable.
Apply Configuration From Groups: Will apply existing
configuration settings from selected phone group.
Firmware Version: Choose an applicable firmware
version. This is based on the phone model. If you are
unsure which to choose, contact our 24/7 helpdesk. (It
is recommended to leave this as is for existing phones)
Audio library
This page displays the collection of sounds available on
your server. This can range from hold music to a simple
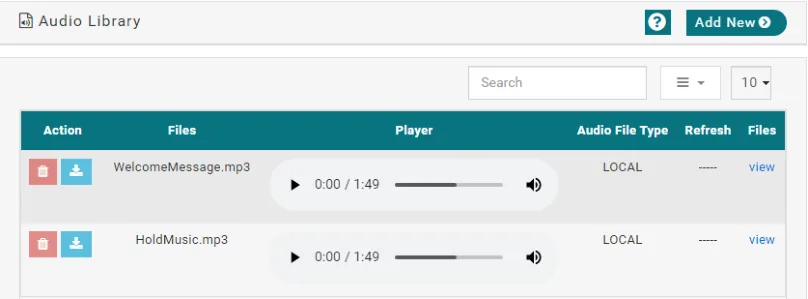
out of office message. Any files here will be presented as
an option anywhere administrative audio files are
selected. This includes Auto Attendant messages, music
on hold and queue messages.
Use the button to delete the audio file.
Use the  button to download the audio file to your PC.
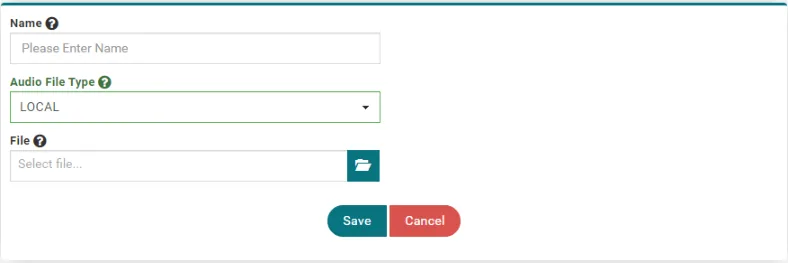
To upload a new audio file use the button.
The Player allows you to play the audio file straight from
the portal without the need to download it.
When uploading a new file fill in the below fields.
Name: Name of the audio file.
Audio File Type: Specifies whether it is being uploaded
from your local machine or a remote URL.
File/URL: The location of the audio file to be uploaded.
Audio phrase
This page allows you to store and organize your audio
phrases. An audio phrase is a combination of existing
audio files to create a unique audio file. This can be
particularly useful when you want to insert a break-in
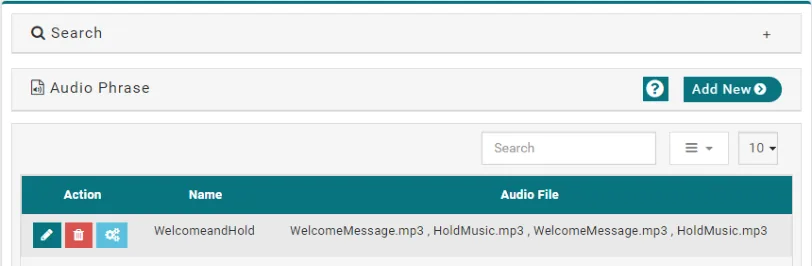
message during a hold music loop.
Use the button to edit the name of a phrase.
Use the button to delete a phrase.
Use the button to configure which audio files will be
played in a phrase.
Use the button to create a new phrase.
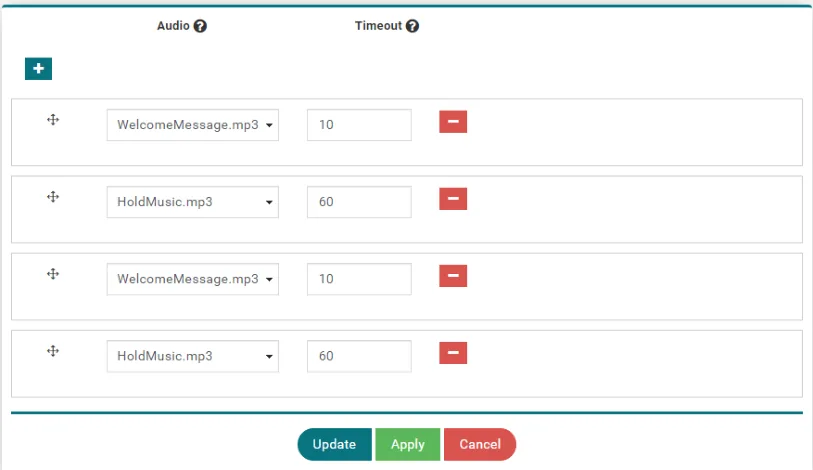
After naming the new phrase enter the configuration
menu.
Use the button to add an audio file.
Use the button to remove an audio file.
Audio: An existing audio file on the server.
Timeout: Set the amount of time you’d like the audio to
play. If you’d like the entire file to play leave this field
blank.
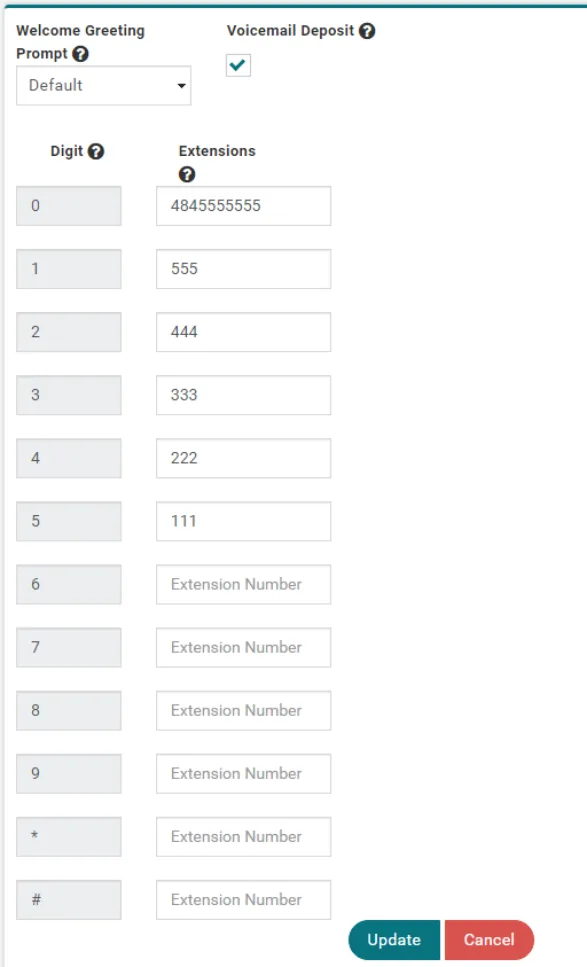
Personal Auto Attendants replace the audio of a
voicemail box.
Welcome Greeting Prompt: Allows the user to
choose what audio will play when a call is missed.
Audio files will be stored in the user’s audio library.
Voicemail Deposit: If checked, the caller will be
directed to the user’s voicemail box for invalid
button presses or on timeout.
Digit: The digit a caller will press to be transferred to
the associated extension.
Extension: The destination the call will be transferred
to. Either a user’s extension or a ten digit phone
number can be entered into these fields.
Use the  button to save any changes.
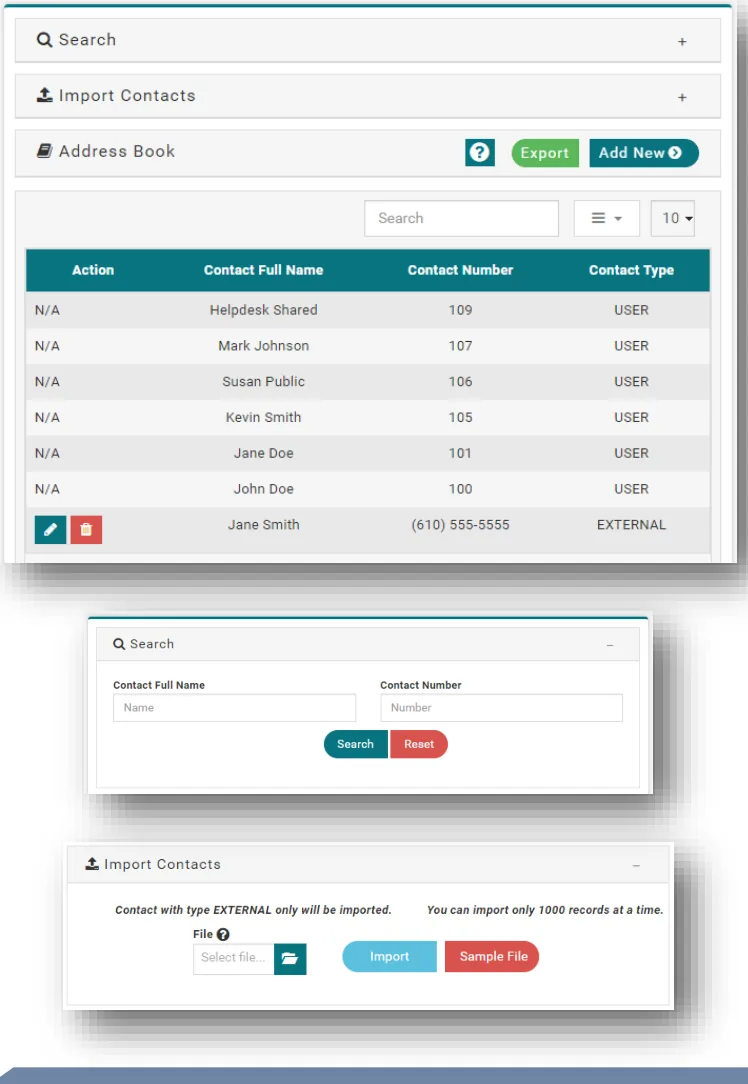
The address book at the admin level allows for contacts
to be added for all users. All users on the tenant will be
automatically populated into the address book. Ten
digit phone numbers are able to be added to the
address book and they will appear in all users’ contact
lists. Contacts in the address book will be listed and
show if the contact is a user on the tenant or an
external number.
Use the button to add additional contacts.
Additional contacts will be added to the bottom of the
list. Use the button to edit added external numbers.
Use the button to delete external contacts. Users
need to be edited on their user page.
Search: The search bar at the top is a drop down that
has fields Contact Full Name and Contact Number as
shown in the second picture. Enter in either the
contacts name or number and use the  button filter
the results.
Import Contacts: Additional external contacts can be
added en masse from a CSV file. Use the  button
to download a sample CSV file showing the proper
format. Use the  button to browse files to be added.
Use the  button to import the file once chosen.
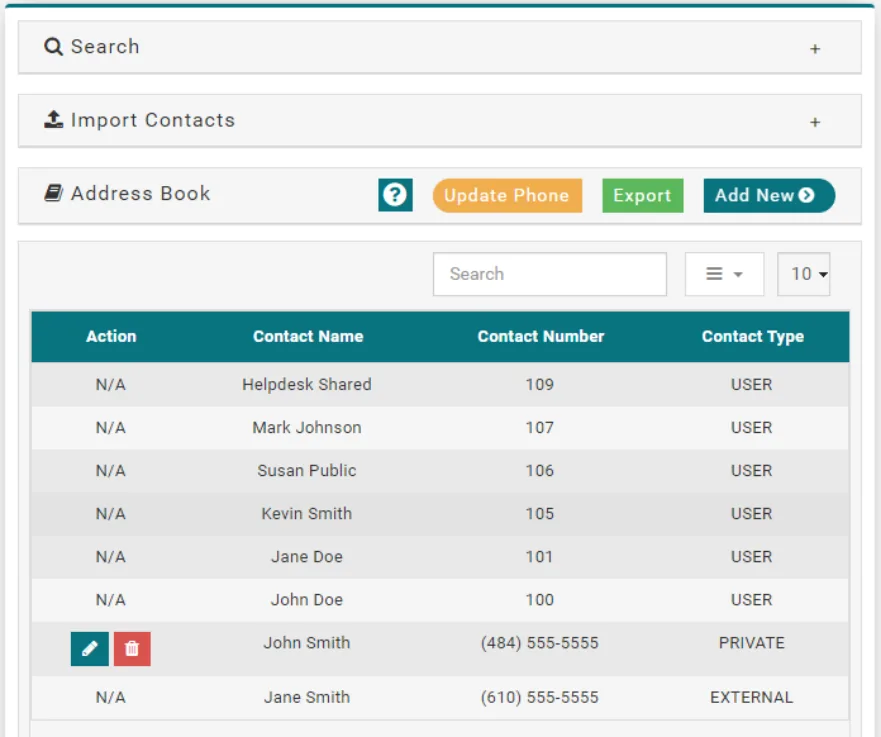
Users’ address books are almost identical to the
admin address book. They will have the same
Search and Import Contacts section as the
admin. The users on the tenant will populate
automatically into the user address book.
Added external numbers from the admin address
book will be listed and will not be editable. A user
can use the button to add additional
contacts to their address book. The contact
type will be listed as “Private.” Use the button
to edit the contact. Use the button to delete
contacts. The address book on the physical
phone will not be updated until it has received
the update. Use the  button to update
the contact list.
Call detail records (CDR)
The CDR log page allows you to see, in high detail,
every call that is made to or out of your phone system.
The search function allows you to search using the
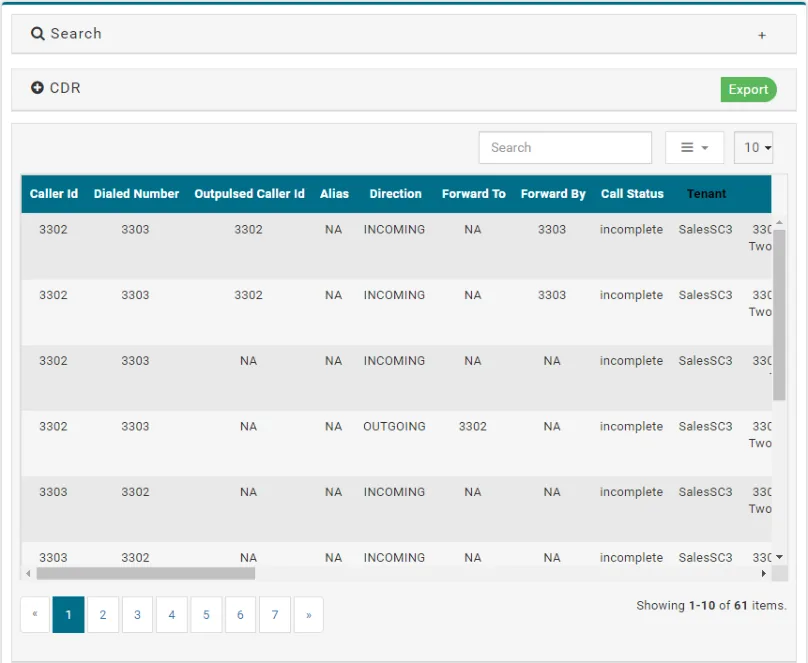
below parameters.
Caller ID: The True Caller ID.
Dialed Number: The numbered dialed by the caller,
whether inbound or outbound.
Outpulsed Caller ID: The Caller ID seen by the receiving
party.
Direction: Specify Inbound or Outbound calling.
Forward By: Specify if this was forwarded by a specific
user or service.
Call Status: Specify whether it was a failed,
abandoned, or successful call.
User: Specify the user involved.
Date and Time Ranges: The date and time the call may
have occurred.
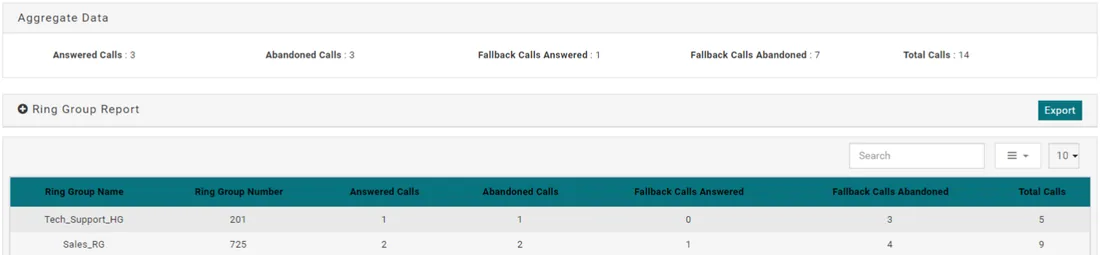
The Ring Group Report allows you to see which ring groups were active during the reporting period. Here
you can track a few metrics to gain a better understanding of how calls are being handled when routed
to the reported ring groups.
Ring Group Name: The name of the reported ring group. Ring Group Number: The extension of the reported ring group. Answered Calls: The amount of calls answered by a ring group participant. Abandoned Calls: The amount of calls unanswered by either a participant or fallback destination. Fallback Calls Answered: The amount of calls that rang through the ring group and were transferred to the fallback destination and answered. Fallback Calls Abandoned: The amount of calls that rang through the ring group and were transferred to the fallback destination and unanswered Total Calls: The amount of calls routed to the reported ring group.
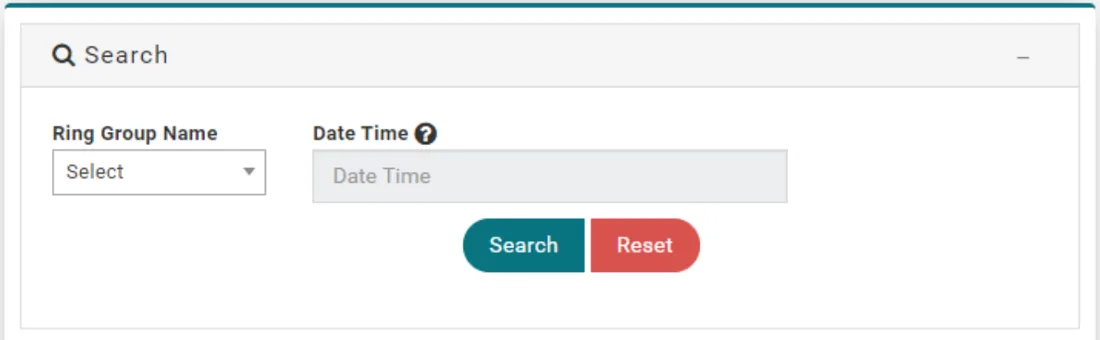
To search for specific metrics you can utilize the search function located in the Ring Group Report section.
Ring Group Name A drop down that allows you to select the name of the ring group.
Date Time You can choose a date/time interval as far back as you wish.
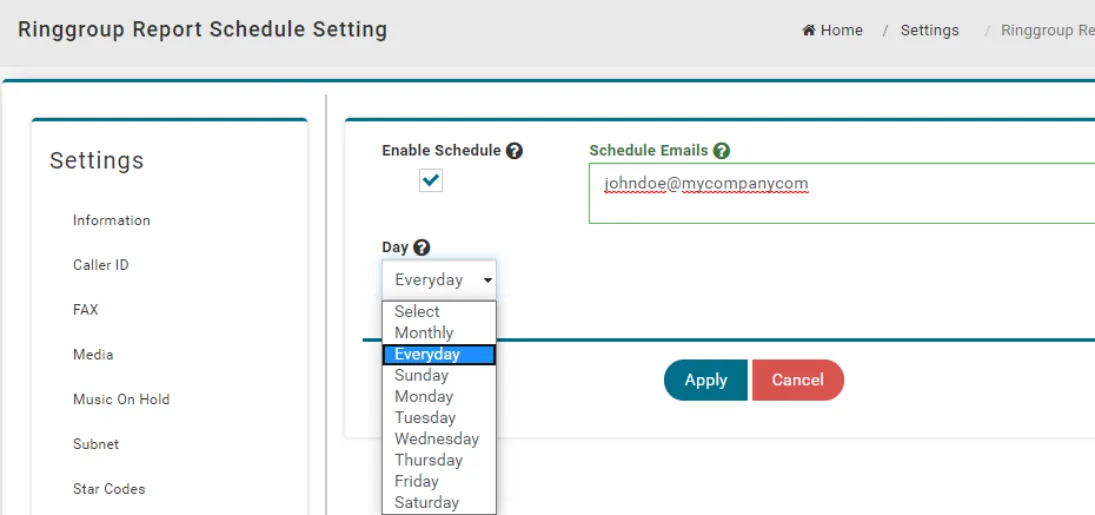
While you are able to pull reports and export them manually. You can also setup an automatic email that
contains a daily, weekly, or monthly report.
To navigate to this page simply click the  button on the lower left hand corner of the page and
scroll to the Ringgroup Report Scheduling tab.
In here you can enable the schedule, choose its frequency, and enter the email addresses you wish the
reporting to be sent to (Maximum of 5).
Reports are sent 6:00 AM EST on the selected frequency.
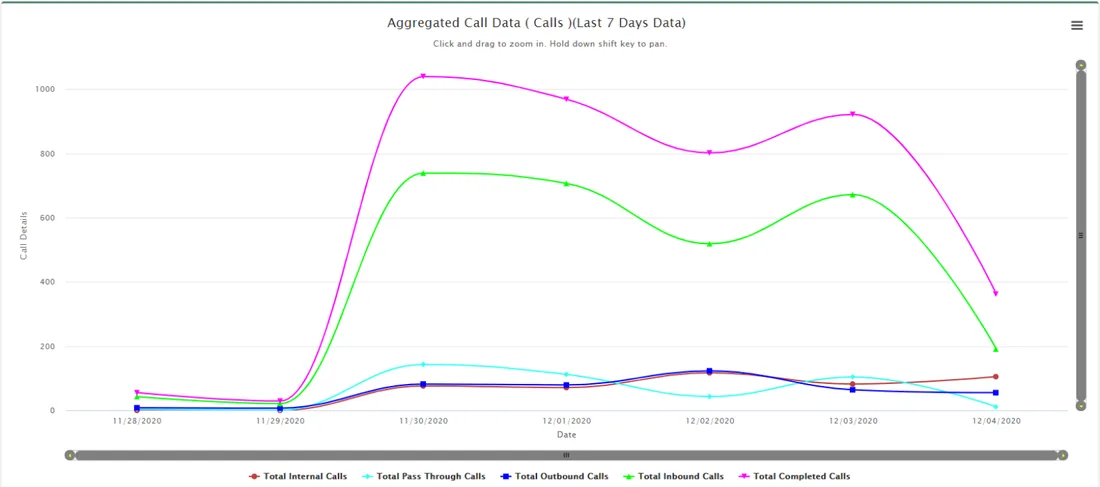
Aggregated Call Data can be chosen under the Dashboard section in the sidebar to see total calls and
minutes from the last seven days.
The Y-axis will show the total number of calls and the X-axis shows the date from within the last seven days.
The different totals can be removed from the graph by clicking the symbols (E.g. )
underneath the graph.
Use the  button to view the graph in full screen, print the chart, or download the graph as a PNG, JPEG, PDF,
or SVG file.
The graph can be zoomed in on by left clicking and dragging across where you would like to see.
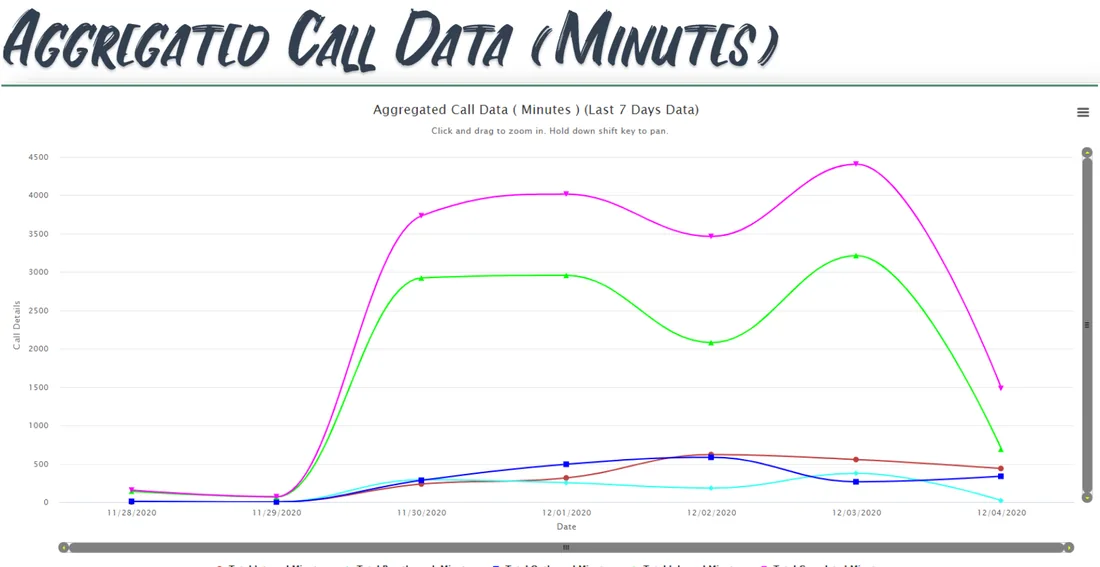
The aggregated minutes is listed just below the total calls graph.
In this example and have been removed by clicking on them
and they are now grayed out.
The  button will have the same options for the minutes graph as the calls graph.

Tech support
Email:
Phone:
HQ:
4000 North Cannon Ave 888.575.4754 helpdesk@netcarrier.com
Lansdale, PA 19446
Still stuck?
Our U.S.-based support team answers 24/7/365.