
Videos and tutorials / nCloud Connect
nCloud Connect user portal guide
How to use the nCloud Connect user portal: your dashboard, profile and password, speed dials, call forwarding, voicemail, audio library, conferencing and personal auto attendants.
Login
This section will quickly cover the login process as a Connect User.
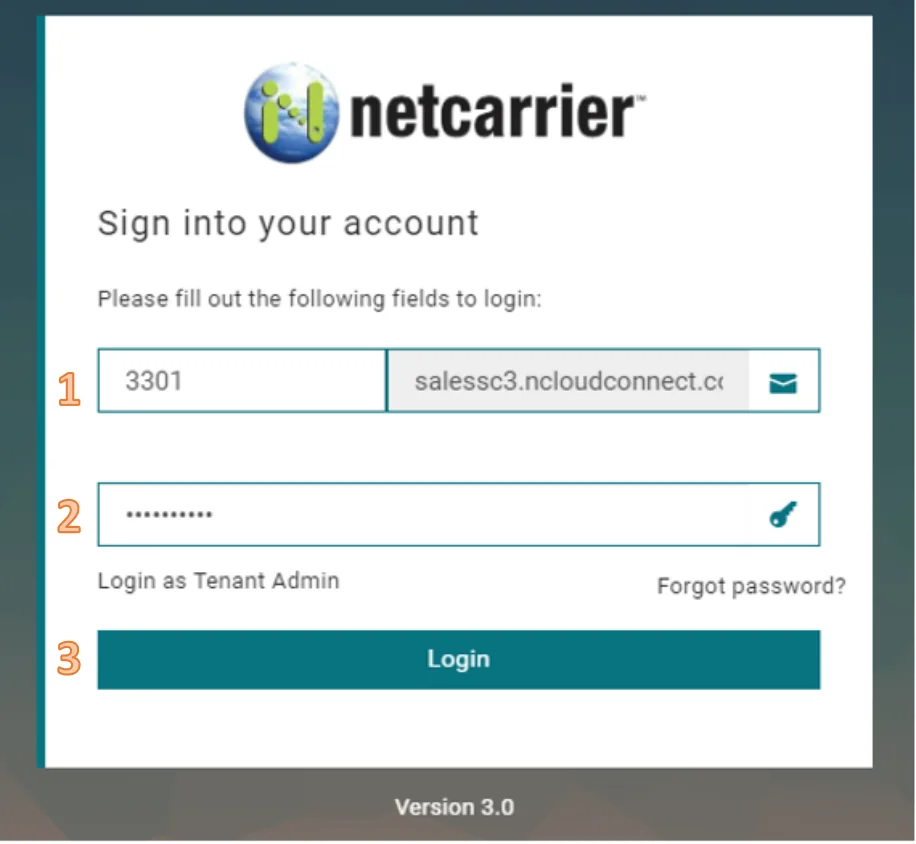
- Enter your extension
- Enter your password
- Click Login
Dashboard
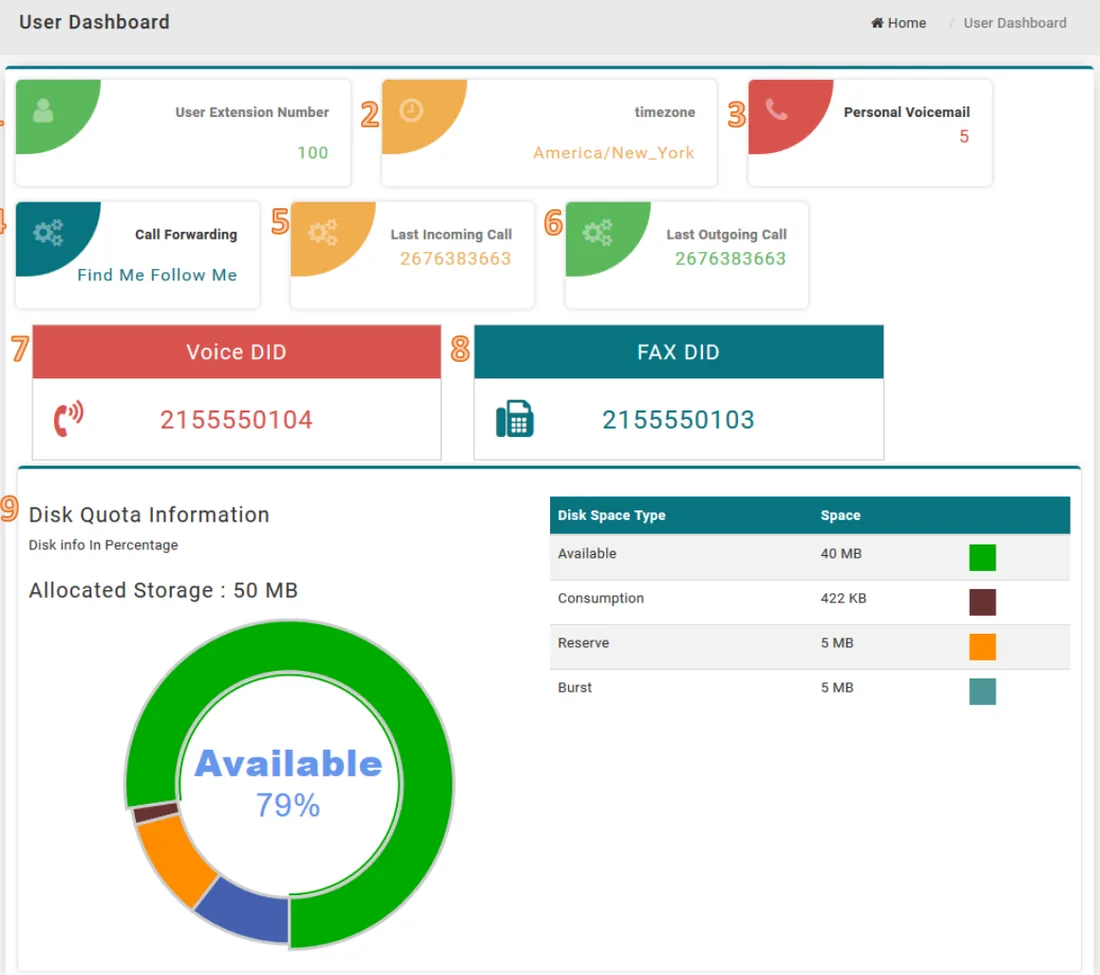
After logging into the User Portal the user’s extension information will display
- Extension number
- User’s time zone
- User’s voicemails
- Call forward service set up
- Last incoming call
- Last outgoing call
- Direct number (if applicable)
- Fax number (if applicable)
- Disk quota
Shrinking the side bar
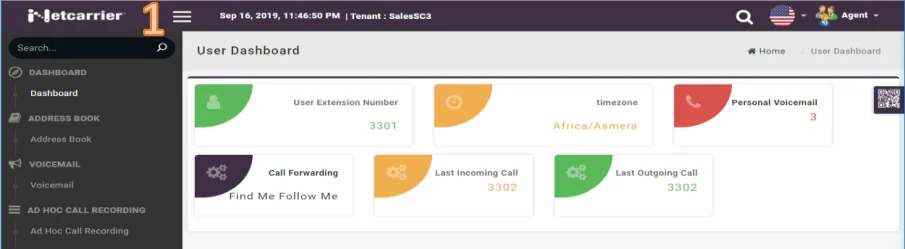
- Click the collapsed menu button at the top left of the screen. This will minimize the side bar menu as shown in the screen shot below
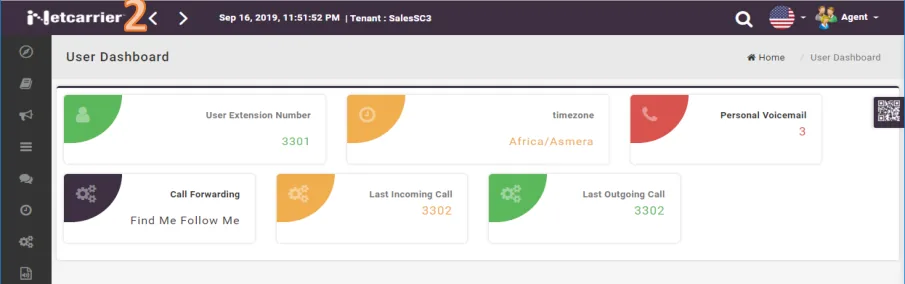
- After the sidebar has been collapsed, the collapsed menu button will be replaced with the “<” and “>” buttons. Pressing the “<” button will collapsed the side bar menu further as shown in the screen shot below. Pressing the “>” button will expand the sidebar menu back to its original size as shown above
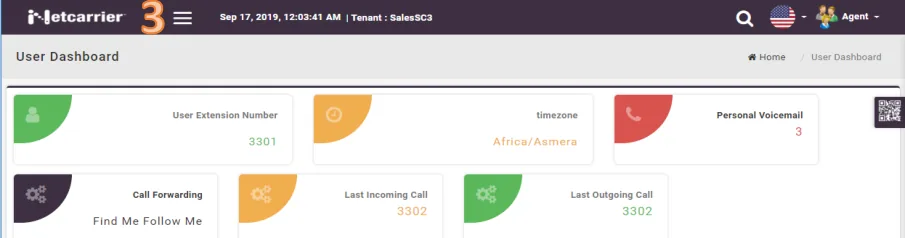
- If the sidebar menu has been completely collapsed, the collapsed menu button will return. Clicking this button will restore the sidebar menu to its original full size as shown in the first screenshot
Profile
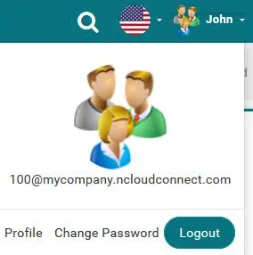
After clicking the on the user’s name in the top right
corner the dropdown on the right will appear. Here
users can update their profile information and their
password.
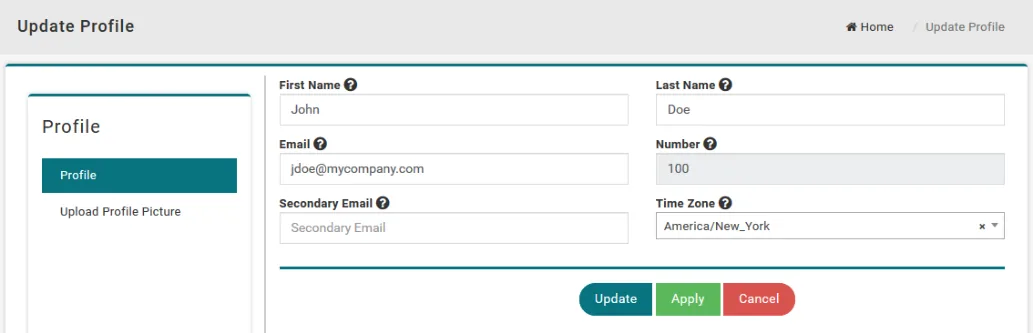
If the user picks profile from the drop they will be taken to the above
screen. Here users can update their name, email addresses, and
time zone. Extension numbers are not editable.
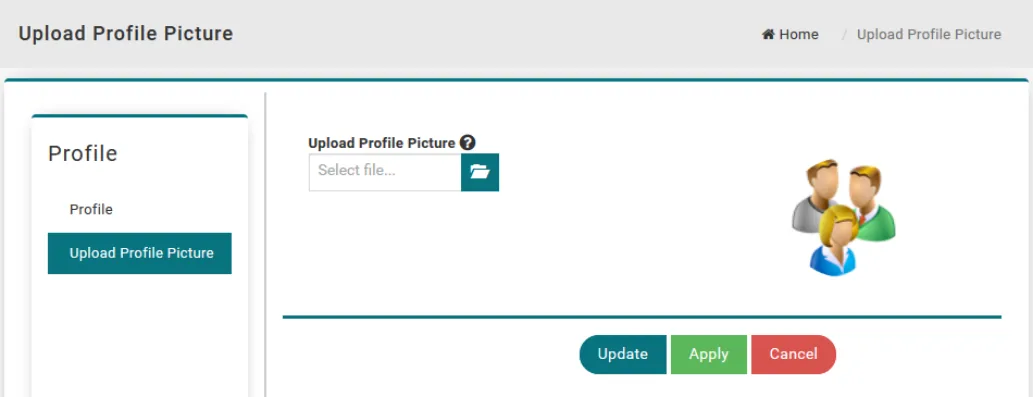
Users are able to upload a profile picture by choosing the Upload
Profile Picture on the left. They will be able to browse through their
local folders and choose a picture.
Password change
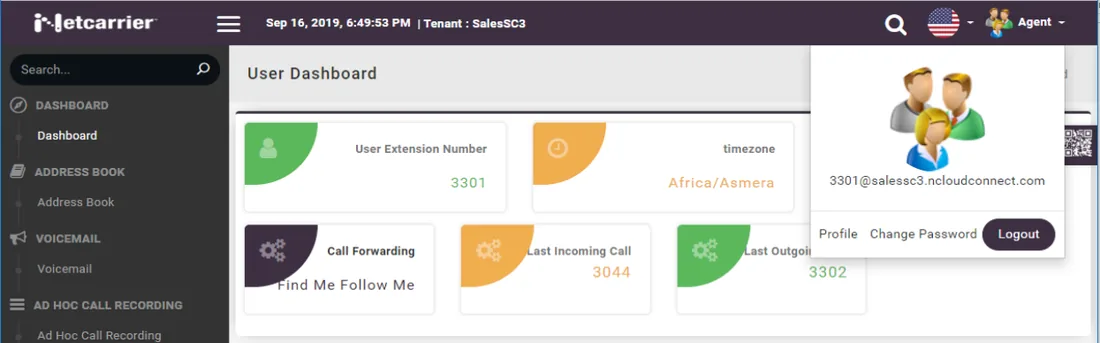
- From the User Dashboard, click the dropdown arrow next to the user name (Agent in this example)
- A menu will drop down below. In this menu, click the Change Password button
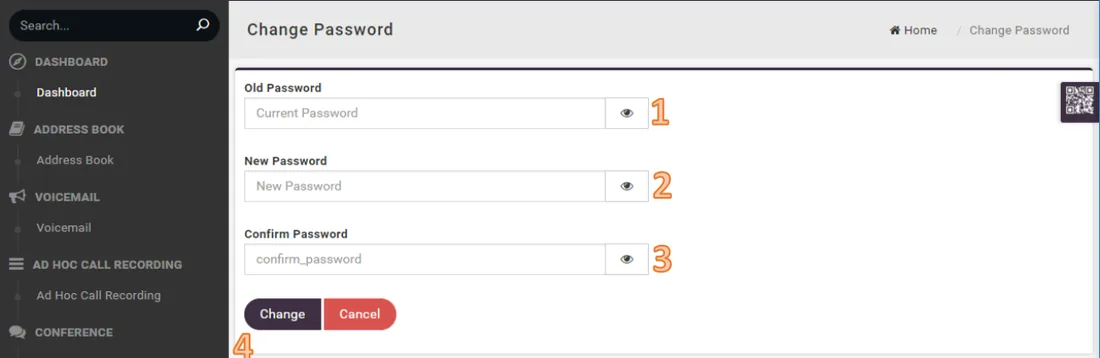
- Input the current password in this field
- Input the new password in this field
- Confirm the new password in this field
- Click the Change button to save the new password. This will bring you back to the Dashboard *Clicking the picture of the eye next to each row will show the actual characters you
are entering. Otherwise, they will only show as dots*
Speed dials
This section will cover adding speed dials to your phone whether they are internal
extensions or external phone numbers.
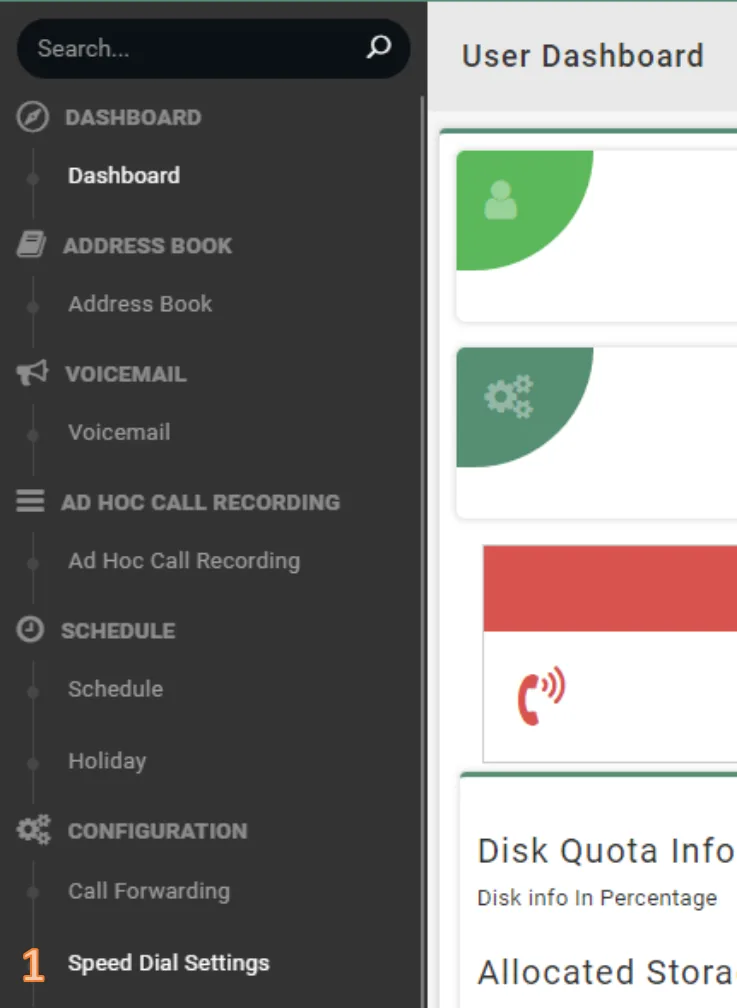
- Click Speed Dial Settings
Configuring speed dials
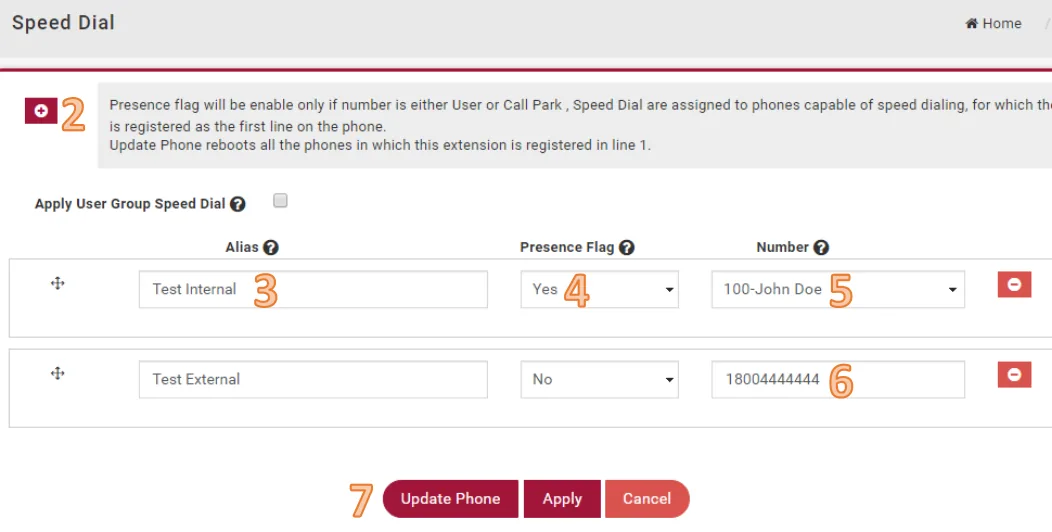
- To add a speed dial click the button
- Specify the name for the speed dial
- Select whether or not you would like presence enabled for this speed dial
a. Presence is a feature that allows you to see the activity of another
user’s extension (e.g. On a call, Receiving a call, Making a call)
b. This feature is only available for extensions. This cannot be used for
external phone numbers
- If this is an internal extension and presence is enabled, select the desired
extension via the drop down
- If the speed dial is an external phone number or an extension without
presence, enter the number in the text box
- Click Update Phone
- You should notice a notification on the top right of your window indicating
the speed dial(s) have been applied to the phone

Call forwarding
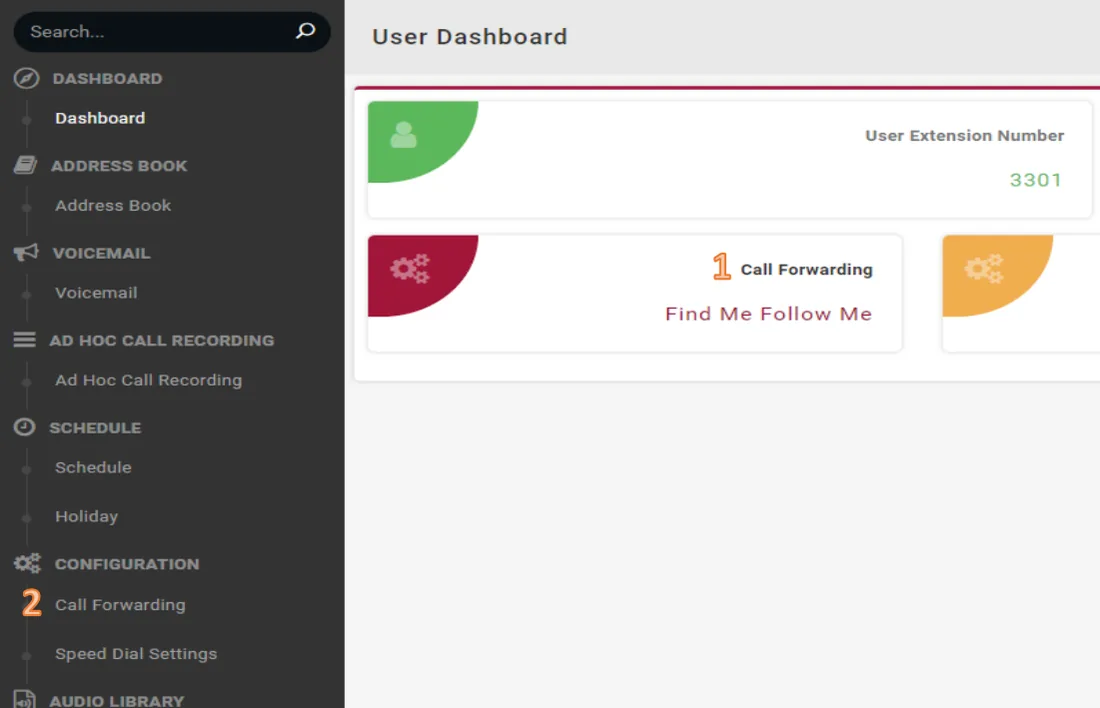
Call Forwarding can be accessed by either:
- Clicking on the Call Forwarding link on the User Dashboard
- Clicking the Call Forwarding link on the sidebar
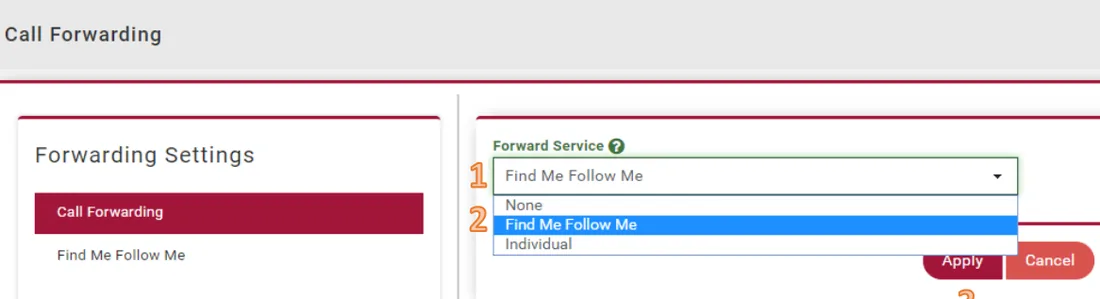
- Click the drop down under Forward Service
- Ensure that Find Me Follow Me is selected
- Hit the Apply button
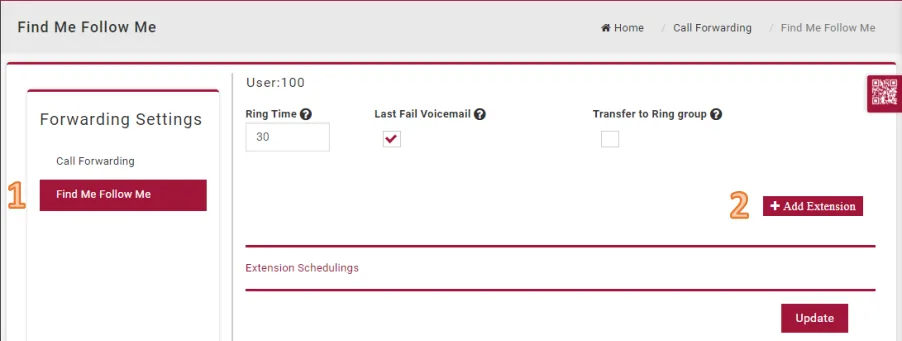
- Click Find me Follow Me on the left hand side to bring up the forwarding menu
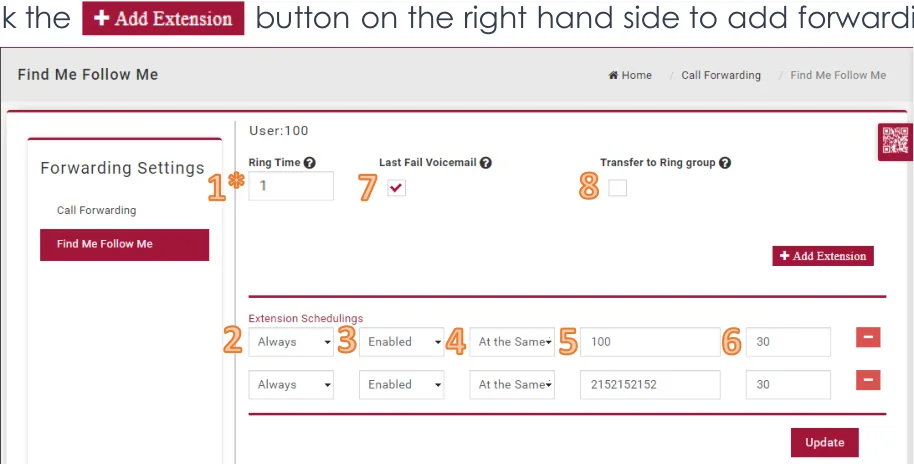
- This is the number of seconds for which the user’s phone will ring before the first
call forward (set this timer to 1 if you would like the call to immediately forward)
- This can be set to either a user defined schedule (Workweek in this example) or
Always
- This can be either Enabled or Disabled and determines if the forward is active or
not
- This can be either At the Same Time or If No Response. If No Response will move
to the next active forward once the previous ring timer expires
- Note: If you wish to create an “At the Same Time” forward then the first line must be your
office extension, followed by all numbers you wish to ring with the phone.
- This is the user extension or 10 digit DID that will be called
- This is the number of seconds that the extension or DID will be called for
*If you would like the call to come back to your voicemail on the nCloud Connect platform,
set the forwarding ring timer to less than 18 seconds and check the last fail voicemail box in
step 7.
- If the call is not picked up, this sends the caller to the user’s voicemail
- This allows the call to be transferred to a Ring Group instead of an individual user
or 10 digit DID
*The total ring time between the initial ring and all active forwards cannot be longer than 60 seconds.
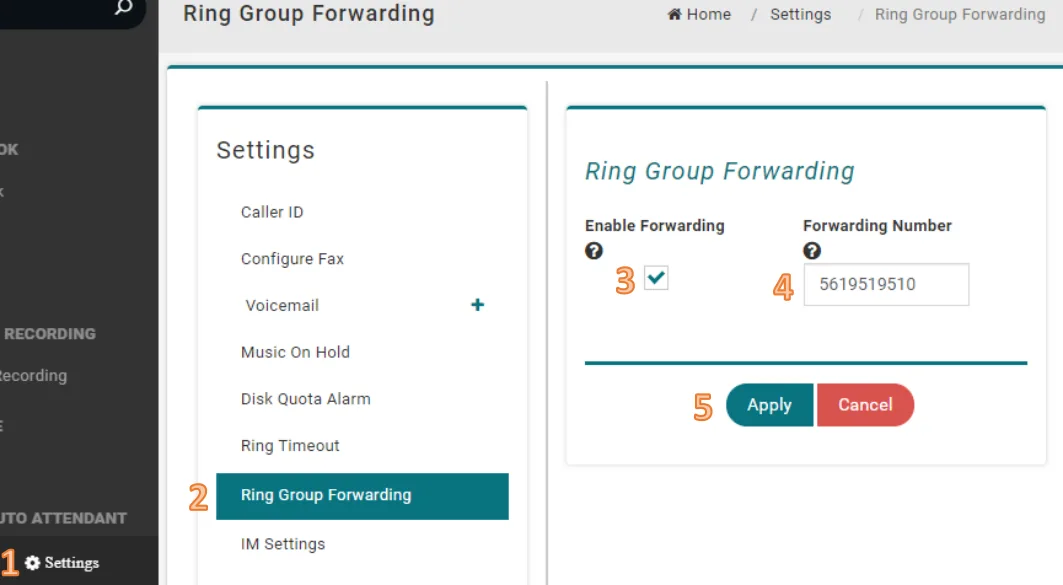
If you are a participant within a ring group, you have the ability to forward calls from that ring group to an outbound destination. this can be a 10 digit phone number or a toll free number. to do so follow the below steps: 1. click 2. click ‘ring group forwarding’ 3. enable and disable forwarding with the check box 4. enter the forward destination 5. click this forward setting runs parallel to your extension forward settings, meaning both are able to be active simultaneously without interfering with each other
Voicemail
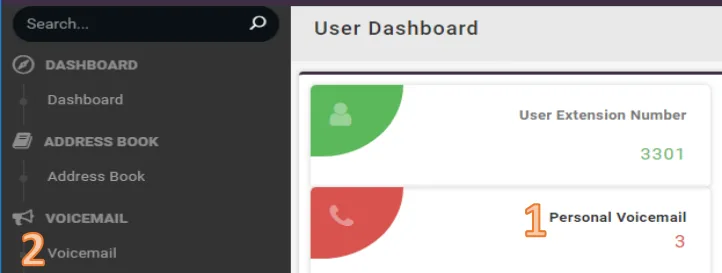
The voicemail box can be accessed in one of two ways:
- Click the Personal Voicemail link on the user Dashboard. The number
underneath reflects the combined total number of voicemails in the inbox,
saved and trash folders
- Click the Voicemail link on the sidebar
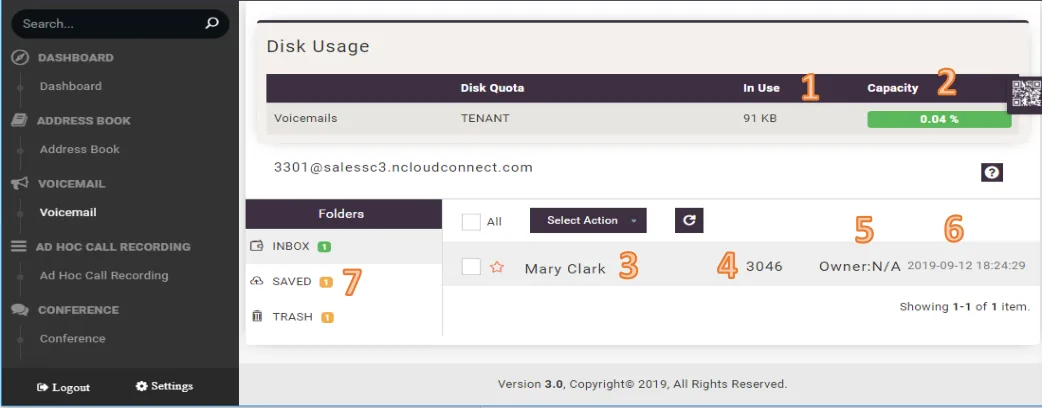
Folder is the Inbox
- This is the total amount of space currently utilized by this user’s voicemails
- This is the same as above but represented as a percentage of total use instead
of a specific amount
- This is the name of the person that left the voicemail
- This is the number of the person that left the voicemail. This can either be an
extension number or 10 digit DID. If the caller has blocked their number this may
say “unknown” or “anonymous”
- If a voicemail was forwarded by another user, that user’s name will be reflected
here
- This is the time and date that the voicemail was received
- Clicking on Inbox, Saved or Trash will move you into the respective folder
- Clicking the checkbox next to a voicemail will allow you to then perform a
number of actions depending on whether you are in the Inbox, Saved or Trash
folder
- While in the Inbox, clicking the Select Action button will lower the drop down
menu and allow you to select one the two options:
Save This will move the selected voicemail(s) into the Saved folder. (Clicking the .  button next to the checkbox will automatically move that voicemail to the saved folder Trash – This will move the selected voicemail(s) to the Trash folder
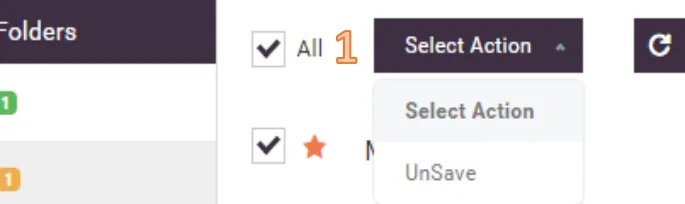
- From within the Saved folder, the Select Action dropdown presents the
following option:
UnSave This will move the voicemail from the Saved folder back to the Inbox
folder (Clicking the  button from within this folder will automatically move that
voicemail back to the Inbox folder
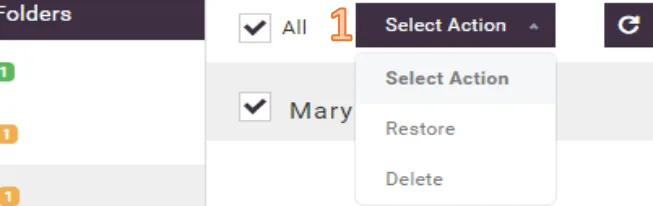
- From within the Trash folder, clicking the Select Action button will present the
following options:
Restore This will move the selected voicemail(s) from the Trash folder to the
Inbox folder Delete – This will permanently delete any selected voicemail(s). These voicemails
are unable to be recovered after deletion.
Extra information
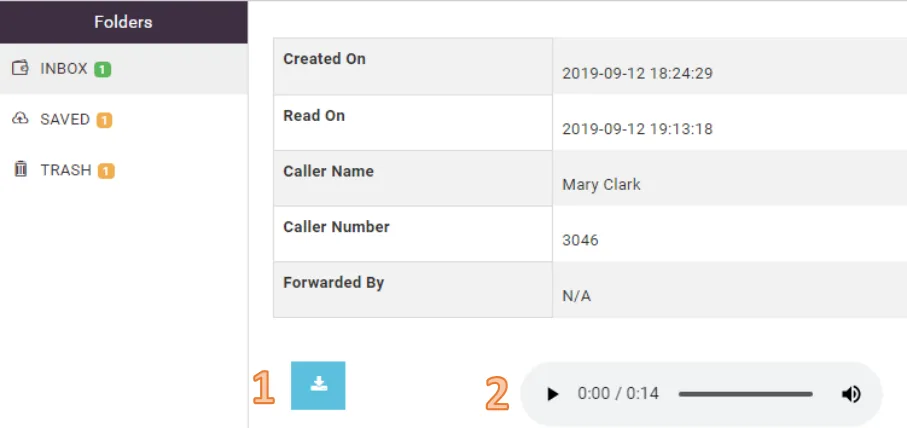
Clicking a voicemail from any folder will bring you to the above screen. From here
you can do the following:
- 1. Download the voicemail locally to our computer by clicking
- Listen to the selected voicemail by clicking
Voicemail to email settings
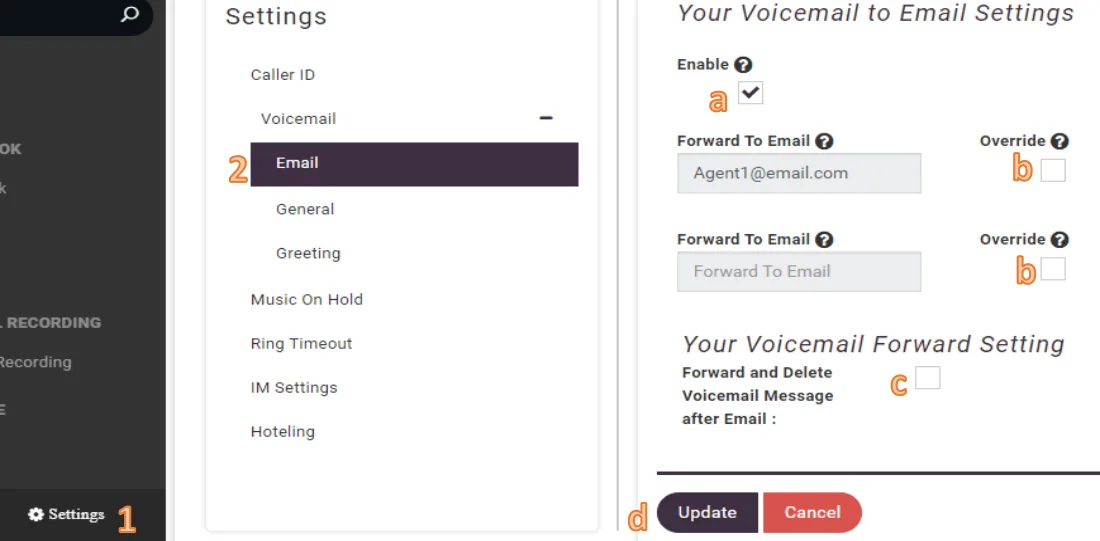
- Clicking the Settings button will open an additional menu that allows more
voicemail related settings to be configured and adjusted
- Clicking the Voicemail option and then selecting the Email submenu underneath
presents the following options.
a. Checking this will enable voicemail, unchecking this will disable voicemail
b. Checking the Override button will allow a user to edit the email address in
this field. This is the email address to which voicemails will be sent. If left
blank, voicemails will not be sent an email address
c. Checking this will forward voicemails to the above email address(es) without
saving copy of the voicemail in the user portal
d. Clicking the Update button will apply any changes that were made in this
menu
General voicemail settings
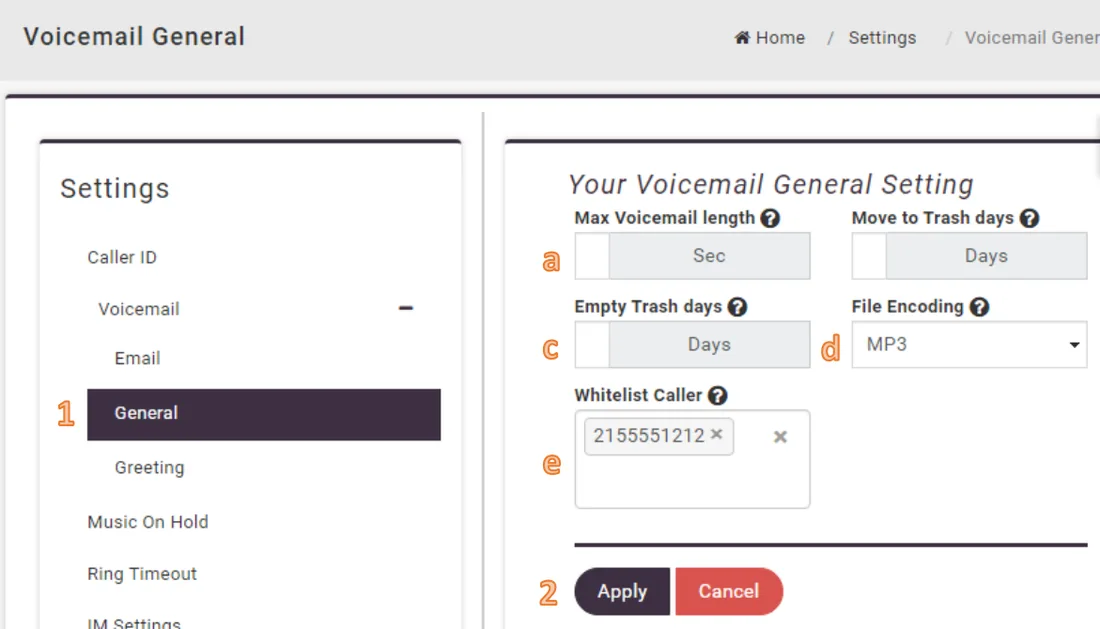
- Clicking the General submenu presents the following options:
a. This is the maximum allowable length, in seconds, that a voicemail can be.
This can be adjusted to varying amounts but 300 seconds (5 minutes) is
generally more than adequate for most people’s needs. Additionally,
setting this to high has the potential to quickly overload the allotted space
if callers are leaving excessively long voicemails frequently
b. This is the number of days before voicemails are automatically moved from
the Inbox to the Trash folder. Though the default is 30 days, we generally
recommend setting this to 7 days if voicemail-to-email is configured
c. This is the number of days before voicemails in the Trash folder are
permanently deleted. Though 30 days is the default, we generally
recommend users set this to 3 days if voicemail-to-email is configured
d. This allows users to choose the default file format of voicemails that are
sent to email. We generally recommend this remain as MP3
e. If the user is set to not require a voicemail PIN, this allows additional phones
to check the user’s voicemail without a PIN, based on the caller ID
number. For instance, a user’s cell phone number. The setting to require a
voicemail PIN can be enabled or disabled by the adminstrator
- Clicking Apply will save any changes made in this menu
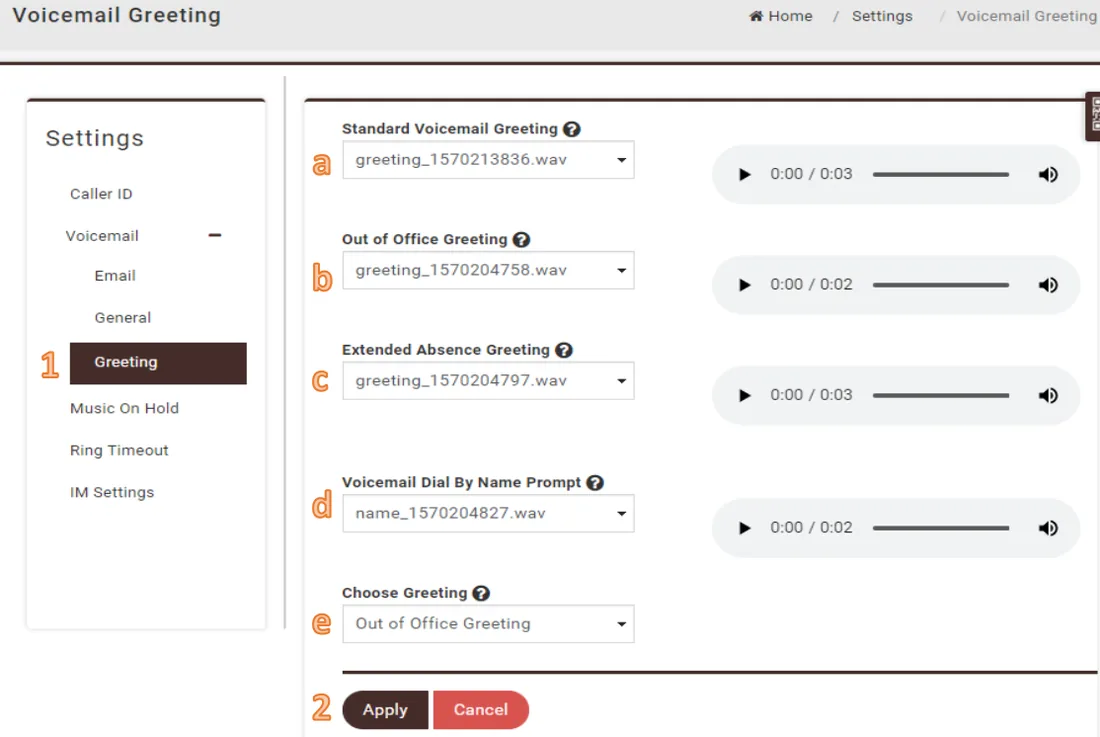
- Clicking the Greeting submenu presents the following options:
a. Standard Voicemail Greeting
b. Out of Office Greeting
c. Extended Absence Greeting
d. Voicemail Dial By Name Prompt
i. Clicking any of the above options opens a dropdown menu
consisting of all available audio files. This allows a user to
select any audio file as appropriate. Each file can be
played on-the-fly by clicking the triangle button  to the
right of the selection
e. Choose Greeting
i. Clicking this will allow the user to select which of the three
standard greetings is the active greeting. *Voicemail Dial
By Name is not a standard greeting, so this can not be
selected from this menu
- Clicking the Apply button will save any changes made in the above
submenu
*All user audio files are uploaded and made available via the Audio Library
Audio library
In this section we’ll cover the audio library and its uses for your user profile.
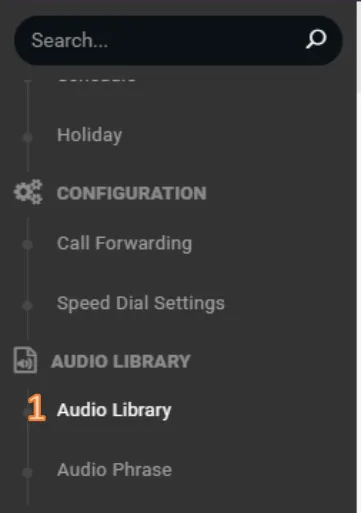
- The Audio Library section can be found in the menu map just under configuration
The first thing you may notice is the Disk Usage section. This is important to keep
an eye on as your admin will have allocated a limited amount of space for your
use.

- This is the space you are currently using
- This is the percentage of the total space used
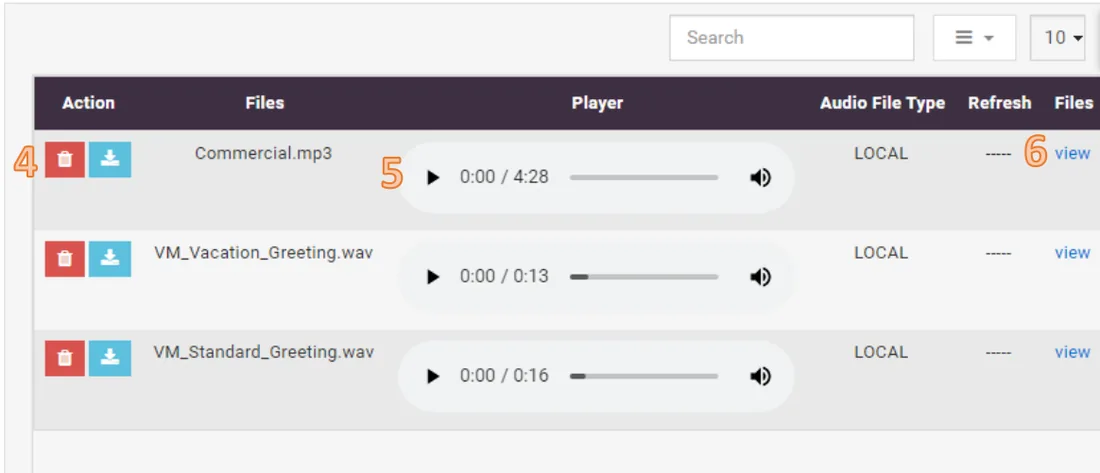
- Here you can delete (red) or download (blue) an audio file
- Here you can play an audio file from your browser
- Here you can see what, within the system, is using the audio file
Audio phrase
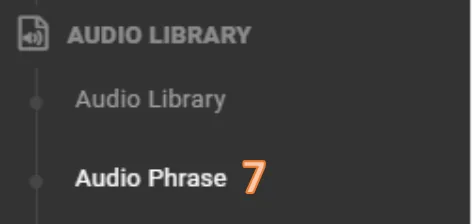
An audio phrase is a combination of audio files that will play in a defined
order (e.g. hold music followed by a “thank you” recording)
- Audio Phrase can be found just under Audio Library
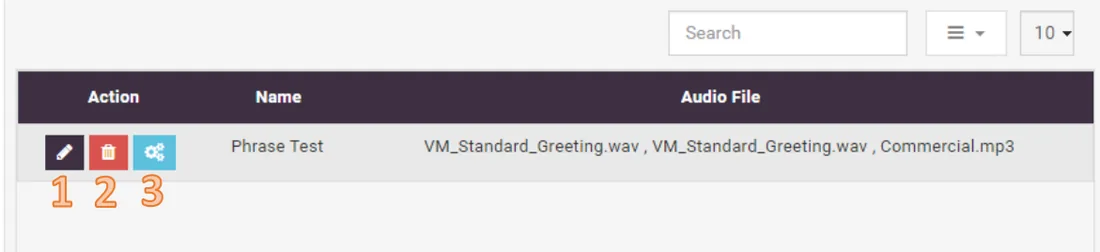
- Here you can edit the name of the phrase
- you can delete the phrase
- Here you can configure the phrase
Audio phrase configuration
Audio Phrase Configuration Window
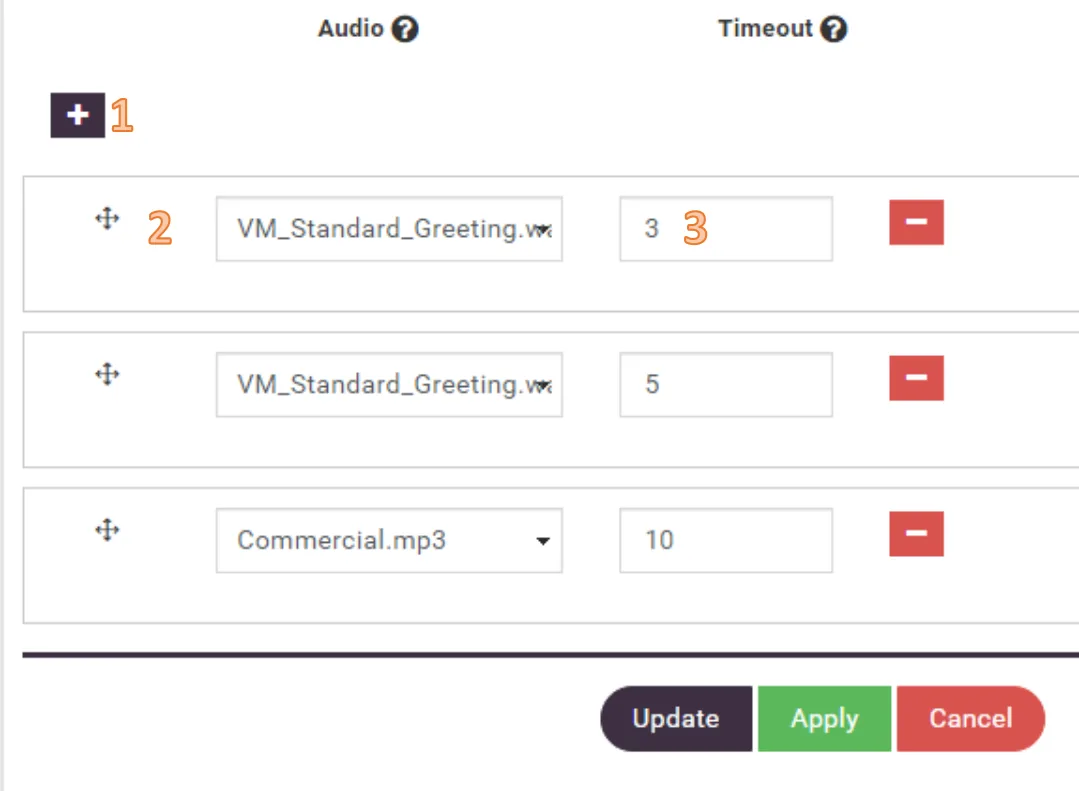
- Here you can add a line to the phrase
- Here you can select the existing audio file
- Here you can define how long the file plays. (0 allows it to play in full)
Conferencing
In this section we will cover conferencing and useful features for this service.
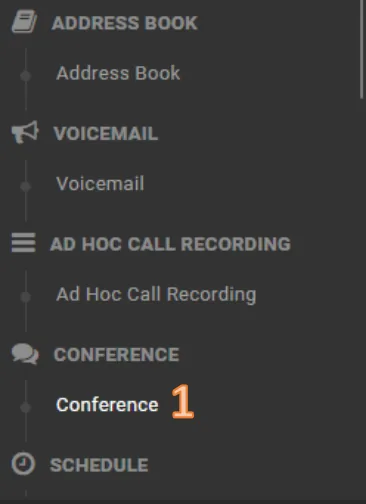
- Your personal conference bridges can be found in the menu map on
the left side of the portal. Click on Conference
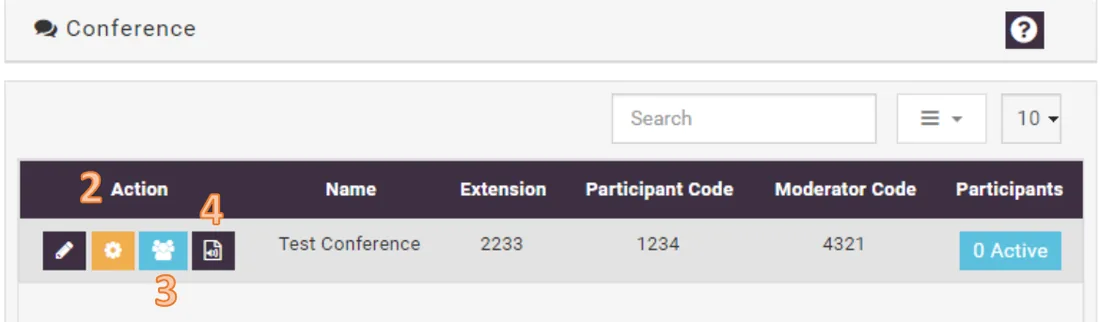
- Editing your conference bridge can be done by clicking.
- You can monitor your conference bridge by clicking
- If auto-recording is enabled, you can listen to and download recorded
conferences by clicking
This is the editing window. Here we will focus on key settings you may want to adjust.
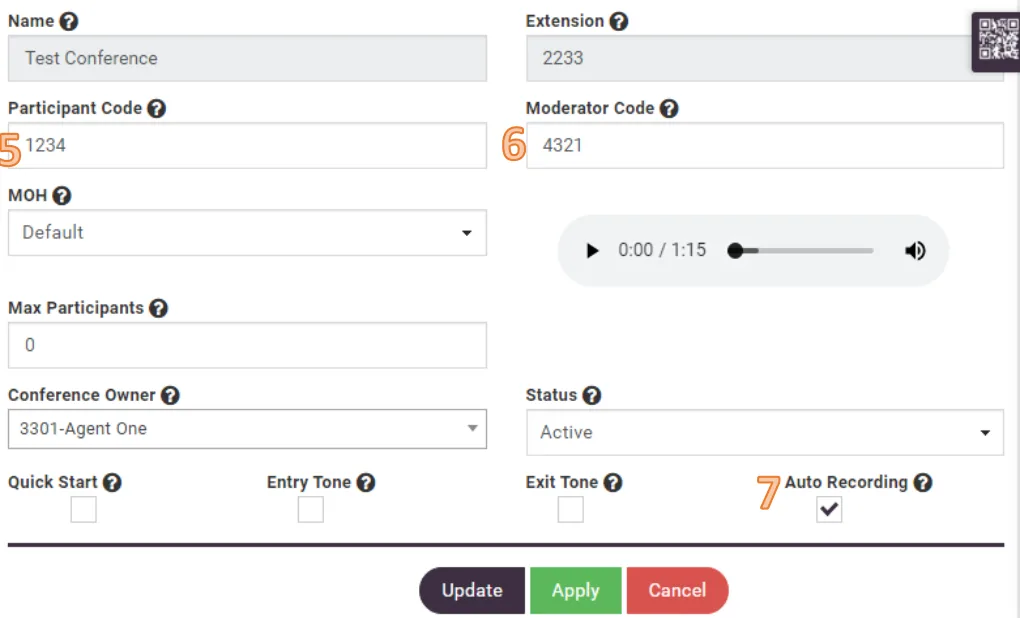
- The participant code is the PIN you will provide to those you would like to join
your conference.
- The moderator code is for you or those you would like to lead and control the
conference.
- 7. Auto Recording determines whether or not you would like the phone system to
record your conferences. These can be found later within the “Auto Recording”
page.
This is the monitoring window. Here you can control the flow of the conference
with the click of a button.
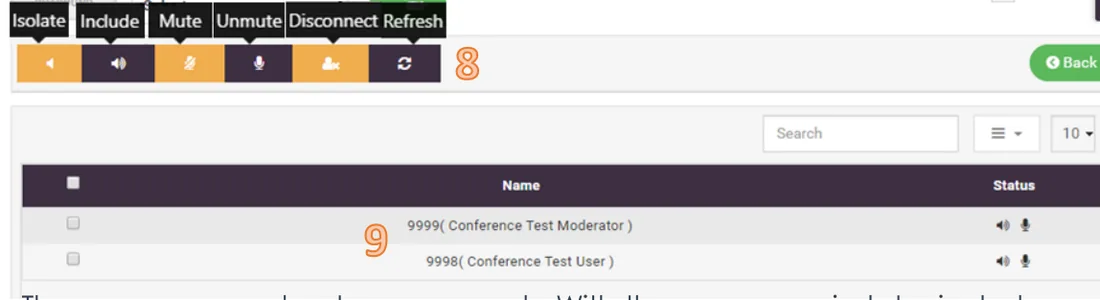
- These are you moderator commands. With these you can isolate, include, mute, unmute, and disconnect a single user or multiple users at once.
- You are able to see the list of participants active on the bridge, in real-time.
This is the Auto Recording page. Here you are able to listen to and download the
audio file of the selected conference
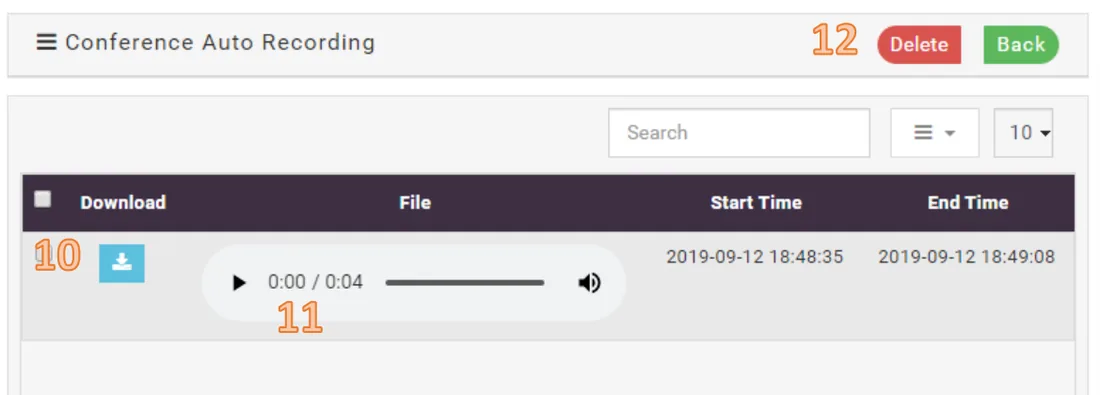
- This button will download a recorded conference as mp3
- This will allow you to play the recording directly from your browser
- To delete a recording simply check the desired file and click delete (This is a permanent change and you will not be able to retrieve the deleted recording)
Personal auto attendants
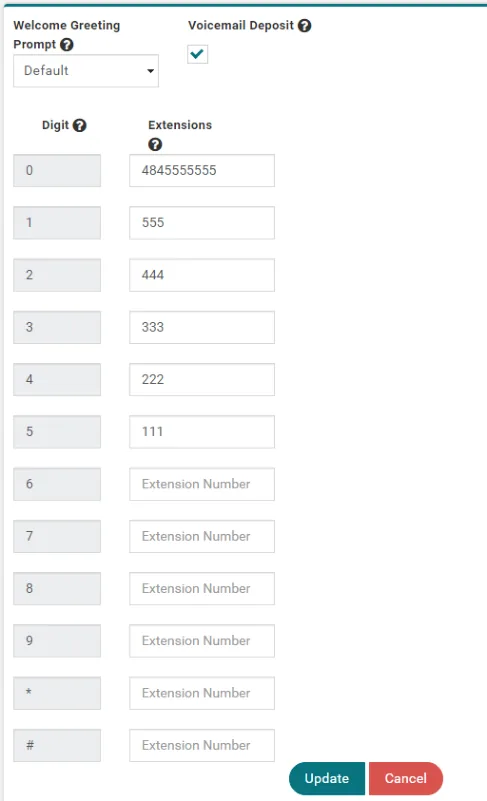
Personal Auto Attendants replace
the audio of a voicemail box.
Welcome Greeting Prompt: Allows
the user to choose what audio will
play when a call is missed. Audio files
will be stored in the user’s audio
library.
Voicemail Deposit: If checked, the
caller will be directed to the user’s
voicemail box for invalid button
presses or on timeout.
Digit: The digit a caller will press to be
transferred to the associated
extension.
Extension: The destination the call will
be transferred to. Either a user’s
extension or a ten digit phone
number can be entered into these
fields.
Use the  button to save any
changes.
Tech support
Email:
HQ:
Phone:
helpdesk@netcarrier.com
888.575.4754
4000 North Cannon Ave
Lansdale, PA 19446
Still stuck?
Our U.S.-based support team answers 24/7/365.